background image


Page 2

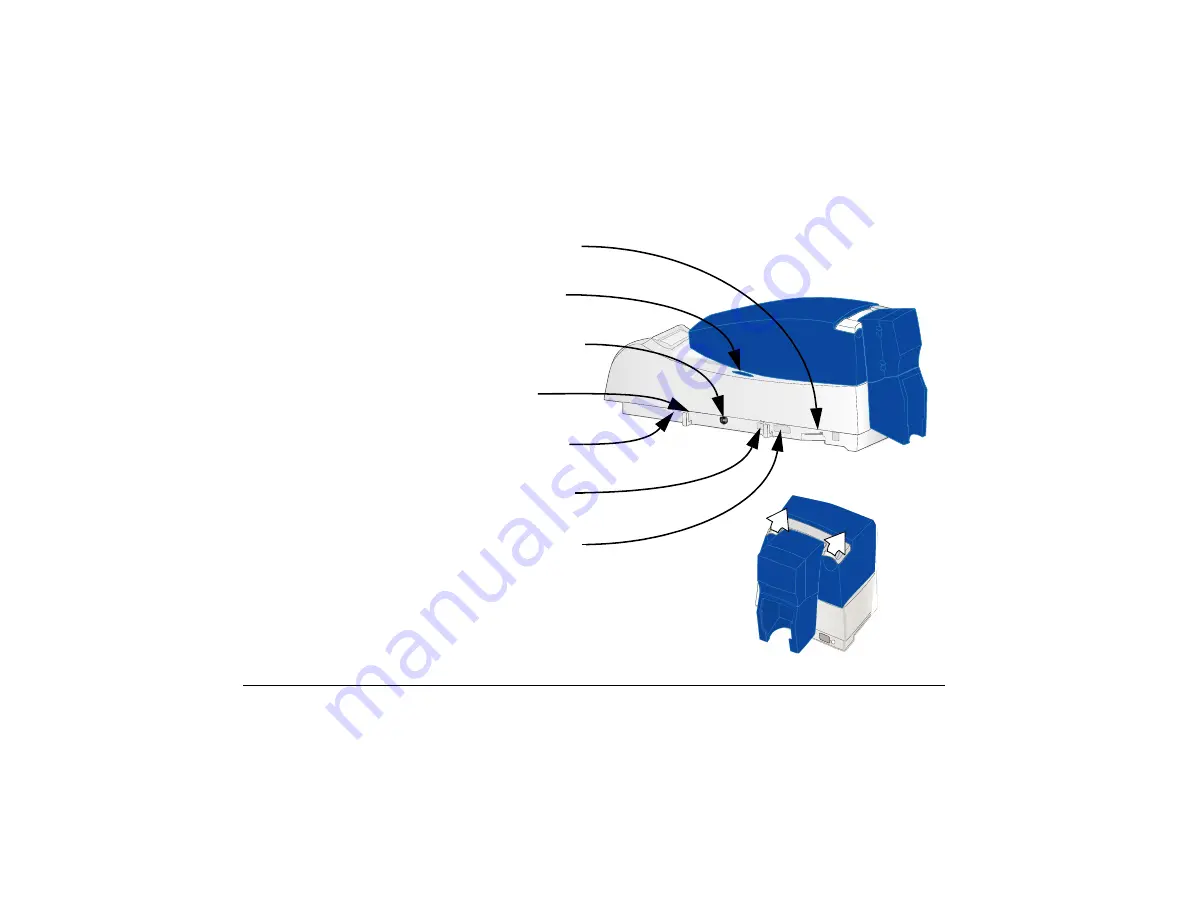
Ports are located on the left side of the printer.

USB Data Port: Connect the data cable to the printer. 

ALL

 printers have this port.

Manual Advance Knob: Use to move a card in the 
printer or to turn rollers.

Power Receptacle: Plug in the power supply to power 
on the printer.

Cable Guides: Hold the data cable securely.

Security lock receptacle: Connect the optional 
security lock to the opening under the ledge of the 
printer (not visible in this drawing).

Optional Smart Card USB Port: See “Features and 
options” on page 4.

Optional Smart Card Serial Port: See “Features and 
options” on page 4.

Tip:

 Lift the latch to open the printer and see inside.

Содержание Datacard SP Series

Страница 1: ...SP55 Printer Guide 554733 001 August 2004...

Страница 2: ...Printer Guide The Printer Guide this document contains operating information for the printer and driver SP Info Central and e Guide For in depth information about using the printer or driver click th...

Страница 3: ...g print ribbon 7 Check the PC connection 9 Status light 11 Opening Properties or Printing Preferences 13 Open the Printer Toolbox 15 Cleaning the printer 17 Printer supplies 19 Getting the most out of...

Страница 4: ...printer Printer Cover Latch Lift the latch to open the printer cover Input Hopper Open the cover to load blank cards Output Hopper Remove completed cards Ready button Push to pause or resume the prin...

Страница 5: ...ceptacle Plug in the power supply to power on the printer Cable Guides Hold the data cable securely Security lock receptacle Connect the optional security lock to the opening under the ledge of the pr...

Страница 6: ...card The label includes YMC for color or K for monochrome printheads Print Ribbon Cartridge shown with color print ribbon Printer Label Includes the serial number and model information located on the...

Страница 7: ...visible inside the printer SP55 Printers can have an 100 card H1 or 200 card H2 Input Hopper The Input Hopper can have a lock K1 An optional smart card module can have Contact coupler SC1x0 on the la...

Страница 8: ...e original package Tips Handling cards Do not touch the surface of cards before printing them Oils on hands will reduce printing quality Handle cards by the edges or wear gloves Orient all cards the s...

Страница 9: ...iagram shows the typical locations for the magnetic stripe and smart card chip 4 Push the input hopper cover closed until it latches See SP Series Info Central for current information about cards to u...

Страница 10: ...ge if present Tips Handling print ribbon Keep unused ribbon in the original package Don t place ribbon on a dusty or dirty surface dirt could damage the printhead 4 Run a cleaning card and replace the...

Страница 11: ...he solid black gear Push until the spool clicks onto the spindle 6 Replace the loaded ribbon cartridge in the printer Make sure both spindles rest in the black supports on the left side of the printer...

Страница 12: ...to the USB data port on the printer The printer can be connected in these other ways Through a direct network connection where the printer is connected to a network using a print server and the PC is...

Страница 13: ...ower cord to the power supply 2 3 Connect the power cord to the power outlet 3 4 The printer powers on and initializes Tips for printer power Wait while the printer initializes The printer Status Ligh...

Страница 14: ...g green for several seconds When the printer is ready to print the status light is steady green Status Light Description Meaning Red Amber Green The printer is starting The light displays colors while...

Страница 15: ...card check the printer for problems If you changed the printer name power the PC off and on Steady Red The printer has a condition that requires service or the printer did not power on correctly To at...

Страница 16: ...ens 3 Click once on the SmartDriver printer icon to select it The driver must be installed for the printer icon to be present SmartDriver is the default name of the printer The name of your printer mi...

Страница 17: ...change the card design review and update all settings for the new card design Use the default settings of Spool printing so program finishes printing faster and Enable bi directional support 7 Choose...

Страница 18: ...ox dialog box is displayed If it is not do one of the following to display it Open the Properties or Printing Preferences dialog and click Printer Toolbox Double click the icon Use the Printer Toolbox...

Страница 19: ...matically resumes when you print a card or when you open the Properties or Printing Preferences dialog box Buttons on the Printer Toolbox are grayed out when a card is ready to print or is printing wh...

Страница 20: ...hopper cover 1 4 Remove unprinted cards from the input hopper 2 5 Open the Printer Toolbox if needed see page 15 6 Click the Clean Printer button A prompt to insert the cleaning card appears 7 Open t...

Страница 21: ...nter cover load cards and resume printing Cleaning tips Use the cleaning card as soon as you open the package The cleaning solution on the card evaporates after a few minutes Some card features such a...

Страница 22: ...rt number 552854 506 prints up to 300 images for duplex printing Color print ribbons are designed for full color card printing The ribbons use the following color panels Y yellow M magenta and C cyan...

Страница 23: ...s available The part number is 549716 002 A package of 10 cleaning cards is available The part number is 552141 002 See SP Series Info Central for complete information about supplies and replacement p...

Страница 24: ...ning the printer using the SmartDriver and the card design using the card creation application Avoid placing an image or important data on the other side of the card from a magnetic stripe smart card...

Страница 25: ...upplies on hand and store them safely Keep the printer clean and keep the area around the printer clean See SP Series Info Central for detailed information about Setting up the printer for the card de...

Страница 26: ...pearance problems 3 Cards jam often The brand of cards might be dirty heavily powdered or bowed curved Consider buying a different brand of cards or clean the printer more often to use the cards The p...

Страница 27: ...ton Power off the printer and power it on to see if communication resumes See SP Series Info Central for more detailed communication troubleshooting information 6 The printer cover will not close Push...

Страница 28: ...pounds 5 3 kg The weight depends on the supplies and options installed Printer dimensions are 21 5 inches 546 mm long and 7 8 inches 198 mm wide The 100 card input hopper is 9 5 inches 241 mm high and...

Страница 29: ...eries Info Central for the statement of liability Regulatory compliance This Datacard product conforms to FCC and regulatory requirements as specified in North America Europe and Asia See SP Series In...

Страница 30: ...11111 Bren Road West Minnetonka MN 55343 9015 952 933 1223 952 933 7971 FAX www datacard com Datacard is a registered trademark of DataCard Corporation August 2004 554773 001 Rev C Dealer information...

Отзывы: