background image

57

If you move the zoom bar all the way to the bottom of the
display, the 

Bottom Track 

and the 

Bottom Lock

features can be activated..  When the 

Bottom Track

feature is activated, the Zoom Bar changes to a thin bar
extending from the top to the bottom of the display.
Pressing the “

ZOOM 

”  button once more activates the

Bottom Lock 

feature.  When in 

Bottom Lock,

 the Zoom

Bar changes to a thick vertical line extending from the top
to the bottom of this display. Move the zoom bar up to
return to the regular zoom operation and turn Bottom
Lock off.  Moving the zoom bar all the way to the top of
the display turns the Zoom off and returns you to full
screen bottom history.

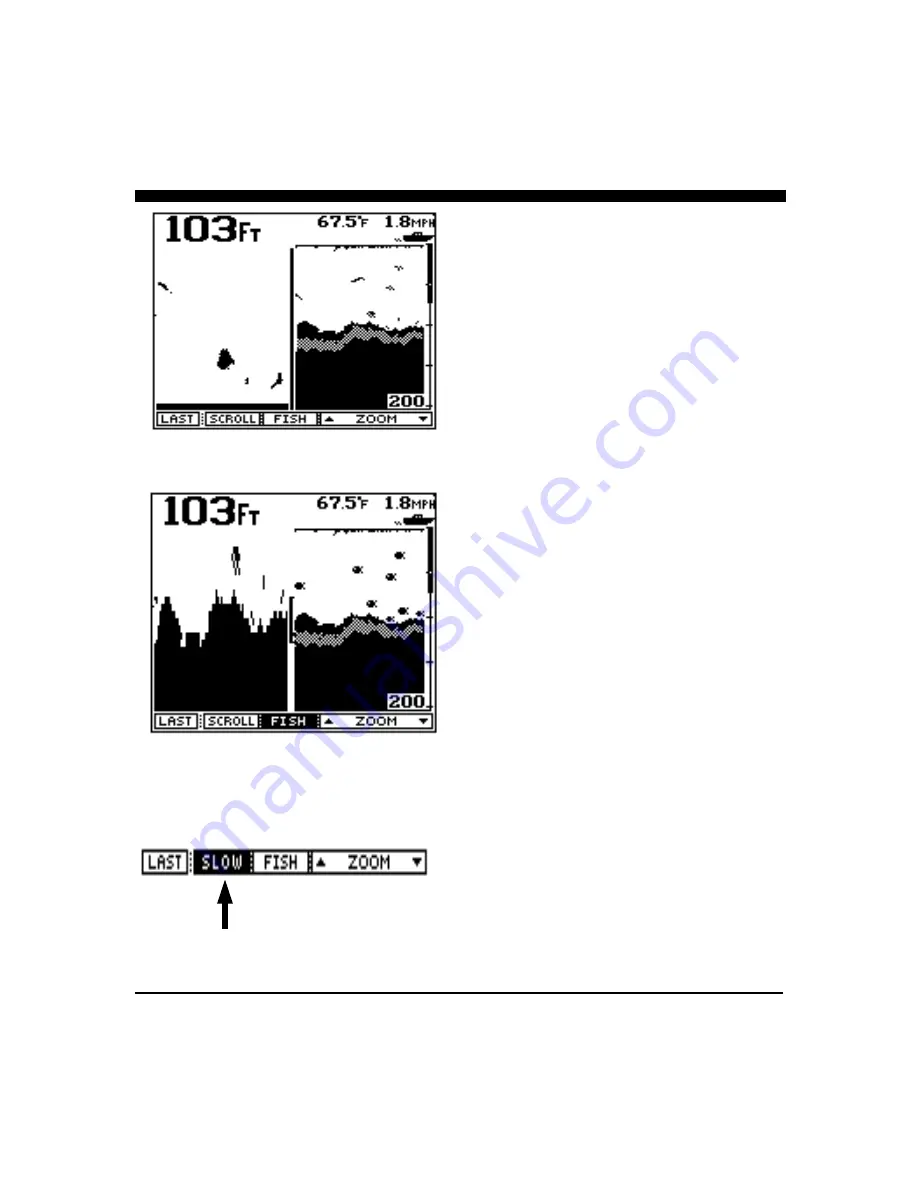
Fish Symbol (Turn on/off)

Pressing the soft key labeled "

FISH

" turns the fish

symbol on or off.  When turned on, the "

FISH

" soft key

will be shown in reverse video and the 

Twinscope’s

microprocessor will scan the output of the receiver and
looks for specific patterns which it has been programmed
to recognize as fish.  If it thinks it “sees” a fish, it creates
a fish symbol in place of the normal blob or arch.  Press
the "

FISH

" soft key to turn this feature off.

Display Scrolling Speed Adjustment

The second softkey from the right can be used to adjust
the speed of the display.  The display “scrolls” the picture
from right to left and this softkey can be used to choose a
scroll speed of “

FAST, SLOW, or STOP

”.  Faster

scrolling rates are generally used when you want to see
the maximum detail possible while slower speeds are used
when you want to slow the display to show the maximum
amount of bottom history.

Split Screen Bottom Lock Display

Zoomed Display with Fish Symbols  ON

Screen Scroll Speed

Содержание Color Twinscope

Страница 1: ...1 OPERATION MANUAL INTERPHASE INTERPHASE TWINSCOPE...

Страница 2: ...n decisions were made We feel proud of the Twinscope Forward Scanning Sonar and your satisfaction is very important to us To this end we welcome any comments or suggestions that you might have in rega...

Страница 3: ...Scout Mode Set Up View 47 Alignment Adjustment 48 Forward View Full Scan 49 Plot Track Plot View 52 Chart View 54 Data View 58 Chart Plot View 61 Chart Scan View 63 NMEA 0183 Interface 66 Interpretin...

Страница 4: ...on zoom and bottom lock large digital display and speed and temperature readings with the speed temperature transducer You will appreciate the very useful features of fish and depth alarms manual or a...

Страница 5: ...losed warranty registration card must be completed and returned to Interphase within 15 days of purchase so that your unit may be protected under the warranty Failure to return the warranty card may c...

Страница 6: ...lements in the array are sending or receiving acoustic energy at the same time the entire array behaves like a single larger element with one important difference the ability of the array to concentra...

Страница 7: ...These impulses are amplified then displayed as an image on the LCD screen The strength of the echo the depth of the object and the angle of the transducer s beam all affect how the image appears on th...

Страница 8: ...tion Connect the two pin plug on the end of the power supply cable to the power supply jack located at the rear of the main display unit Connect the red wire to the positive terminal and the black wir...

Страница 9: ...le see sketch at right The Twinscope can also use two seperate thru hull transducers one for the Vertical scanning Interphase part number T1 I200 026 and another for Horizontal scanning part number T1...

Страница 10: ...els are not readable you can tell the difference by looking at the mounting brackets The Sea Scout has a 1 4 hole drilled as shown in the sketches below Also the Probe s part number on the label is T1...

Страница 11: ...l void your warranty NO EXCEPTIONS Cable Connectors view from front of female plug Transducers 1 White 1st element 2 Brown 2nd element 3 Orange 3rd element 4 Yellow 4th element 5 Green 5th element 6 B...

Страница 12: ...rward horizontally from side to side The Twinscope has an amazing amount of capabilities but it can not perform magic It can not see through objects such as your boat s hull Therefore it is important...

Страница 13: ...usion which will cause the water to be turbulent when it reaches the transducer s or which will obstruct the transducer s forward looking view For displacement hull power and sail boats the thru hull...

Страница 14: ...ion where water flow is smoothest For dual engine installation just off the center line is usually acceptable Because the transducers rotate back and upwards when the brackets kick up they must be mou...

Страница 15: ...and aft direction is parallel to the surface then the forward looking display may be distorted where flat bottoms appear to be slanted upwards or downwards After mounting the transducer and actually u...

Страница 16: ...Generally this provides the best compromise between obtaining aeration free water and minimizing propeller noise The Twinscope s transducer can not see through aerated water and water near the bow and...

Страница 17: ...line as possible If necessary use a fairing block to properly position the transducer Use of a Thru hull Fairing Block Nearly all vessels have some dead rise angle at the transducer mounting location...

Страница 18: ...st the housing slightly to squeeze out excess sealant Carefully confirm that the transducer is aligned so that the blunt rounded end the front is pointed directly toward the front of the boat 6 Instal...

Страница 19: ...stic Fairing Block Add sealing compound between faring block hull Boat s Hull Bronze Nut OPTIONAL SPEED TEMPERATURE TRANSDUCERS INTERPHASE DESCRIPTION PART T1 0200 021 Transom mount S T transducer T1...

Страница 20: ...upgrades which may include new important features The use of fixed permanently labeled buttons would severely limit any future upgrade ability User Interface The Twinscope is a very advanced product w...

Страница 21: ...aving to completely re set the range gain contrast and all your other settings Because the Twinscope contains an internal lithium memory battery it remembers all system settings with the power removed...

Страница 22: ...will respond with an audible beep when it turns on Pressing this key again turns the backlight on and off each time accompanied by a beep To turn the Twinscope off press this key and hold it down for...

Страница 23: ...the approximate width of the cone at different distances from the boat Although 50 of the acoustic radiation is concentrated within this cone 50 is also outside the cone which permits the Twinscope t...

Страница 24: ...om the Control Center Menu In the following sections these different displays are called Views They include Full Screen Forward View Full Screen Track Plot View Full Screen Chart Conventional View Ful...

Страница 25: ...to side sweeping action of the scanning beam is ideal to locate forward targets up to 45 degrees on either side of the bow In the horizontal scanning mode the display will show the distance and bearin...

Страница 26: ...scanning modes The display will also change to display either the full screen vertical Probe forward scan or the full screen horizontal Sea Scout forward scan view Once the desired scanning mode has b...

Страница 27: ...27 PLOT View Track Plot DATA View Large Digits CHART PLOT View FWD View Forward Scan CHART View Conventional SET UP View Languages etc CHART SCAN View VERTICAL SCAN PROBE CONTROL CENTER FLOW CHART...

Страница 28: ...features At any time you can press any key to gain control of the DEMO program to make your own selections and adjustments If you do not press any button for about 45 seconds the unit will automatical...

Страница 29: ...problems especially thru hull installations where the transducer is not perfectly vertical to the water s surface This problem can be caused by improper installation or by changes in the boats fore af...

Страница 30: ...m conditions change To manually adjust the range press either the range button labeled or or rotate the large knob If you make a manual depth adjustment the AUTO range mode is turned off and will rema...

Страница 31: ...om conditions Note the horizontal line will disappear a few seconds after the alarm is adjusted but the vertical bar will remain The Shallow Alarm is often used to alert the user to shallowing bottom...

Страница 32: ...e boat to the surface ahead The RESET button can be used to quickly select three popular scanning sectors If the RESET button is pressed once the Twinscope will return to the full 90 degree sector sca...

Страница 33: ...O soft key to bring up the menu showing the features and adjustments for this view Range The RANGE soft key calls up the sub menu which lets you turn on and off an automatic plot ranging function by p...

Страница 34: ...screen track plotter Both of these Views are updated automatically regardless of what display screen is in use Although these two track plot views are similar the user may select different ranges for...

Страница 35: ...st the depth range as bottom conditions change To manually adjust the depth rotate the front panel knob or press either the range button labeled or If you make a manual depth adjustment the AUTO range...

Страница 36: ...Shallow Deep and Zone Alarms As either the or keys are pressed and held down or the front panel knob is rotated a vertical bar on the left side of the screen just below the boat icon shows the area c...

Страница 37: ...ecause the Twinscope uses an Interphase unique 4X over sampling technique the zoom actually shows more data than the non zoomed picture Fishermen have long used the bottom locking features when fishin...

Страница 38: ...Bottom Lock off Moving the zoom bar all the way to the top of the display turns the Zoom off and returns you to full screen bottom history Fish Symbol Turn on off Pressing the soft key labeled FISH t...

Страница 39: ...e the soft key labeled AUTO will be shown in reverse video white on black To return to the main forward looking menu press the soft key labeled LAST Log Res Distance log reset If your Twinscope is equ...

Страница 40: ...covered by the depth alarm In addition a horizontal line will appear across the display Whenever a solidly displayed target appears at the same depth as that covered by the alarm bar the audible alarm...

Страница 41: ...e steered throughout the possible 90 degree sector from directly beneath the boat to the surface ahead The RESET button can be used to quickly select three popular scanning sectors If the RESET button...

Страница 42: ...key calls up the sub menu which lets you turn on and off an automatic plot ranging function by pressing the soft key labeled TRACK This feature will for example automatically increase the track plot r...

Страница 43: ...ck Plot Note The Twinscope has both a full screen and a split screen track plotter Both of these Views are updated automatically regardless of what display screen is in use Although these two track pl...

Страница 44: ...mode is turned off and will remain off until the button labeled AUTO is again selected Note when in the AUTO mode the soft key labeled AUTO will be shown in reverse video white on black To return to t...

Страница 45: ...ton can be used to quickly select three popular scanning sectors If the RESET button is pressed once the Twinscope will return to the full 90 degree sector scan from straight ahead to below the boat p...

Страница 46: ...46 PLOT View Track Plot DATA View Large Digits CHART PLOT View FWD View Forward Scan CHART View Conventional SET UP View Languages etc CHART SCAN View HORIZONTAL SCAN SEA SCOUT CONTROL CENTER FLOW...

Страница 47: ...key to gain control of the DEMO program to make your own selections and adjustments If you do not press any button for about 45 seconds the unit will automatically resume cycling through the different...

Страница 48: ...The Twinscope includes a feature that will allow you to compensate for some transducer installation problems where the transducer is not pointing straight forward but instead points off to the right...

Страница 49: ...tures for this forward looking view Your display menus should appear as on the left Range Adjustment Press the button labeled RANGE to bring up the Forward Range Adjustment soft key menu as shown at l...

Страница 50: ...arm menu choices As either the up or down keys are pressed and held down or the large knob is rotated counterclockwise a horizontal bar will move from the bottom of the display towards the top A verti...

Страница 51: ...zontal sector scan pressing RESET again will put the Twinscope into one of two preprogrammed forward sector scans The RESET button cycles through the possible scan sectors as shown at left Beam Speed...

Страница 52: ...and press the GO soft key to bring up the menu showing the features and adjustments for this view Range The RANGE soft key calls up the sub menu which lets you turn on and off an automatic plot rangi...

Страница 53: ...use Although these two track plot views are similar the user may select different ranges for each of these views For example the full screen track plotter can be set up for a 64 mile range while the s...

Страница 54: ...he depth range as bottom conditions change To manually adjust the depth rotate the front panel knob or press either the range button labeled or If you make a manual depth adjustment the AUTO range mod...

Страница 55: ...and held down or the front panel knob is rotated a vertical bar on the left side of the screen just below the boat icon shows the area covered by the depth alarm Whenever a solidly displayed target ap...

Страница 56: ...dless of changes in bottom depth the left side tracks it and keeps the zoomed bottom picture in view In the Bottom Lock mode the bottom is forced to appear as a straight horizontal line across the bot...

Страница 57: ...turns the fish symbol on or off When turned on the FISH soft key will be shown in reverse video and the Twinscope s microprocessor will scan the output of the receiver and looks for specific patterns...

Страница 58: ...f and will remain off until the button labeled AUTO is again selected Note when in the AUTO mode the soft key labeled AUTO will be shown in reverse video white on black To return to the main forward l...

Страница 59: ...a forward alarm may be set for targets which are closer than a present distance To adjust or clear the alarm settings press the soft key labeled ALARM to bring up the forward looking alarm menu choic...

Страница 60: ...he possible 90 degree horizontal sector The RESET button can be used to quickly select three popular scanning sectors If the RESET button is pressed once the Twinscope will return to the full 90 degre...

Страница 61: ...ANGE soft key calls up the sub menu which lets you turn on and off an automatic plot ranging function by pressing the soft key labeled TRACK This feature will for example automatically increase the tr...

Страница 62: ...ted automatically regardless of what display screen is in use Although these two track plot views are similar the user may select different ranges for each of these views For example the full screen t...

Страница 63: ...O is again selected Note when in the AUTO mode the soft key labeled AUTO will be shown in reverse video white on black To return to the main forward looking menu press the soft key labeled LAST Sensit...

Страница 64: ...om the bottom of the display towards the top A vertical bar will also move along the range scale The horizontal and vertical bar indicate the alarm range Any strong target between the boat at the bott...

Страница 65: ...the possible 90 degree horizontal sector The RESET button can be used to quickly select three popular scanning sectors If the RESET button is pressed once the Twinscope will return to the full 90 degr...

Страница 66: ...er information on interfacing The Twinscope needs to be interfaced via the eight pin jack on the rear panel of the display unit The pin connections are shown at right Interphase also offers a NMEA 8 P...

Страница 67: ...winscope sequentially steps the acoustic beam from the bottom to the area ahead of the vessel the LCD display shows a continuously updated display of the return echoes in their approximate position in...

Страница 68: ...adings and too much sensitivity will cause an increase in screen noise and a possible display of unwanted transducer sidelobe readings Transducer Sidelobe Effect The Twinscope s transducer like all ac...

Страница 69: ...creases This feature tends to compensate for the weakening of the signal at large distances as the receiver s gain will be increased as the signal gets smaller It is also helpful in minimizing sidelob...

Страница 70: ...designed to help reduce the effects of surface noise clutter when the water is choppy and to allow easier mounting of the transducer to the transom of smaller boats As the acoustic sound beam is proje...

Страница 71: ...h as this it is advisable to adjust the gain manually Otherwise the Auto gain feature will reduce the gain because of the strong close in bottom reflections On the following page two bottom situations...

Страница 72: ...Sides of Underwater Trench Bottom Under Boat Bottom Getting Deeper to port left of boat Examples of two bottom situations followed by the resulting view on the Twinscope split screen Chart Scan Displ...

Страница 73: ...nd causes a small vibration in the transducer The small vibrations in the transducer caused by the returning acoustic echo cause the transducer to send a small electrical signal back up the cable to t...

Страница 74: ...that can achieve both outstanding coverage and good resolution Interphase pioneered the use of Ultrasonic Phased Array Technology In 1991 we received the prestigious IMTEC Innovation Award in recognit...

Страница 75: ...ch too costly and bulky to be of any practical use in the marine market Since the acoustic beam in the phased array is steered electronically requiring no moving parts it can be quickly and reliably s...

Страница 76: ...beam This means that the diameter of the beam at 100 is about 15 wide The transducer operates at approximately 200 kHz The beam has many unique characteristics which allow increased resolution as wel...

Страница 77: ...ee a regular depth sounder view of the bottom and scan forward or zoom into the bottom at the same time All Interphase products provide both full screen views as well as split screens for bottom chart...

Страница 78: ...carefully remove any marine growth Use a mild detergent 220 grit sandpaper or crocus cloth to remove stubborn growth 3 If the in line fuse is blown replace it with a 2 amp fuse NEVER REPLACE WITH A HI...

Страница 79: ...ansducer may refer to a plastic bracket The stainless steel brackets include a spray shield to reduce possible rooster tails The spray shield rests between the transducer tabs in a U fashion with the...

Страница 80: ...d have continuity with pin 1 on the female side of the power supply lead Loses picture at speed Adjust the transducer angle or placement Make sure that the transducer is installed in the area which ha...

Страница 81: ...tall an alternator filter to smooth the alternator s output signal Interference may also be caused by radiation from other nearby equipment and can be detected by turning off all other equipment and o...

Страница 82: ...s peak to peak Surface Water Temperature With optional speed temperature upgrade kit installed display continuously indicates surface water temperature in tenths of a degree F from 32 0 to 99 9 F Powe...

Страница 83: ...83 Notes...

Страница 84: ...84...

Страница 85: ...nc 2880 Research Park Drive Suite 140 Soquel CA 95073 In addition to speed your repair please fill out the following tear this page out of the manual or photocopy it and tape it to your unit for our t...

Страница 86: ...86...

Страница 87: ...due to improper installation misuse or accident nor does it apply to products which have been repaired or altered outside the Interphase factory Any costs incurred with transducer replacement are spe...

Страница 88: ...88...

Отзывы:

Похожие инструкции для Color Twinscope