background image

14 

EasyCoder PC41 User’s Guide

Chapter 3 — Operation

Feed Key

The Feed key performs the following functions depending on the mode:

Controls and Indicators

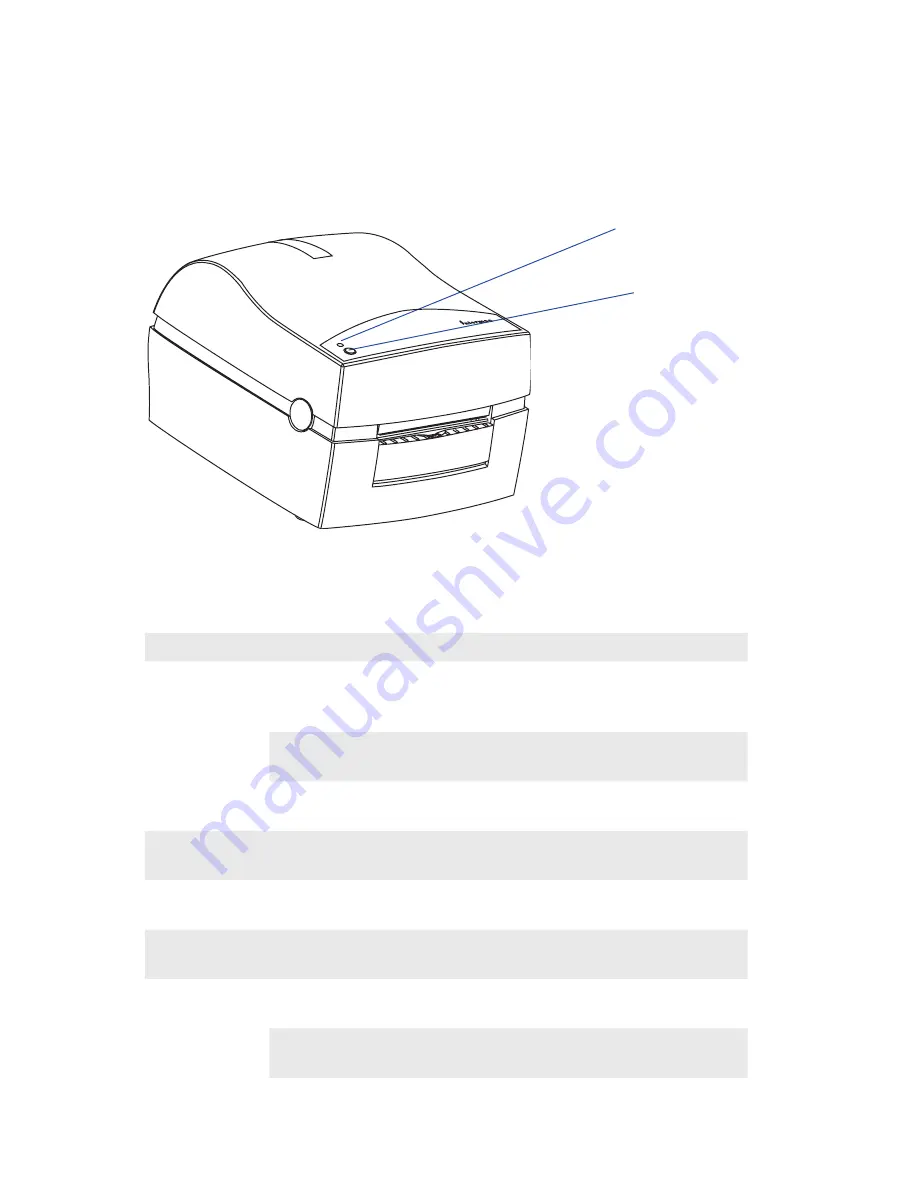
The EasyCoder PC41 is controlled by the operator by means of a Feed 

key, an On/Off switch, and a multi-color indicator lamp.

Indicator lamp

Feed key

EasyCoder

C4

Feed

Power

Printer Mode  You want to

What to do

Idle

Feed out one label or 

a minimum specified 

amount of media

Press and release the Feed key

Continuously feed 

media

Press and hold the Feed key. When you 

release the key, the media stops feeding

Take the printer 

offline

Press the Feed key twice. Press the key 

again to bring the printer online.

Printing

Pause the printer 

Press and release the Feed key. Press and 

release the key again to resume printing

Cancel the current 

print job

Press and hold the Feed key until the 

printer stops printing

Powered on for 

the first time

Print the hardware 

configuration label

Press and hold the Feed key while you 

switch on the printer

Print the software 

configuration label

Press the Feed key after the hardware con-

figuration label stops printing

Print the pitch label

Press the Feed key after the software con-

figuration label stops printing

Содержание EasyCoder PC41

Страница 1: ...User s Guide EasyCoder PC41 Bar Code Label Printer ...

Страница 2: ...rm EasyCoder EasyLAN Enterprise Wireless LAN EZBuilder Fingerprint i gistics INCA under license InterDriver Intermec Printer Network Manager IRL JANUS LabelShop Mobile Framework MobileLAN Nor Ware Pen Key Precision Print PrintSet RoutePower TE 2000 Trakker Antares UAP Universal Access Point and Virtual Wedge are either trademarks or regis tered trademarks of Intermec Technologies Corporation Throu...

Страница 3: ...ever measures may be required to correct the interference DOC Notice Canada Canadian Dept of Communication REGULATIONS COMPLIANCE DOC A This digital apparatus does not exceed the class A limits for radio noise emissions from a digital apparatus as set out in the radio interference regulations of the Canadian Department of Communication Ministère des Communications du Canada CONFORMITE DE REGLEMENT...

Страница 4: ...gelangen Dies könnte einen Brand bzw elektrischen Schlag auslösen 7 Öffnen Sie niemals das Gerät Das Gerät darf aus Gründen der elektrischen Sicherheit nur von autorisiertem Servicepersonal geöffnet werden 8 Wenn folgende Situationen auftreten ist das Gerät vom Stromnetz zu trennen und von einer qualifizierten Servicestelle zu Überprüfung a Flüssigkeit ist in das Gerät eingedrungen b Das Gerät war Fe...

Страница 5: ...6 Never pour any liquid into any openings this could cause fire or elec trical shock 7 Never open the equipment For safety reason the equipment should only be opened by qualified service personnel 8 If one of the following situations arises get the equipment checked by a service personnel a Liquid has penetrated into the equipment b The equipment has been exposed to moisture c The equipment does not...

Страница 6: ...A2 A3 A4 A11 EMC Based upon EN 50081 2 Generic Emissions Standard EN 55022 1994 EN 61000 3 2 A12 Based upon EN 50082 1 Generic Immunity Standard EN 61000 4 2 1995 EN 61000 4 3 1996 ENV 50204 1995 EN 61000 4 4 1995 EN 61000 4 6 1996 following the provisions of Directives 89 336 EEC and 73 23 EEC Mölndal 2004 10 08 Per Ove Jacobsson Site Manager 1 Intermec assumes no responsibility regarding the CE ...

Страница 7: ...ion Description of the EasyCoder PC41 2 Safety Summary 3 Product Identification 3 2 Installation Unpacking 6 Power Connection 7 Memory Cartridge 8 Installation of Memory Cartridge 8 Computer Connection 9 Centronics Parallel Interface 9 Serial RS 232 Interface 10 Software Installation 11 3 Operation Controls and Indicators 14 On Off Switch 14 Feed Key 14 Indicator Lamp 15 Media Compartment 16 Media L...

Страница 8: ...ent 28 Test Mode 29 Factory Default Settings 30 4 Maintenance External Cleaning 32 Printhead Cleaning 32 5 Troubleshooting Problems and Solutions or Reasons 34 A Technical Data Technical Data 36 B Media Specifications Direct Thermal Media 42 Thermal Transfer Media 43 Transfer Ribbons 44 Media Roll Size 45 Labels 46 Tags and Strip with Slots 47 Tags and Strip with Black Marks 48 Plain Continuous Sto...

Страница 9: ...EasyCoder PC41 User s Guide ix Contents ...

Страница 10: ...nces Someone capable of providing first aid must always be present for your safety First aid Always obtain first aid or medical attention immediately after an injury Never neglect an injury no matter how slight it seems Resuscitation Begin resuscitation immediately if someone is injured and stops breath ing Any delay could result in death To work on or near high voltage you should be familiar with a...

Страница 11: ...alerts you to an operating procedure practice condition or statement that must be strictly observed to prevent equipment damage or destruction or corruption or loss of data This icon appears at the beginning of any procedure in this manual that could cause you to touch components such as printed circuit boards that are susceptible to damage from electrostatic discharge ESD When you see this icon y...

Страница 12: ... distribu tor Visit the Intermec technical knowledge base Knowledge Central at http intermec custhelp com to review technical information or to request technical support for your Intermec product Telephone Support Contact your local Intermec representative To search for your local rep resentative from the Intermec web site click Contact Who Should Read This Document This User s Guide provides you ...

Страница 13: ...syCoder PC41 User s Guide 1 1 Introduction This chapter introduces the EasyCoder PC41 printer The chapter covers the following topics Description of the EasyCoder PC41 Safety summary Product identification ...

Страница 14: ...makes it possible to produce printouts from most stan dard programs run under the various versions of MS Windows Label design becomes an easy task with Intermec LabelShop a series of what you see is what you get PC label editing programs and com patible with the full range of Intermec EasyCoder printers Intermec LabelShop START is included in the delivery EasyCoder PC41 can also be run using IPL I...

Страница 15: ...hen the power is on Place the printer on an even surface which can support its weight Do not spray the printer with water If you are using a hose to clean the premises in an industrial environment remove the printer or pro tect it carefully from spray and moisture Carefully read the warning text on the envelope before using a clean ing card Product Identification The machine label is attached to th...

Страница 16: ...4 EasyCoder PC41 User s Guide Chapter 1 Introduction ...

Страница 17: ...5 2 Installation This chapter describes how the EasyCoder PC41 is unpacked connected to a power source and connected to a computer It also explains how to install the software and how to expand the memory using a memory cartridge ...

Страница 18: ...rmec EasyCoder PC41 printer Power supply adapter with either one power cord for 115V U S wall sockets or two different power cords for 230V European and 240V U K wall sockets Communication cable Empty ribbon core thermal transfer printers only Sample roll of labels Media roll spindle Quick Start Guide Manuals and an assortment of application software on CD ROM Should any kind of damage have occurre...

Страница 19: ...nter and an electrical outlet for example on the floor The power supply adapter can be used for 100 to 240 VAC 50 to 60 Hz The configuration of the power cord plug differs according to national standards 3 Check that the printer s On Off switch at the back is off O 4 First fit the round connector into the power receptacle on the printer s rear plate Then connect the power cord between the power supply a...

Страница 20: ...switch on the printer is off 0 2 Open the top cover by pressing the two locks on either side 3 Remove the cartridge slot cover located to the left of the media roll Be careful not to drop it inside the printer 4 Ensure that the switch at the front short side of the cartridge is in its lower position 5 Insert the memory cartridge into the cartridge slot Its slightly curved shape ensures that the car...

Страница 21: ...ics Parallel Interface If you intend to use the Intermec InterDriver or any version of Intermec LabelShop connect the parallel communication cable delivered between the printer s Centronics interface connector and the parallel port of your PC LPT1 The parallel interface can also be used for programming the printer using the IPL protocol described in the IPL Programmer s Reference Manual However in...

Страница 22: ...up is variable by means of the P com mand see IPL Programmer s Reference Manual Use the Test Mode to check the printer s present setup bold characters indicate default setup Baud rate 1200 2400 9600 or 19200 Parity None Odd or None Data bits 7 or 8 Stop bits 1 Flow control XON XOFF Note No serial communication cable is included in the deliv ery unless specifically ordered For pinout specifications p...

Страница 23: ...to install the Intermec InterDriver and the Intermec LabelShop START found on the CD ROM that comes with the printer If you use any other operating system than Windows you will need to use the IPL protocol described in the IPL Programmer s Reference Manual IPL also supports Windows Updates and installation instructions are available at the Intermec home page http www intermec com ...

Страница 24: ...12 EasyCoder PC41 User s Guide Chapter 2 Installation ...

Страница 25: ...EasyCoder PC41 User s Guide 13 3 Operation This chapter describes how to control the printer how to load it with media and ribbon how to adjust the label gap sensor and how to use the test mode ...

Страница 26: ... the Feed key When you release the key the media stops feeding Take the printer offline Press the Feed key twice Press the key again to bring the printer online Printing Pause the printer Press and release the Feed key Press and release the key again to resume printing Cancel the current print job Press and hold the Feed key until the printer stops printing Powered on for the first time Print the har...

Страница 27: ...the back of the printer Indicator Lamp When the power to the printer is switched on the indicator lamp will glow green if the printer is loaded with media and in case of thermal transfer printing ribbon If the printer is out of media and or ribbon the indicator lamp will glow orange Any error condition such as software errors will be indicated by the lamp changing to red If the indicator lamp fail...

Страница 28: ... also the transfer ribbon supply see illustration below Media roll spindle Ribbon compart ment release Ribbon rewind hub Top cover release Edge guide adjustment wheel Adjustable edge guides Peel off Self strip mechanism or paper cutter Label gap black mark sensor Peel off self Strip bar Label taken sensor Top cover Platen roller Tear bar Ribbon supply hub Print mechanism ...

Страница 29: ... the edge on the top cover Tear off mode can for example be used for tearing off tags at the perforation or tearing off the liner backing paper between labels Peel Off Self Strip Peel off Self strip means that self adhesive labels are automatically sepa rated from the liner backing paper after printing It cannot be used in connection with a paper cutter The labels are fed straight out from the printer ...

Страница 30: ... using the switch next to the sensor see below or if using the IPL protocol described in the IPL Programmer s Reference Manual by the SI t command The Intermec InterDriver provides options for selecting the following modes of operation without any commands having to be entered by the operator Tear off Peel off Self strip with LTS enabled If the printer runs out of media while printing do not switch ...

Страница 31: ...re of a fresh media roll Rotate the spindle according to the inner diameter of the media roll core see markings on the spindle 4 Wind the green edge guide wheel towards the front of the printer so you can fit the media roll between the guides 5 Place the media roll and spindle in the media compartment and snap the spindle into the slots on either side 6 Wind the green edge guide wheel towards the r...

Страница 32: ...in the front edge guides 8 Firmly close the top cover 9 Press the Feed key 10If the printer did run out of media while printing the printing will automatically be resumed Else tear off excessive media by pulling it upwards against the tear bar Tear off the media upwards against the tear bar ...

Страница 33: ...ull up the spindle and remove possible remaining labels or empty label roll core 4 Place the spindle into the core of a fresh label roll Rotate the spindle according to the inner diameter of the label roll core see markings on the spindle 5 Wind the green edge guide wheel towards the front of the printer so you can fit the label roll between the guides 6 Place the label roll and spindle in the medi...

Страница 34: ... away the labels from the first 10 cm 4 inches or so of the liner 10Thread the liner around the peel off self strip bar and insert it inside the peel off self strip mechanism so it protrudes from the slot below the mechanism 11Hold the labels while pulling at the liner so it becomes tight then close the peel off self strip mechanism 12Firmly close the top cover 13Press the Feed Key 14If the printer di...

Страница 35: ...cing outward to prevent jamming the cutter 1 Open the printer s top cover by pressing the release buttons on both sides and folding the cover upwards rearwards 2 Pull up the spindle and remove possible remaining media or empty media roll core 3 Place the spindle into the core of a fresh media roll Rotate the spindle according to the inner diameter of the media roll core see markings on the spindle...

Страница 36: ...f the printer so the rear edge guides just touch the media roll without actually break ing its rotation 7 Thread the labels through the slits in the front edge guides 8 Route the media through the slot in the optional cutter mechanism just in front of the tear bar 9 Firmly close the top cover 10Press the Feed key 11If the printer did run out of media while printing the printing will automatically ...

Страница 37: ... can be provided from an external supply for example a stack of fan folded tags Follow the loading instructions for the type of operation in question but ignore all paragraphs concerning the internal spindle Instead insert the media through the slot at the back of the printer see illustrations Be careful to protect any external media supply from dirt grit dust water and direct sunlight ...

Страница 38: ...f the top cover on both sides of the printhead and fold down the print carriage halfway 45 angle while keeping the top cover fully opened 3 Remove front core with the used up ribbon and the empty core at the rear Keep the empty core 4 Unpack a fresh roll of transfer ribbon and route the ribbon leader down in front of the wall that separates the print carriage from the media compartment so the ribb...

Страница 39: ...sed Ribbon When switching between direct thermal and thermal transfer printing or when switching between different types of transfer ribbon a partially used transfer ribbon can be removed and saved for later use 1 Open the printer s top cover by pressing the release buttons on both sides and folding the cover upwards rearwards 2 Press the green release tabs at the bottom of the top cover on both si...

Страница 40: ...28 EasyCoder PC41 User s Guide Chapter 3 Operation ...

Страница 41: ...r tags switch off the power to the printer 2 Press down and hold the Feed key while turning on the printer The hardware configuration test label prints out and the firmware pro gram and version are sent to the host You are now in Data Line Print mode 3 Send a few characters down from the host The printer prints out your data with the hexadecimal equivalent directly underneath it 4 Hold the Feed key d...

Страница 42: ...rinter and remove all media from the paper path 3 Turn the printer back on while pressing down the Feed key 4 When the feeding mechanics start working release the Feed key and press it down again The Indicator light should now be flashing 5 Press and hold the Feed key down for eight seconds or until the Indi cator light stops flashing The printer resets all parameters to factory default 6 Switch off ...

Страница 43: ...EasyCoder PC41 User s Guide 31 4 Maintenance This chapter explains how to clean the printer externally and how to clean the printhead ...

Страница 44: ...w roll of labels or tags Cleaning Cards contain isopropyl alcohol CH3 2 CHOH CAS 67 63 0 which is highly flammable moderately toxic and mildly irritating 1 Switch off the power to the printer 2 Open the top cover print carriage 3 Unload the media stock 4 In case of thermal transfer printing also remove the transfer ribbon 5 Open the pouch and pull out the cleaning card Be careful not to tear the car...

Страница 45: ... This chapter contains instructions for solving the most common problems the may occur when using the EasyCoder PC41 The troubleshooting is restricted to the operator level If the problem cannot be solved using this list please contact the ditributor ...

Страница 46: ...rkness setup Prints only partial label Print carriage not completely locked Label caught on printhead Remove and clean Printer keeps print ing or feeding when it should not Label caught on label gap sensor Open top cover Remove the label and clean using cleaning card or isopropyl alcohol Possible firmware problem Printing stops and indicator lamp lights orange Possible problem with the label gap se...

Страница 47: ...EasyCoder PC41 User s Guide 35 A Technical Data This appendix lists the technical data for the EasyCoder PC41 ...

Страница 48: ...Net Weight Thermal transfer printer excl power supply media cable cutter battery pack and memory cartridge 2 30 kg 5 07 lbs Power Separate power supply unit Input 100 to 240 VAC 50 to 60 Hz 1 9 A Output 24 VDC 3 0A Interfaces 1 Asynchronous RS 232 serial DB 9pin 1 Centronics parallel Serial Communication Serial ASCII code XON XOFF protocol Intermec Standard Block protocol Baud Rates 1200 2400 4800...

Страница 49: ...ons only wax hybrid and resin in widths of 33 60 63 5 83 5 89 and 110 mm 1 33 2 36 2 5 3 29 3 5 and 4 33 inches centered on 110 mm 4 33 inches wide cardboard cores Core inner diameter 13 mm 0 5 inches Max ribbon roll diameter 41 mm 1 6 inches Ink coated side facing outwards cores with notches Printing Speed 50 75 or 100 mm sec 2 3 or 4 inches sec Sensors Label gap label mark label taken out of med...

Страница 50: ... Data 8 bit AscII Swedish Finnish Norwegian Danish Italian Code Page 850 French Swiss Spanish Bar Codes Codabar Code 2 of 5 Code 11 Code 16K Code 39 Code 49 Code 93 Code 128 Data Matrix EAN HIBC Code 39 HIBC Code 128 Interleaved 2 of 5 JIS ITF Maxicode ...

Страница 51: ...e UPC Memory EPROM 2MB DRAM 512K User Interface Keyboard One Feed button Display 1 multi color LED indicator Accessories and Options Memory Cartridge 1MB Flash Serial Communication Cable RS 232 Parallel Communication Cable Centronics Paper Cutter Printhead V spring for stiff thick media ...

Страница 52: ...40 EasyCoder PC41 User s Guide Appendix A Technical Data ...

Страница 53: ... Guide 41 B Media Specifications This appendix specifies the physical characteristics and sizes for the direct thermal media receiving face materials and thermal transfer ribbons that can be used in an EasyCoder PC41 printer ...

Страница 54: ...intout quality and resistance against moisture plasticizers and vegetable oils Examples Europe North America Thermal Top Board Duratherm II Thermal Top IR Duratherm II Tag Thermal Top High Speed Duratherm Ltg Duratherm IR Economy Quality Non top coated media with less resistance to moisture plasticizers and vegetable oils In all other respects it is equal to Premium Quality Examples Europe North A...

Страница 55: ... TMX 1500 ribbons Examples Europe North America TTR Matte Duratran II TTR Premium Duratran II Tag 5 mil TTR Premium Board Duratran II Tag 7 mil Polyethylene Plastics Good resistance to water and many common chemicals Can be use outdoors and offer good tear resistance Most often used in combination with HP TMX 2500 ribbons Examples Europe North America TTR Polyethylene Kimdura TTR Gloss Polyethylene...

Страница 56: ...faces They have good smear resistance and are most suitable for intricate logotypes and images on matte coated papers and synthetic face materials High Resistance HR TMX 3200 transfer ribbons give an extremely durable printout which is resistant to most chemical agents and high temperatures However such transfer ribbons set high demands on the receiving face material which must be very smooth such...

Страница 57: ...ss 0 06 mm 0 003 inches All types of media should normally be wound with the printable side facing outwards and unroll from the top of the roll However tags and continuous strip can optionally be wound with the printable sidefacing inwards and unroll from the bottom of the roll as long as they are not used for cut off operation Protect the media against sand grit and other hard par ticles during pr...

Страница 58: ... Media Specifications a b c LABELS Labels a Media width incl liner Maximum 116 0 mm 4 57 inches Minimum 25 0 mm 1 inches b Label length Minimum 6 35 mm 25 inches c Label gap height Maximum 10 mm 39 inches Minimum 2 mm 08 inches Liner Opacity 75 ...

Страница 59: ...inches Minimum 25 0 mm 1 00 inches b Tag length Minimum 6 35 mm 0 25 inches c Detection slot width Minimum 14 mm 0 55 inches d Detection slot height Maximum 10 mm 0 39 inches Minimum 1 mm 0 08 inches The label gap sensor is offset 4 5 mm 0 177 inches to the right of the center of the media path a c TICKETS TAGS CONTINUOUS STRIP d b ...

Страница 60: ...0 mm 4 57 inches Minimum 25 0 mm 1 00 inches b Tag length Minimum 6 35 mm 0 25 inches c Detection slot width c Black mark width Minimum 28 mm 1 10 inches d Black mark height Maximum 10 mm 0 39 inches Minimum 3 mm 0 12 inches The black mark sensor is offset 10 mm 0 394 inches to the right of the center of the media path Max reflectance 5 at 940 nanometer Carbon black ...

Страница 61: ...The printer must be set for continuous stock by the Q command see IPL Programmer s Reference Manual The length of each copy is decided by the size of the print image and any additional media feed is decided by the Q command Continuous stock cannot be used in the Test Dump Mode a Tag or strip width Maximum 116 0 mm 4 57 inches Minimum 25 0 mm 1 00 inches a CONTINUOUS STRIP ...

Страница 62: ...50 EasyCoder PC41 User s Guide Appendix B Media Specifications ...

Страница 63: ...EasyCoder PC41 User s Guide 51 C Interfaces This appendix describes the signals on the serial RS 232 port and the parallel IEEE 1284 port ...

Страница 64: ...al Name Transmitter 1 Strobe Host 2 9 Data 0 7 Host 10 11 Busy Printer 12 Paper empty Printer 13 Select Printer 14 15 Not connected 16 Signal ground 17 Chassis ground 18 5V DC Max 500 mA1 19 30 Signal ground 31 Init 32 Fault Printer 33 Signal ground 34 36 Selectin 1 The combined load on the external 5V on both the parallel and the serial port must not exceed a total of 500 mA ...

Страница 65: ...ector Printer EasyCoder PC41 Host Signal DB 9 Signal DB 9 DB 25 Signal 1 5V 500 mA1 1 RXD 2 TXD 2 3 RXD TXD 3 RXD 3 2 TXD DTR 4 4 20 DTR GND 5 GND 5 7 GND DSR 6 RDY 6 6 DSR RTS 7 7 4 RTS CTS 8 RDY 8 5 CTS 9 9 1 The combined load on the external 5V on both the parallel and the serial port must not exceed a total of 500 mA ...

Страница 66: ...54 EasyCoder PC41 User s Guide Appendix C Interfaces ...

Страница 67: ......

Страница 68: ...ntermec Technologies Corporation Corporate Headquarters 6001 36th Avenue West Everett WA 98203 U S A tel 425 348 2600 fax 425 355 9551 www intermec com 1 960635 00 EasyCoder PC41 User s Guide 1 960635 00 ...

Отзывы: