background image


DE : 10  

DVR 41 Schnellstartanleitung 

Regelmäßig verwendete Funktionen in der 
Livebildanzeige können durch Klicken mit der 
linken Maustaste auf das Kamerabild schnell 
aufgerufen werden. Die Popup-Symbolleiste 
der jeweiligen Verknüpfung wird angezeigt. 
Eine Beschreibung der verfügbaren 
Funktionen finden Sie in Abbildung 3 auf 
Seite 7. 

Konfigurieren des DVR 41 

Der DVR 41 hat eine symbolgesteuerte 
Menüstruktur, die Ihnen die Konfiguration 
der Geräteparameter erlaubt. Jeder Befehl 
zeigt einen Bildschirm an, in dem Sie eine 
Gruppe von Einstellungen bearbeiten 
können. Die meisten Menüs sind nur für 
Systemadministratoren zugänglich. 

Einzelheiten zur Konfiguration des Gerätes 
finden Sie im Benutzerhandbuch des DVR 41. 

So greifen Sie in der Livebildanzeige auf 
das Hauptmenü zu: 

  Drücken Sie die Taste 

Menu

 auf der 

Fernbedienung oder dem 
Frontbedienelement. 
- oder - 

  Klicken Sie mit der rechten Maustaste und 

wählen Sie 

Menü

 aus dem Popup-Menü.  

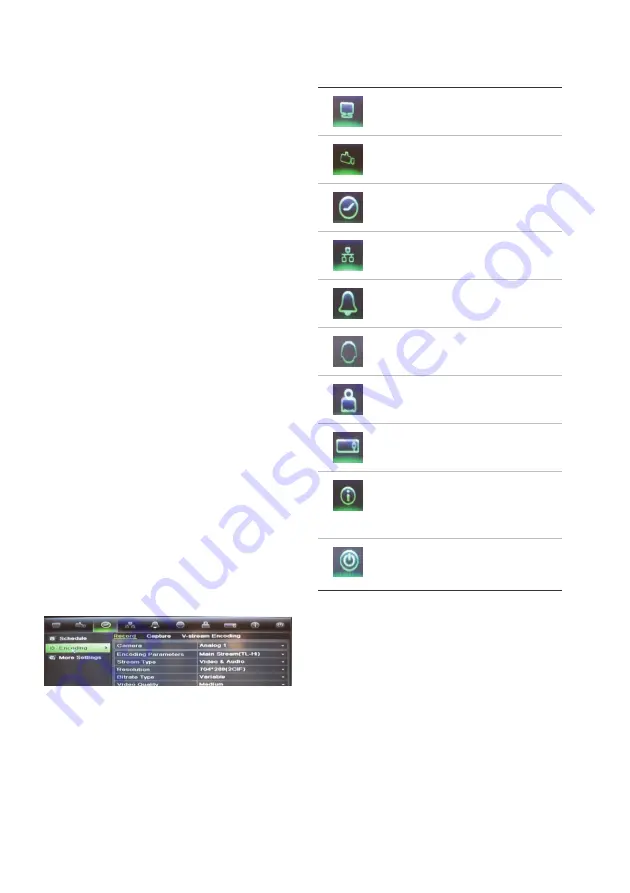
Das Hauptmenü wird angezeigt. Bewegen 
Sie die Maus über ein Befehlssymbol in der 
Menüsymbolleiste und klicken Sie darauf, 
um es auszuwählen. 

Beschreibung der Befehlssymbole in der 
Menüsymbolleiste: 


Konfiguriert 
Anzeigeeinstellungen. 


Konfiguriert 
Kameraeinstellungen. 


Konfiguriert 
Aufnahmeeinstellungen. 


Konfiguriert Standard-
Netzwerkeinstellungen. 


Konfiguriert Alarmeinstellungen.  


Konfiguriert PTZ-Einstellungen. 


Konfiguriert 
Benutzereinstellungen. 


Konfiguriert 
Systemeinstellungen. 


Enthält Informationen zu den 
verschiedenen Symbolleisten 
und Menüs der 
Benutzeroberfläche. 


Enthält Informationen zu 
Optionen für Abmeldung, 
Neustart und Herunterfahren. 


Содержание TruVision DVR 41

Страница 1: ...DVR 41 FR Guide rapide de d marrage du TruVision DVR 41 IT Guida di avvio rapido di TruVision DVR 41 NL TruVision DVR 41 Snel aan de slag gids PL Instrukcja szybkiego uruchamiania rejestratora TruVisi...

Страница 2: ...Copyright 2012 UTC Fire Security All rights reserved Contact information www interlogix com or www utcfireandsecurity eu...

Страница 3: ...Connect to an optional eSATA device such as SATA HDD CD DVD RM 9 Connect to a HDTV The HDMI connection supports both digital audio and video 10 Connect to an optional USB device such as a mouse CD DVD...

Страница 4: ...to select presets and shadow tours 12 Press to control playback replay current playback file and to return to live view mode 13 Press to enter the main menu and advanced search modes Figure 3 Quick a...

Страница 5: ...requirements 2 Connect the power cord to the unit and turn on the power 3 Set up the unit with the required settings using the setup Wizard First time use The DVR 41 has an express installation wizard...

Страница 6: ...immediately operational and the pointer should appear Web browser control The DVR 41 Web browser lets you view record and play back videos as well as manage all aspects of the DVR from any PC with In...

Страница 7: ...lay settings Configures camera settings Configures recording settings Configures standard network settings Configures alarm settings Configures PTZ settings Configures user settings Configures system...

Страница 8: ...optionales eSATA Ger t z B SATA Festplatte CD DVD RM 9 Anschluss an einen HDTV Die HDMI Verbindung unterst tzt digitales Audio und Video 10 Anschluss an ein optionales USB Ger t z B Maus CD DVD Brenn...

Страница 9: ...teuern sowie Presets und Touren auszuw hlen 12 Dr cken um die Wiedergabe zu steuern die aktuelle Wiedergabedatei zu wiederholen und zum Live Modus zur ckzukehren 13 Dr cken um das Hauptmen und die erw...

Страница 10: ...ngen sind optional und h ngen von den jeweiligen Installationsanforderungen ab 2 Schlie en Sie das Netzkabel an und schalten Sie das Ger t ein 3 Nehmen Sie die erforderlichen Ger teeinstellungen mithi...

Страница 11: ...Gegensatz zum Frontbedienelement dessen Funktionalit t eingeschr nkt ist Verwenden Sie die Maus zum Navigieren und nehmen Sie in der Bedieneroberfl che so nderungen an den Einstellungen vor Schlie en...

Страница 12: ...Benutzerhandbuch des DVR 41 So greifen Sie in der Livebildanzeige auf das Hauptmen zu Dr cken Sie die Taste Menu auf der Fernbedienung oder dem Frontbedienelement oder Klicken Sie mit der rechten Mau...

Страница 13: ...HDD oder DVD R W DVR 4104 DVR 4108 DVR 4116 35W 40W 45W Betriebstemperatur 10 bis 55 C 50 bis 131 F Relative Luftfeuchtigkeit 10 bis 90 Abmessungen B x H x T 445 470 90mm Gewicht 8kg ohne HDD oder DVD...

Страница 14: ...n disco duro SATA y una unidad de CD DVD RM 9 Conexi n a un dispositivo HDTV La conexi n HDMI admite tanto audio como v deo digital 10 Conexi n a un dispositivo USB opcional como por ejemplo un rat n...

Страница 15: ...eccionar valores preestablecidos y shadow tours 12 Pulse el bot n para controlar la reproducci n volver a reproducir el archivo actual o regresar al modo de v deo en directo 13 Pulse el bot n para acc...

Страница 16: ...onales y dependen de los requisitos de instalaci n 2 Conecte el cable de alimentaci n a la unidad y enci ndala 3 Configure la unidad con los valores necesarios mediante el Asistente de configuraci n P...

Страница 17: ...del panel frontal que cuenta con una funcionalidad limitada El rat n le permite desplazarse por las opciones de la interfaz de usuario y realizar cambios en ellas Conecte el rat n al dispositivo DVR i...

Страница 18: ...al men principal desde el modo de v deo en directo Pulse el bot n Menu Men en el mando a distancia o en el panel frontal O bien Haga clic con el bot n derecho del rat n y seleccione Menu Men en el me...

Страница 19: ...W DVR 4104 DVR 4108 DVR 4116 35 W 40 W 45 W Temperatura de funcionamiento 10 a 55 C 50 a 131 F Humedad relativa De 10 a 90 Dimensiones An x Al x Pro 445 470 90 mm 17 5 x 18 5 x 3 5 pulg Peso 8 kg 17 6...

Страница 20: ...ATA facultatif par exemple un disque dur ou CD DVD RM SATA 9 Connexion un t l viseur HD La connexion HDMI prend en charge l audio et la vid o num riques 10 Connexion un p riph rique USB facultatif par...

Страница 21: ...des shadow tours 12 Bouton de contr le de la lecture de la r p tition du fichier de lecture en cours et de retour au mode direct 13 Bouton d acc s au menu principal et aux modes de recherche avanc e F...

Страница 22: ...ranchez le cordon d alimentation et mettez l unit sous tension 3 Configurez l unit avec les param tres requis l aide de l assistant de configuration Premi re utilisation Le DVR 41 est dot d un assista...

Страница 23: ...id o digital La souris permet de parcourir le menu et de modifier les r glages de l interface utilisateur Connectez la souris l enregistreur vid o digital en raccordant le connecteur USB de la souris...

Страница 24: ...unit Pour acc der au menu principal en mode direct Appuyez sur le bouton Menu partir de la t l commande ou du panneau avant Ou Appuyez sur le bouton droit de la souris et s lectionnez Menu dans le men...

Страница 25: ...n nerg tique sans disque dur ou DVD RW DVR 4104 DVR 4108 DVR 4116 35 W 40 W 45 W Temp rature de fonctionnement 10 55 C Humidit relative 10 90 Dimensions L x H x P 445 x 470 x 90 mm Poids 8 kg sans dis...

Страница 26: ...le ad esempio HDD SATA CD DVD RM 9 Collegare a un HDTV Il collegamento HDMI supporta audio e video digitali 10 Collegare a un dispositivo USB opzionale ad esempio un mouse un masterizzatore CD DVD o u...

Страница 27: ...adow tour 12 Premere per controllare la riproduzione per riprodurre il file di riproduzione corrente e per tornare alla modalit di visualizzazione live 13 Premere per accedere al menu principale e all...

Страница 28: ...urare l unit con le impostazioni richieste utilizzando la procedura di configurazione guidata Primo utilizzo L unit DVR 41 dispone di una procedura guidata per l installazione rapida che consente di c...

Страница 29: ...sul pannello frontale Il mouse immediatamente operativo e dovrebbe venire visualizzato il puntatore Browser Web Il browser Web dell unit DVR 41 consente di visualizzare registrare e riprodurre video...

Страница 30: ...zione delle icone di comando nella barra degli strumenti del menu Consente di configurare impostazioni di visualizzazione Consente di configurare impostazioni della telecamera Consente di configurare...

Страница 31: ...r een optioneel eSATA apparaat zoals SATA HDD CD DVD RM 9 Aansluiting voor een HDTV De HDMI aansluiting ondersteunt digitale audio en video 10 Aansluiting voor een optioneel USB apparaat zoals een mui...

Страница 32: ...tie te bedienen en om voorkeuze en schaduwtrajecten te selecteren 12 Druk hierop om afspelen te bedienen de huidige afspeelbestanden opnieuw af te spelen en terug te keren naar de live weergavemodus 1...

Страница 33: ...op de unit en zet het apparaat aan 3 Stel de vereiste instellingen in voor de unit met behulp van de installatiewizard Voor de eerste keer gebruiken De DVR 41 beschikt over een installatiewizard waarm...

Страница 34: ...op de DVR door de USB aansluiting van de muis in de USB poort van het voorpaneel te steken De muis is meteen operationeel en de muisaanwijzer wordt weergegeven Bediening via de webbrowser Met de DVR 4...

Страница 35: ...eren Beschrijving van de opdrachtpictogrammen in de menuwerkbalk Configuratie van weergave instellingen Configuratie van de camera instellingen Configuratie van opname instellingen Configurate van de...

Страница 36: ...d cz do opcjonalnego urz dzenia eSATA takiego jak dysk twardy SATA lub nagrywarka CD DVD RW 9 Pod cz do telewizora HD Po czenie HDMI obs uguje cyfrowe audio i wideo 10 Pod cz do opcjonalnego urz dzeni...

Страница 37: ...ustawienia zaprogramowane i trasy shadow tour 12 Naci nij aby sterowa odtwarzaniem ponownie odtworzy bie cy plik lub powr ci do trybu podgl du na ywo 13 Naci nij aby przej do menu g wnego i tryb w szu...

Страница 38: ...rzednim Po czenia opcjonalne Wszystkie inne przedstawione po czenia s opcjonalne i zale ne od wymaga instalacji 2 Pod cz przew d zasilaj cy do urz dzenia i w cz zasilanie 3 Skonfiguruj wymagane ustawi...

Страница 39: ...do obs ugi wszystkich funkcji urz dzenia w przeciwie stwie do panelu przedniego kt ry ma ograniczone funkcje Za pomoc myszy mo na przechodzi mi dzy menu i wprowadza zmiany w ustawieniach w interfejsie...

Страница 40: ...lko dla administrator w systemu Szczeg owe informacje na temat konfigurowania urz dzenia zawiera Instrukcja u ytkownika rejestratora DVR 41 Aby przej do menu g wnego z trybu podgl du na ywo Naci nij p...

Страница 41: ...ardego lub nagrywarki DVD R W DVR 4104 DVR 4108 DVR 4116 35 W 40 W 45 W Temperatura robocza 10 do 55 Wilgotno wzgl dna od 10 do 90 Wymiary Sz x W x G 445 470 90 mm Waga 8 kg bez dysku twardego lub nag...

Страница 42: ...SATA opcional como disco r gido SATA CD DVD RM 9 Ligar a uma TV de alta defini o A liga o HDMI suporta udio e v deo digital 10 Ligar a um dispositivo USB opcional como um rato gravador de CD DVD ou di...

Страница 43: ...ow tours 12 Premir para controlar a reprodu o para reproduzir o ficheiro de reprodu o actual e para voltar para o modo de visualiza o em directo 13 Premir para aceder ao menu principal e para entrar n...

Страница 44: ...dependem dos requisitos da instala o 2 Ligue o cabo de alimenta o unidade e ligue a alimenta o 3 Configure a unidade com as defini es necess rias utilizando o assistente de instala o Utiliza o inicial...

Страница 45: ...ncionalidade limitada O rato permite navegar pelas defini es e efectuar altera es s mesmas na interface do utilizador Para ligar o rato ao DVR basta ligar o conector USB do rato porta USB no painel fr...

Страница 46: ...nidade Para aceder ao menu principal a partir do modo de visualiza o em directo Prima o bot o de Menu no comando dist ncia ou no painel frontal Ou Clique com o bot o direito do rato e seleccione Menu...

Страница 47: ...VD R W DVR 4104 DVR 4108 DVR 4116 35 W 40 W 45 W Temperatura de funcionamento 10 a 55 C 50 a 131 F Humidade relativa 10 a 90 Dimens es L x A x P 445 470 90 mm 17 5 18 5 3 5 pol Peso 8 kg 17 6 lb sem d...

Страница 48: ...RU 46 DVR 41 RU DVR 41 1 1 16 2 16 RCA 3 CCTV 4 5 RCA 6 RS 232 7 VGA 8 eSATA SATA CD DVD ROM 9 HDTV HDMI 10 USB CD DVD 11 12 RS 485 13 PTZ 14 KTD 405 15 16 16 17 18 19 16...

Страница 49: ...TZ 7 8 9 10 PTZ 11 PTZ 12 13 3 1 2 3 4 5 PTZ PTZ 6 7 8 DVR 41 Eject Archive Menu Search Display Seq A F1 B F2 Live Replay Zoom Preset Tour Alarm HDD Network Internal Alarm 1 2 3 4 5 6 7 8 9 10 11 12 1...

Страница 50: ...RU 48 DVR 41 TruVision DVR 41 DVR 41 AAA USB DVR TruVision DVR 41 TruVision DVR 41 1 DVR 41 1 46 BNC A BNC VGA HDMI USB 2 3 DVR 41 1234 Finish DVR 41 DVR 41...

Страница 51: ...RU 2 47 AAA 1 Menu Menu 2 Display mode settings Monitor 3 255 4 Device 5 DVR 41 6 ENTER USB DVR 41 USB USB USB DVR 41 IP admin 1234 DVR 41 DHCP IP 192 168 1 82 255 255 255 0 192 168 1 1 8000 HTTP HTTP...

Страница 52: ...RU 50 DVR 41 3 47 DVR 41 DVR 41 DVR 41 Menu Menu PTZ...

Страница 53: ...DVR 41 51 RU 100 240 6 3 A 50 60 DVD R W DVR 4104 DVR 4108 DVR 4116 35 40 45 10 55 C 50 131 F 10 90 445 470 90 17 5 18 5 3 5 8 17 6 DVD R W www interlogix com www utcfssecurityproducts eu...

Страница 54: ...TA HDD CD DVD RM gibi iste e ba l bir eSATA cihaza ba lay n 9 Bir HDTV ye ba lay n HDMI ba lant s dijital ses ve videoyu destekler 10 Fare CD DVD yaz c veya HDD gibi iste e ba l bir USB cihaz na ba la...

Страница 55: ...etmek ve nayarlar ve g lge turlar n se mek i in bas n 12 zlemeyi kontrol etmek ge erli izleme dosyas n tekrar oynatmak ve canl g r nt moduna d nmek i in bas n 13 Ana men ve geli mi arama modlar na gir...

Страница 56: ...u niteye ba lay n ve g c a n 3 niteyi gerekli ayarlarla ayar Sihirbaz n kullanarak ayarlay n lk kullan m DVR 41 ilk kullan ld nda temel DVR ayarlar n kolayl kla yap land rabilece iniz h zl bir kurulum...

Страница 57: ...ar Taray c n n kullan m kolay kontrolleri size t m DVR fonksiyonlar i in h zl bir eri im sunar niteye eri mek i in bir Web taray c a n ve DVR ye atanm IP adresini bir Web adresi gibi girin Oturum a ma...

Страница 58: ...n yap land r r Sistem ayarlar n yap land r r Aray zdeki e itli ara ubuklar ve men ler i i referans bilgileri sa lar Oturumu kapatma yeniden ba latma ve kapatma se eneklerine eri im sa lar Teknik zelli...

Страница 59: ......

Страница 60: ......

Отзывы: