background image

Page

Connecting the Mouse to the 

Computer

Retrieve the micro USB receiver dongle 

stored inside the battery compartment 

by opening the battery door as shown 

in Installing the Rechargeable Batteries 

section.  Close the door.
Connect the micro USB receiver dongle to 

an available USB port on your computer.  

Wait for the computer to go through its 

default process of recognizing the new 

hardware and installing the built-in native 

mouse driver.  You don’t need to do 

anything while your computer is going 

through the installation of a new device.

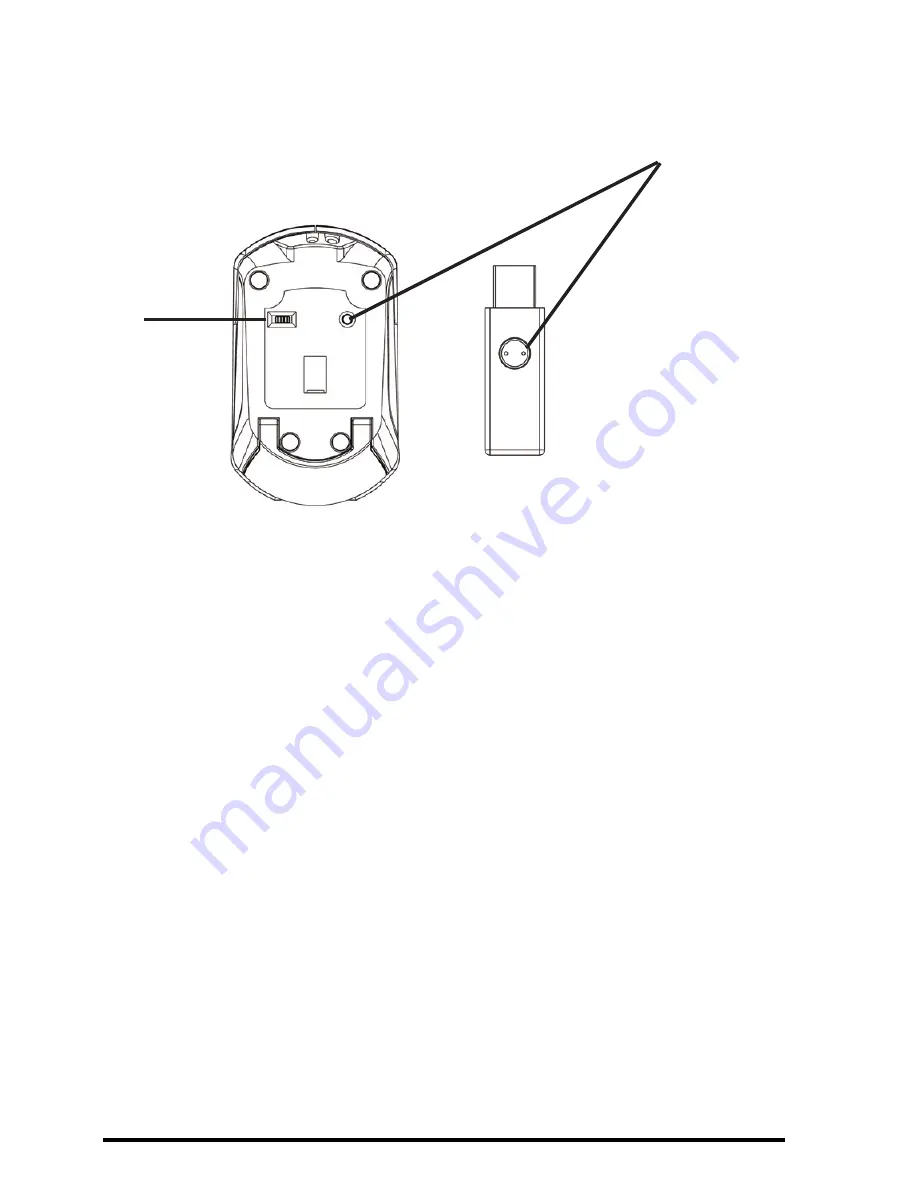
On/Off

Switch

Connect Button

Содержание Presenter Mouse

Страница 1: ...Page User s Manual Rechargeable Wireless Presenter Mouse ...

Страница 2: ...st harmful interference when the equipment is operated in a residential installation This equipment generates uses and can radiate radio frequency energy and if not installed and used in accordance with the instructions may cause harmful interference to radio communications However there is no guarantee that interference will not occur in a particular installation If this equipment does cause harm...

Страница 3: ...rtification The term IC before the certification registration number only signifies that the Industry Canada technical specifications were met Declaration of conformity Hereby SMK LINK Electronics Corporation declares that this product is in compliance with the essential requirements and other relevant provisions of Directive 1999 5 EC All trademarks and registered trademarks mentioned in this doc...

Страница 4: ...ible F5 and Application Switch in Presenter Mode not supported Package Contents Wireless presenter mouse Micro USB receiver dongle stored inside battery compartment USB charging cable 2 x AAA rechargeable Ni MH batteries User s manual Carrying case Installing the Rechargeable Batteries Supplied Battery Compartment Cover Latch Press down to open ...

Страница 5: ... slots Make sure the positive and negative ends of the batteries match the polarity markings inside the battery compartment Close the battery cover back into position Do not use any disposable or Alkaline batteries in this mouse Use only the rechargeable Ni MH batteries supplied with this mouse Shall replacing batteries become necessary use only rechargeable AAA batteries Do not mix new and old ba...

Страница 6: ... port Connect the barrel tip end of the USB charging cable to the mouse s charge port located at the front end of the mouse The power indicator LED flashes green indicating the battery power is low and turns to solid green when fully charged The initial charging process may take up to 4 hours Subsequent recharge may require less time depending on the level of residual power Power Indicator Power L...

Страница 7: ...the right or left button You are now ready to connect the mouse to your computer system Note it s not necessary to wait for the batteries to be fully charged before connecting the mouse to your system Turn on the power by sliding the on off switch located at the bottom of the mouse to the on position Make sure the computer s power management is set to disable hibernation mode while the mouse is be...

Страница 8: ...eable Batteries section Close the door Connect the micro USB receiver dongle to an available USB port on your computer Wait for the computer to go through its default process of recognizing the new hardware and installing the built in native mouse driver You don t need to do anything while your computer is going through the installation of a new device On Off Switch Connect Button ...

Страница 9: ...less devices in the vicinity operating in the same radio frequency channel The mouse can be easily reset to another channel by pressing on the connect button located on the top of the micro USB receiver dongle while it s plugged in to the computer s USB port and pressing the connect button located at the bottom of the mouse This will switch the mouse and the receiver to a different channel to avoi...

Страница 10: ...ions as a standard 3 button mouse right click left click and the scroll wheel as the 3rd button The mouse goes to sleep mode to save battery power after approximately 10 minutes of inactivity Wake it up by clicking on any button Cover Connect Button On Off Switch Mouse Mode Door Closed Presenter Mode Door Open ...

Страница 11: ... open position The presenter automatically detects the mode switch when the sliding door is open The presentation control buttons are exposed and the device automatically converts to a presenter with laser pointer The optical sensor for the mouse function is shut off To use the mouse cursor control you must close the sliding door first There are 5 presenter functions plus laser pointer Under Windo...

Страница 12: ...iod of time remove the batteries from the battery compartment Optical mouse works best in non reflective non white surface If cursor movements are lagging placing the mouse on a mousepad will help Darker surface requires more energy to operate thus consumes more battery power When the mouse cursor behaves erratically check the power indicator LED for power status i e LED light Next Page Previous P...

Страница 13: ...r is closed when the device is not in use and when traveling in order to avoid damaging to the door Remember to store the micro USB receiver dongle in the storage compartment when traveling Warranty SMK LINK Electronics warrants to the original end user purchaser of the Product you that the Product excluding batteries will be free from defects in materials or workmanship under normal use and servi...

Страница 14: ...rties other than you and injury to property SMK LINK Electronics s total liability for damages for any cause related to or arising out of the use or inability to use the product shall not exceed the original price paid for the product even if SMK LINK Electronics has been informed of such possibility If your Product requires warranty service you must first contact SMK LINK Electronics Product Supp...

Страница 15: ...ations The laser beam emits for the duration that you press the button Caution Do not stare into laser beam for it can cause harm to your eyes Do not aim the laser at people and procedures other than those specified therin may result in hazardous radiation exposure FDA Compliance for Class 2 Laser CFR21 SUBCHAPTER J EN 60825 1 1994 A1 A2 CLASS II LASER PRODUCT LASER RADIATION DONOT STARE INTO BEAM...

Страница 16: ...se We know you had other choices and we appreciate that you chose Interlink Electronics Wireless Presenter Mouse by SMK LINK for your product needs So that we may better serve you in the future please register online at www smklink com register 2008 SMK LINK Electronics P N 94 36544 ...

Отзывы: