MAINTENANCE
The Micro Mosquito was engineered to be a light weight robust structure; however, as a real flying helicopter it is possible to
damage the rotors or structure. Use these simple procedures to repair your helicopter and get back into the air.
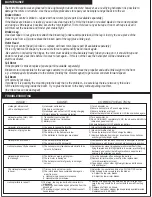
TROUBLESHOOTING
CORRECTIVE ACTION:
CAUSE:
ISSUE:
Helicopter will not start,
LED on helicopter is off
1) Helicopter not turned on.
2) Battery is not charged.
3) Helicopter was not set to OFF during charging.
4) Rotors locked for overload protection.
1) Turn helicopter on.
2) Ensure helicopter is off and charge battery.
3) Ensure batteries are fresh.
4) Adjust helicopter's on/off switch to OFF, then switch on again.
Helicopter will not start, LED
on helicopter is ON.
1) Transmitter is not turned ON.
2) Speed control is not initialized .
3) Battery is low.
1) Turn transmitter on.
2) Push UP/DOWN completely to UP, then back to DOWN to
initialize speed control.
3) Ensure helicopter is OFF and charge battery.
Helicopter is flying too high.
1) You need to reduce the throttle.
1) Move the throttle stick down.
Helicopter is flying too low.
1) Needs more power/throttle.
2) The battery in the helicopter is low.
3) The batteries in the charger are drained.
1) Move the throttle stick up.
2) Ensure the helicopter is OFF and charge the battery.
3) Remove batteries from charger & replace with new batteries
and charge the helicopter again.
Helicopter doesn’t hover.
1) The helicopter drifts forward.
2) The helicopter drifts backwards.
1) Compensate with the back stick to hold helicopter in position.
2) Compensate with forward stick to hold helicopter in position.
Helicopter doesn't move
fast enough.
1) The battery charge is getting low.
2) The tail rotor is damaged.
3) The helicopter center of gravity is no longer
correct.
1) Turn the helicopter off and charge the battery.
2) Replace tail rotor with new unit from the replacement
rotor kit (available in stores)
3) Tape a paper clip or other light weight item under the nose
of the helicopter.
The Helicopter always spins
in hover.
1) Trim control is not set correctly.
2) The rotor blades have sustained damage / or
wear from use:
a. Helicopter spins counter clockwise.
b. Helicopter spins clockwise.
1) Adjust the trim control knob.See the FLYING TIPS section.
2) Gently bend more curvature into the blades.
a. Adjust the top rotor blades.
b. Adjust the lower rotor blades.
Helicopter doesn’t fly backwards
1) The helicopter only flies backwards briefly then
spins to fly forward.
1) Aerodynamics make flying backwards more difficult than
flying forwards and this flight pattern is normal, practice flying
backward and control the left/right motion to keep the tail
pointed in the direction you desire.
Helicopter fails to take off.
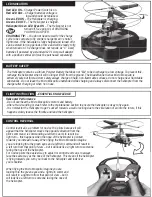
1) The large, top cog (under the bottom rotor) is
misaligned.
2) Shaft lock under the body has detached from the
drive shaft.
3) The rubber stopper on the top of the drive shaft
has detached.
1) Realign with equal spacing between the pair of large cogs.
Large, top cog should be in contact with the small front cog
(top).
2) Replace shaft lock as shown.
3) Replace the rubber stopper (part separately available inside
Replacement Kit, 60-4461).
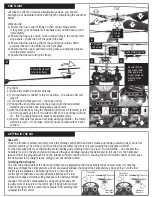
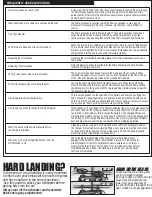
Broken Rotor
If the ring or centre is broken – replace with new rotor. (spare part kit available separately.)
If the blades are broken or cracked, you can use clear tape to fix. Hold the broken or cracked blades in the correct position
and using as little tape as possible, secure the rotor together. Trim or fold over any extra tape. If too much tape is used it
will throw out the balance and hinder your stable flight.
Broken Leg
Use clear tape or Crazy glue to reattach the broken leg (under adult supervision).If the leg is lost,try to use a piece of the
plastic tube from a Q-tip to replace the broken part of the leg (plus a little glue).
Rotor Head
If the ring or centre (head) is broken – replace with new rotor. (spare part kit available separately.)
If it is only bent out of shape try to use some force to permanently bend it back again.
-Be careful to not destroy the hinges, the rotor must be able to tilt absolutely freely (when you tap on it, it should tilt up and
down for at least 2 seconds before it comes to rest again – if this is not the case the helicopter will be unstable and
start to oscillate).
Tail Rotor
If the propeller is broken replace. (spare part kit available separately.)
Broken motor not possible for the average customer to change. Remove the propeller and add a little weight to the front
e.g. a metal paper clip attached to the motors (hold by the motor magnet) to get a slow constant forward speed.
Tail Boom
Will normally not break.
If problems it is possibly the mounting into the body that is the problem – be careful as there are two very thin wires
for the tail motor going inside the boom. Try to glue the boom to the body without pulling it out first.
(the thin wires can be damaged).
How much space do I need to fly?
What about fans, air conditioners, vents and windows?
Can I fly outdoors?
The Rotors are tilted an not level, is this okay?
Repairing the rotor blades.
Replacing the rotor blades
The top rotor will not side on the rotor shaft.
The Micro Mosquito tips over during take off.
How long will the Micro Mosquito Fly
How long does it take to charge the Micro Mosquito
What if I disconnect the Micro Mosquito before
the charge is complete
Why does my Controller light flash when I turn the
On/Off switch to On.
At least a mid size living room, clear of any obstructions is needed. Be sure to keep
the Micro Mosquito away from walls, ceiling and other fixtures. Because of the
aerodynamics of the rotors the Micro Mosquito will seem to get sucked towards any
obstacle/wall if it gets too close.
The Micro Mosquito is very light weight and hence sensitive to wind, any air
movement from heating vents, fans, windows, etc will make it more difficult to
control.
The Micro Mosquito is and indoor helicopter. The same innovations that make it
super stable also make’s it easily effected by wind and turbulence. Even the
calmest out door day has wind that will effect the Micro Mosquito’s performance.
When the rotors are not spinning it is normal fro the rotors to rest in a tilted position.
This is normal even if they are properly balanced. In hover the rotors will level out;
however, in moving flight the lower rotor will usual tilt sideways due to aerodynamic
and gyroscopic forces and is necessary to maintain stability.
Repairing the rotor blade is possible, please refer to the maintenance section of
this manual
Rotor Replacement kits are available for the Micro Mosquito and have detailed
instruction to replace the rotors.
The upper rotor has been keyed to match the D shape of the drive shaft. When
replacing the upper rotor you must ensure to orient it properly so that the D shape
of the rotor’s central opening matches the D shaped drive shaft.
Launch the Micro Mosquito from hard flat surfaces only. When taking off briskly
move the throttle stick forward to get the Micro Mosquito airborne quickly. Letting
the helicopter sit on the ground with the rotors spinning will almost always result in
the helicopter tipping over.
This is very dependent on the condition of the battery and how you are flying the
Micro Mosquito. Typical flight times are between 8 and 10 minutes. Should you be
able to fly over 10 minutes you should land and let your motors cool down to ensure
you do not burn them out, this will ensure many more fun flights.
This depends on the condition of the charger batteries (the six C sized alkaline cells)
and the condition of the helicopter battery. After a long flight of 10 minutes or more it
can take 30 to 45 minutes to fully recharge the battery. If the charge batteries are
old, performed multiple charges, or been used in other product then the charge time
can be longer. If the charge time becomes excessive or you are having short flights
from a charge replace your charger’s batteries with new alkaline batteries.
Stopping a charge cycle before it is finished will not effect the helicopter battery or
the charger, it is just like not completely filling a car’s gas tank. Just like the car will
not drive a far before running out of gas if the tank is not full, the Micro Mosquito
will not fly as long if the charge is stopped early.
The helicopter is programmed with a safety feature that helps prevent
damage to the helicopter. When the controller is turned on it the helicopter
will not respond to it until the helicopter control is initialized. To do this you
must cycle the throttle from 0% to 100% to 0%, at which point the LED will
stop flashing and be steady – the flashing is to remind you that the speed
control is not initialized.
FREQUENTLY ASKED QUESTIONS
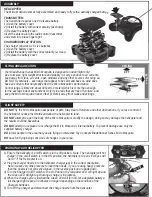
In the event of a hard landing it is very important
to check over your helicopter to ensure the gears
and drive shaft are in the correct positions!
-use this guide to check your helicopter before
getting back into the air!
MAIN DRIVE GEARS
Always turn off the helicopter and transmitter
before doing any adjustments!
Check that the main drive gears
are in the proper position.
Each gear drives a different rotor.
Gear A (as shown)drives the
lower rotor gear and gear B
(as shown) drives the upper rotor
gear. Check for proper alignment.
A
B
CORRECT
INCORRECT
HARD LANDING?


