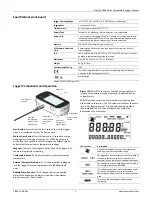
InTemp CX400 Series Temperature Logger Manual
1-800-LOGGERS 3
www.onsetcomp.com
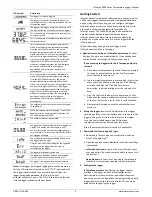
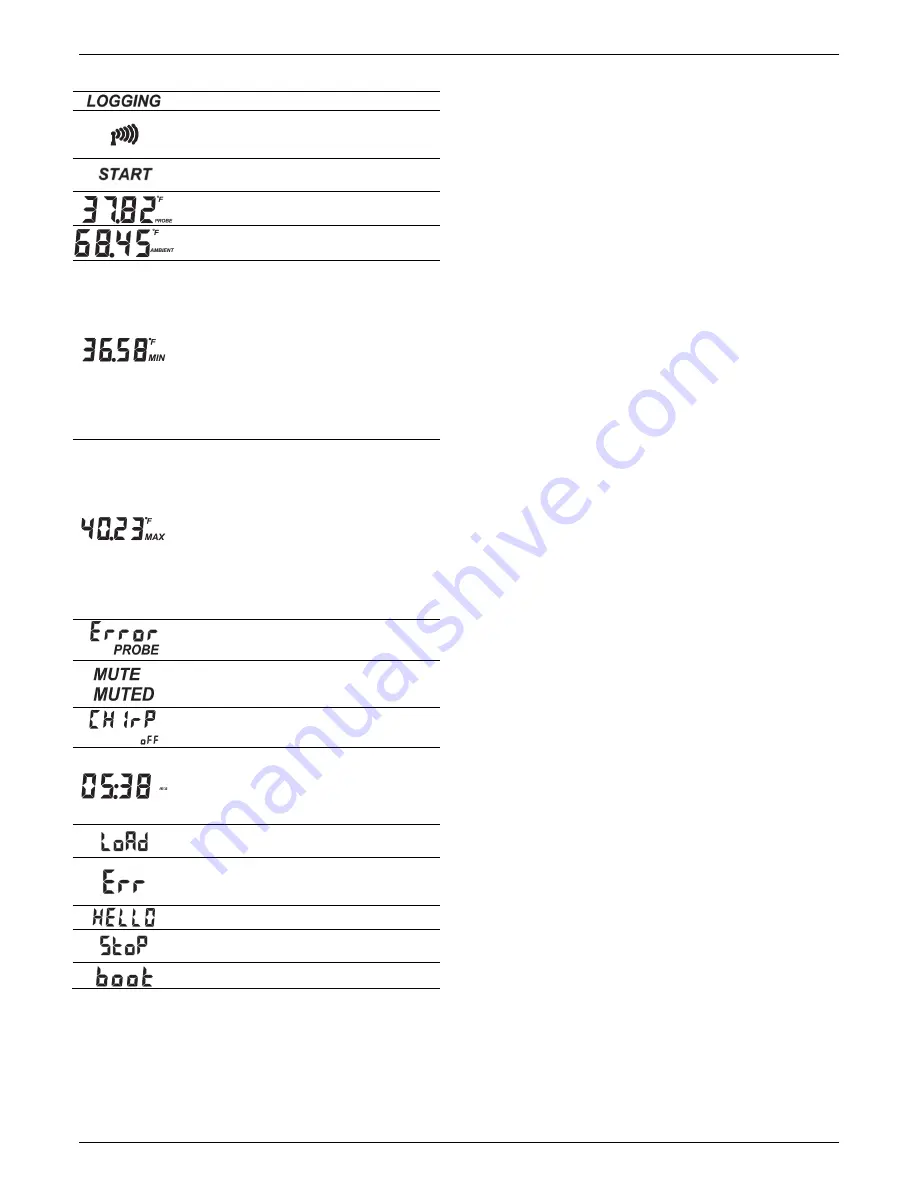
LCD Symbol
Description
The logger is currently logging.
The logger is currently connected to a phone or
tablet via BlueTooth. The more bars there are, the
stronger the signal.
The logger is waiting to be started. Press and hold
the Start button for 3 seconds to start the logger.
This is an example of a temperature reading from
an external probe.
This is an example of a temperature reading from
the internal sensor.
This is an example of a minimum temperature,
which is the lowest probe temperature reading
from the day (CX402 models) or the lowest
ambient temperature reading (CX403 model)
within the current 24-hour period (midnight from
one day to midnight the next day) if the logger
was set to record logger checks (see
Performing
Logger Checks
). Otherwise the minimum and
maximum readings represent the entire logging
period and only reset when the logger is
downloaded and restarted or stopped and
reconfigured.
This is an example of a maximum temperature,
which is the highest probe temperature reading
from the day (CX402 models) or the lowest
ambient temperature reading (CX403 model)
within the current 24-hour period (midnight from
one day to midnight the next day) if the logger
was set to record logger checks (see
Performing
Logger Checks
). Otherwise the minimum and
maximum readings represent the entire logging
period and only reset when the logger is
downloaded and restarted or stopped and
reconfigured.
and
The external probe is not connected to the logger
(if applicable).
or
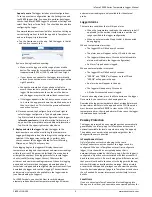
MUTE indicates an alarm is beeping. Turn off the
beeping alarm by pressing the Mute button. The
LCD then changes to MUTED.
The audible alarm has been muted.
The logger has been configured to start logging on
a delay. The display will count down in days,
hours, minutes, and seconds until logging begins.
In this example, 5 minutes and 38 seconds remain
until logging will begin.
The configuration settings are being loaded onto
the logger from the app.
An error occurred while loading the configuration
settings onto the logger from the app. Try
reconfiguring the logger.
The logger was paged from the app.
The logger has been downloaded and stopped
with the app or because the memory is full.
The logger is being updated with new firmware.
Note:
If the logger has stopped logging because the memory is
full, the LCD screen will remain on with “STOP” displayed until
the logger is downloaded to your mobile device. Once the
logger has been downloaded, the LCD will turn off
automatically after 2 hours. The LCD will turn back on the next
time the logger connects with your device.
Getting Started
InTempConnect is web-based software where you can monitor
CX400 series logger deployments and view downloaded data
online. Using the InTemp app, you can configure the logger
with your phone or tablet and then download reports, which
are saved in the app and automatically uploaded to
InTempConnect. The CX5000 Gateway is also available to
automatically download loggers and upload data to
InTempConnect (see www.intempconnect.com/help for
details). You also have the option to use the logger with the
InTemp app only.
Follow these steps to begin using the loggers with
InTempConnect and the InTemp app.
1.
Administrators:
Set up an InTempConnect account
. Follow
all steps if you are a new administrator. If you already have
an account and roles assigned, follow steps c and d.
If you are using the logger with the InTemp app only, skip
to step 2.
a.
Go to www.intempconnect.com and follow the prompts
to set up an administrator account. You’ll receive an
email to activate the account.
b.
Log into www.intempconnect.com and add roles for the
users you will be adding to the account. Click Settings
and then the Roles tab. Click Add Role, enter a
description, select the privileges for the role and click
Save.
c.
Click the Users tab to add users to your account. Click
Add and enter the email address and first and last name
of the user. Select the roles for the user and click Save.
d.
New users will receive an email to activate their user
accounts.
2.
Set up the logger.
Insert two AAA batteries in the logger,
observing polarity. Insert the battery door in the back of the
logger making sure it is flush with the rest of the logger
case. Use the included screw and a Phillips-head
screwdriver to screw the battery door into place.
Insert the external temperature probe (if applicable).
3.
Download the InTemp app and log in.
a.
Download InTemp to a phone or tablet from the App
Store® or Google Play™.
b.
Open the app and enable Bluetooth in the device settings
if prompted.
c.
InTempConnect users:
Log in with your InTempConnect
user credentials. (Your device must be able to connect to
the internet.)
App only users:
If you will not be using InTempConnect,
create a local user account and log in when prompted.
4.
Configure the logger
.
InTempConnect users:
Configuring the logger requires
privileges. The logger includes preset configurations.
Administrators or those with the required privileges can
also set up custom configurations (including setting up daily
logger checks) and trip information fields. This should be
done before configuring the logger.


