background image


16


Serial Communication Control


In  default  working  mode,  the  camera  is  able  to  connect  to  a  VISCA  controller  with  RS232C  serial 

interface.   


RS232 Communication Control: 

The camera can be controlled via RS232, the parameters of RS232C are as follows: 

Baud rate: 2400/4800/9600 bit/s. 

Start bit: 1 bit. 

Data bit: 8 bits. 

Stop bit: 1bit. 

Parity bit: none. 


RS485 Communication Control: 

The camera can be controlled via RS485,Half-duplex mode: 

Baud rate: 2400/4800/9600 bit/s. 

Start bit: 1 bit. 

Data bit: 8 bits. 

Stop bit: 1bit. 

Parity bit: none. 

Pan-Tilt will rotate to the maximum position of top right after the camera started, then it return to the 

center, the process of initialization is finished. (Note: If the position preset 0 has been stored, the position 

preset 0 will be called up after initialization) Then the users can control the camera with commands in the 

command list. 


Command List 

Ignore


Note: 

The  camera  serial  standard  VISCA/Pelco-D/Pelco-P,  if  the  need  for  the  secondary  development, 

According to standard protocol to control the camera. If you need VISCA/Pelco - D/Pelco - P protocol 

command list in detail, please contact the manufacturer. 

Содержание IT-VCHD710KIT

Страница 1: ...IT VCHD710KIT USB2 0 HD Video Conference Camera Kit User Manual V1 1 English ...

Страница 2: ...zed engineer Never operating under unspecified temperature humidity and power supply Please use the soft dry cloth to clean the camera If the camera is very dirty clean it with diluted neuter detergent do not use any type of solvents which may damages the surface Note This is class A product Electromagnetic radiation at the specific frequency may affect the image quality of TV in home environment ...

Страница 3: ... 6 Product Specification 7 Main Unit 9 Size 10 IR Remote Controller Explanation 11 RS 232 Interface 14 VISCA Network Configuration 15 Serial Communication Control 16 Command List 16 Menu Setting 17 VC200 U User Manual 23 USB2 0 24 Maintenance and Troubleshooting 25 ...

Страница 4: ...so may result in mechanical damage Don t apply in corrosive liquid gas or solid environment to avoid damaging the cover which is made up of plastic material To make sure no obstacle in rotation range Never power on before installation is not completed 2 Don t dismantle the camera We are not responsible for any unauthorized modification or dismantling CAUTION The specific frequency of electromagnet...

Страница 5: ...e driver according to the equipment Step3 Use the USB connect the camera with the USB hub Connection for the first time PC will automatically install the driver according to the equipment Use of relevant software such as AMCAP to view the camera image If you cannot view images please pull plug USB confirm USB is properly connected whether the driver installed correctly If invalid please see the sp...

Страница 6: ...l by minimizing sound refection s reverb and distracting with the advanced acoustic engineering reduces echo Audio artifacts 1080P Full HD Apply Panasonic s 1 2 7 inch 2 07 million effective pixels high quality HD CMOS sensor can reach maximum 1920 x 1080 high resolution and achieve quality image Ultra high Frame Rate The output frame rate up to 60fps in 1080P 72 5 Wide angle Lens 16x Digital Zoom...

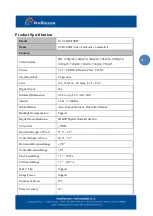
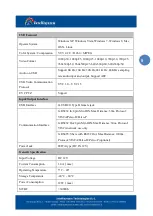
Страница 7: ...F2 8 Digital Zoom 16x Minimal Illumination 0 5 Lux F1 8 AGC ON Shutter 1 30s 1 10000s White Balance Auto Indoor Outdoor One Push Manual Backlight Compensation Support Digital Noise Reduction 2D 3D Digital Noise Reduction Video S N 55dB Horizontal Angle of View 72 5 6 9 Vertical Angle of View 44 8 3 9 Horizontal Rotation Range 170 Vertical Rotation Range 25 Pan Speed Range 1 7 100 s Tilt Speed Rang...

Страница 8: ...nication Protocol UVC 1 0 UVC 1 5 UVC PTZ Support Input Output Interface USB Interface 2xUSB2 0 Type B female jack Communication Interface 1xRS232 In 8pin Min DIN Max Distance 30m Protocol VISCA Pelco D Pelco P 1xRS232 Out 8pin Min DIN Max Distance 30m Protocol VISCA network use only 1xRS485 Share with RS232 Out Max Distance 1200m Protocol VISCA Pelco D Pelco P optional Power Jack JEITA type DC IN...

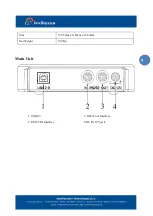
Страница 9: ...9 Size 128 5mm x 118mm x 156 2mm Net Weight 0 91Kg Main Unit 1 USB2 0 3 RS232 out Interface 2 RS232 IN Interface 4 DC IN 12V jack ...

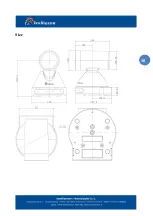
Страница 10: ...10 Size ...

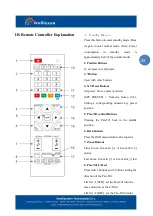
Страница 11: ...ore a preset position SET PRESET Numeric button 0 9 Setting a corresponding numeric key preset position 5 Pan Tilt control Buttons Pressing the Pan Tilt back to the middle position 6 Back buttons Press the OSD menu return to the superior 7 Zoom Buttons Slow Zoom Zoom In or Zoom Out slowly Fast Zoom Zoom In or Zoom Out fast 8 Pan Tilt L R set Press with 1 buttons and 2 buttons setting the direction...

Страница 12: ... Press this button to enable the backlight compensation Press it again to disable the backlight compensation NOTE Effective only in auto exposure mode Note If a light behind the subject the subject will become dark In this case press the backlight ON OFF button To cancel this function press the backlight ON OFF button 17 Pan Tilt reset Preset Pan Tilt self test 18 Image freezing function Manually ...

Страница 13: ...13 3 OSD menu default Chinese 5 Save OSD 6 Quickly recover the default 8 Look the camera version 9 Quickly set up inversion ...

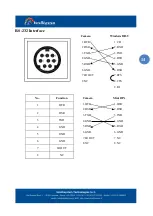
Страница 14: ...2 RXD 3 TXD 3 TXD 4 GND 4 DTR 5 RXD 5 GND 6 GND 6 DSR 7 IR OUT 7 RTS 8 NC 8 CTS 9 RI Camera Mini DIN 1 DTR 1 DTR 2 DSR 2 DSR 3 TXD 3 TXD 4 GND 4 GND 5 RXD 5 RXD 6 GND 6 GND 7 IR OUT 7 NC 8 NC 8 NC No Function 1 DTR 2 DSR 3 TXD 4 GND 5 RXD 6 GND 7 IR OUT 8 NC ...

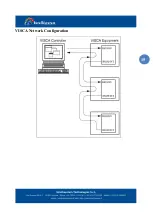
Страница 15: ...15 VISCA Network Configuration ...

Страница 16: ...t bit 1 bit Data bit 8 bits Stop bit 1bit Parity bit none Pan Tilt will rotate to the maximum position of top right after the camera started then it return to the center the process of initialization is finished Note If the position preset 0 has been stored the position preset 0 will be called up after initialization Then the users can control the camera with commands in the command list Command L...

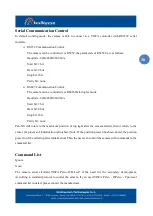
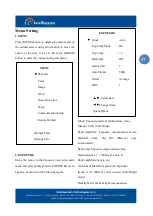
Страница 17: ...anual SAE AAE Bright ExpCompMode Exposure compensation mode Optional items On Off Effective only inAutomode ExpComp Exposure compensation value Optional items 7 7 Effective only in ExpCompMode item to on Gain Limit Maximum gain limit Optional Items 0 15 Effective only in Auto AAE Bright mode Backlight Set the backlight compensation MENU Exposure Color Image P T Z Noise Reduction Setup Communicatio...

Страница 18: ... 1 10000 Effective only in Manual SAE mode 3 COLOR Move the cursor to the Color item in the main menu and press home button COLOR menu appears as shown in the following figure WB Mode White balance mode Optional Items Auto Indoor Outdoor One push Manual RG Red gain Optional items 0 255 Effective only in Manual mode BG Blue gain Optional items 0 255 Effective only in Manual mode RG Tuning Red gain ...

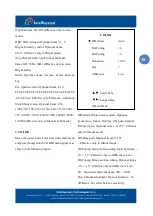
Страница 19: ...items 0 14 Sharpness Sharpness adjustment Optional Items Auto 0 15 Flip H Image flipped horizontally Optional Items On Off Flip V Image Flip Vertical Optional items On Off B W Mode Image color Optional items On Off Gamma Optional items Default 0 45 0 5 0 56 0 63 Style Optional items Norm Clarity Bright Soft 5Q Q Style IMAGE Luminance 6 Contrast 8 Sharpness 4 Flip H Off Flip V Off B W Mode Off Gamm...

Страница 20: ...ss home button NOISE REDUCTION menu appears as shown in the following figure NR2D Level 2D noise reduction Optional Items Off Auto 1 5 NR3D Level 3D noise reduction Optional Items Off 1 8 D HotPixel Dynamic bad points Optional Items Off 1 5 7 SETUP Move the cursor to the Setup item in the main menu and press home button SETUP menu appears as shown in the following figure P T Z SpeedByZoom On AF Zo...

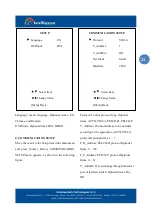
Страница 21: ... VISCA PELCO D PELCO P V_Address Protocol address to be decided according to the agreement AUTO VISCA protocol Optional items 1 7 P_D_Address PELCO D protocol Optional Items 0 254 P_P_Address PELCO P protocol Optional Items 0 31 V_AddrFix If I can change through the serial port of infrared switch Optional items On Off SETUP Language EN DVIMode DVI Select Item Change Value Menu Back COMMUNICATION S...

Страница 22: ... the cursor to the Restore Default item in the main menu and press home button RESTORE DEFAULT menu appears as shown in the following figure Restore Confirm restore factory settings Optional items Yes No Note Press HOME button to confirm all Parameter restore default Include IR Remote address and VISICAAddress Save Save Options Optional items Yes No RESTORE DEFAULT Restore No Change Value Home OK ...

Страница 23: ...function then you can network with each other 2 Volume Up Down control In the process of conference call can adjust the speaker volume through the volume switch 3 Mute In the process of conference call mute the volume on the local Please press the mute button and the quiet light is lit up Press the mute key again the local stop mute the quiet light is put out ...

Страница 24: ...etc Linux V412 software driver and VLC media player etc Mac OS Face Time IChat Photo Booth and Debut Video Capture etc Notice Recommend making AMCAP version 8 0 in Windows which software performance is more relatively stable When using high version of AMCAP in low configuration system it will make the stream rendering slow NOTE When camera first time accessed by USB cable automatically install UVC...

Страница 25: ...t light sources etc No operating in unstable lighting conditions otherwise image will be flickering No operating close to powerful electromagnetic radiation such as TV or radio transmitters etc Troubleshooting Image No image 1 Check whether the power cord is connected voltage is OK POWER lamp is light 2 Check whether the camera can self test after startup 3 Check the BOTTOM switch and make sure th...

Страница 26: ... the camera 1 Change the battery 2 Check the camera working mode 3 Check IR address of the Remote Commander is set correctly Serial communication cannot control the camera 1 Check the camera working mode 2 Check control cable is connected correctly ...

Отзывы: