background image

Diese Kurzanleitung zeigt die grundlegenden Installationsschritte. 
Details zur Anwendung sowie die Spezifikationen finden Sie im 
Benutzerhandbuch auf der beiliegenden CD und auf 

intellinetnetwork.com

.

HARDWARE-INSTALLATION
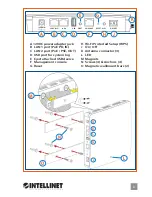
Auf Seite 2 finden Sie erklärendes Bildmaterial.
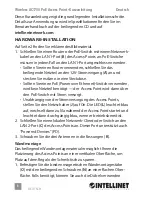
1.   Schließen Sie einen Router oder PoE-Switch mit einem Netzwerk- 
    kabel an den LAN 1-Port (

B

) des Access Points an. PoE-Switche  

    müssen in jedem Fall an den LAN 1-Port angeschlossen werden.
    •  Sollten Sie einen Router verwenden, schließen Sie das  
      beiliegende Netzteil an den 12V-Stromeingang (

A

) an und  

      stecken Sie es dann in eine Steckdose.
    •  Sollten Sie einen PoE (Power over Ethernet)-Switch verwenden,  
      wird kein Netzteil benötigt — der  Access Point wird dann über  
      den PoE-Switch mit Strom versorgt.
    •  Unabhängig von der Stromversorgung des Access Points,  
      stellen Sie den Netzschalter (

J

) auf On. Die LED (

L

) leuchtet blau 

      auf, wechselt dann zu lila während der Access Point startet und 
      leuchtet dann durchgängig blau, wenn er betriebsbereit ist.
2.   Schließen Sie einen lokalen Netzwerk-Client oder Switch an den  
    LAN 2-Port (

C

) des Access Points an. Dieser Port unterstützt auch  

    “Powered Devices” (PD). 
3.  Schrauben Sie die drei Antennen in die Fassungen (

K

).

Wandmontage

Das beiliegende Wandmontagematerial ermöglicht Ihnen die  
Platzierung des Access Points an einer vertikalen Oberfläche, um 
Platz auf dem Regal oder Schreibtisch zu sparen. 
1.  Befestigen Sie die beiden magnetischen Wandmontagestäbe  
  (

O

) mit den beiliegenden Schrauben (

N

) an einer flachen Ober-

    fläche. Falls benötigt, können Sie auch die Dübel verwenden. 

6

 DEUTSCH

Wireless AC1750 PoE Access Point • Kurzanleitung 

Deutsch

Содержание 525787

Страница 1: ...HIGH POWER WIRELESS AC1750 DUAL BAND GIGABIT PoE ACCESS POINT QUICK INSTALL GUIDE MODEL 525787 INT 525787 QIG ML1 0515 01 intellinetnetwork com ...

Страница 2: ......

Страница 3: ...r system log E Eject attached USB device F Management console G Reset H Wi Fi Protected Setup WPS J On Off K Antenna connector 3 L LED M Magnets N Screws 4 Anchors 4 O Magnetic wallmount bars 2 A B C D E F G J H 12VDC IN LAN 1 PoE LAN 2 USB EJECT CONSOLE RESET WPS ON OFF M A K G L B J O N C ...

Страница 4: ...ver Ethernet switch then it is not necessary to use the power adapter the access point will be powered by the PoE switch Regardless of what powers the access point set the On Off switch J to On The LED L lights blue then purple while the access point starts up then lights blue again when ready for operation 2 Connect a local network client or switch to the access point s LAN 2 port C which can sup...

Страница 5: ...Installation above and the LED on the access point is blue 2 Set your computer s IP address to 192 168 2 x where x is a number in the range 3 100 Ensure there are no other active network connections on your computer disconnect Wi Fi connections and Ethernet cables 3 Enter the access point s default IP address 192 168 2 1 into the URL bar of a Web browser 4 When you re prompted for a username and p...

Страница 6: ... wird dann über den PoE Switch mit Strom versorgt Unabhängig von der Stromversorgung des Access Points stellen Sie den Netzschalter J auf On Die LED L leuchtet blau auf wechselt dann zu lila während der Access Point startet und leuchtet dann durchgängig blau wenn er betriebsbereit ist 2 Schließen Sie einen lokalen Netzwerk Client oder Switch an den LAN 2 Port C des Access Points an Dieser Port unt...

Страница 7: ...ten Sie darauf dass alleVerbindungen sicher hergestellt sind siehe oben stehende Hardware Installation und die LED des Access Points blau leuchtet 2 Setzen Sie die IP Adresse Ihres PCs auf 192 168 2 x wobei das x einer Zahl zwischen 3 und 100 entspricht Achten Sie darauf dass keine anderen Netzwerkverbindungen an Ihrem PC aktiv sind trennen SieWLAN Verbindungen und Netzwerkkabel 3 Geben Sie die St...

Страница 8: ...ch Power over Ethernet PoE no es necesario conectar el adaptador de corriente El Access Point se energizara por el Switch PoE Independientemente del dispositivo que alimente al Access Point coloque el botón de encendido J en On El LED L se encenderá en azul posteriormente cambiara a púrpura mientras se restablece a continuación se encenderá en azul nuevamente indicando que está listo 2 Conecte la ...

Страница 9: ...as ver Instalación de Hardware en la parte de arriba el LED del Access Point deberá estar en color azul 2 Establezca una dirección IP en su ordenador 192 168 2 X donde X es un número en el rango de 3 100 Asegúrese de que no hay otras conexiones de red en su ordenador desconecte elWi Fi o algún cable Ethernet 3 Introduzca la dirección IP por defecto del Access Point 192 168 2 1 en un navegadorWeb e...

Страница 10: ...limenté par le commutateur Quelle que soit la source d alimentation du point d accès réglez le commutateur Marche Arrêt J sur Marche Le voyant DEL L s allume en bleu puis en violet lorsque le point d accès démarre puis redevient bleu lorsque le point d accès est prêt à fonctionner 2 Connectez un commutateur ou un client réseau local au port LAN 2 C du point d accès qui peut prendre en charge les d...

Страница 11: ...ont fiables reportez vous à Installation du matériel ci dessus et que le voyant DEL du point d accès est bleu 2 Définissez l adresse IP de votre ordinateur sur 192 168 2 x où x est un nombre compris entre 3 et 100 Assurez vous qu aucune autre connexion réseau n est active sur votre ordinateur désactivez les connexionsWi Fi et débranchez les câbles Ethernet 3 Entrez l adresse IP par défaut du point...

Страница 12: ...łącznika PoE Power over Ethernet nie ma potrzeby podłączania zasilacza Access Point zostanie zasilony przez przełącznik PoE Niezależnie jakiego źródła zasilania używa Access Point ustaw przełącznik ON OFF J w pozycji ON Dioda L zaświeci się na niebiesko następnie na fioletowo podczas uruchamiania urządzenia i znów na niebiesko sygnalizując gotowość do pracy 2 Podłącz użytkownika sieci LAN lub prze...

Страница 13: ...pali się niebieska dioda KONFIGURACJA POCZĄTKOWA 1 Upewnij się że wszystko zostało prawidłowo podłączone patrz powyżej Instalacja Sprzętowa oraz że dioda świeci na niebiesko 2 Ustaw adres IP karty sieciowej komputera na 192 168 2 x gdzie x jest cyfrą z zakresu 3 100 Upewnij się że komputer nie ma innego aktywnego połączenia sieciowego wyłączWi Fi odłącz kabel sieciowy 3 Wpisz domyślny adres IP Acc...

Страница 14: ...indi l alimentatore alla presa di corrente Se si utilizza uno switch PoE Power over Ethernet allora non è necessario utilizzare l alimentatore il punto di accesso sarà alimentato dallo switch PoE Indipendentemente dal tipo di alimentazione del punto di accesso impostare l interruttore J su ON Il LED L diventerà prima blu e poi viola durante l avvio del punto di accesso quando ritornerà nuovamente ...

Страница 15: ...colore blu IMPOSTAZIONI INIZIALI 1 Assicurarsi che tutti i collegamenti siano sicuri vedi Installazione sopra e il LED del punto di accesso sia blu 2 Impostare come indirizzo IP del computer 192 168 2 x dove x è un numero compreso tra 3 100 Assicurarsi che non vi siano altre connessioni di rete attive sul computer scollegare le connessioni Wi Fi e i cavi Ethernet 3 Inserire l indirizzo IP di defau...

Страница 16: ...L Estesímboloenelproductoosuembalajeindicaqueelproductonodebetratarsecomoresiduodoméstico De conformidad con la Directiva 2012 19 UE de la UE sobre residuos de aparatos eléctricos y electrónicos RAEE esteproductoeléctriconopuededesecharseconelrestoderesiduosnoclasificados Deshágasede esteproductodevolviéndoloasupuntodeventaoaunpuntoderecolecciónmunicipalparasureciclaje FRANÇAIS Ce symbole sur Ie p...

Страница 17: ...ualesquiera que hayan sido adicionados al mismoporelusuarioodistribuidor Para hacer efectiva esta garantía bastará con presentar el producto al distribuidor en el domicilio donde fue adquirido oeneldomiciliodeICIntracomMéxico S A P I deC V juntoconlosaccesoriosconteni dos en su empaque acompañado de su póliza debidamente llenada y sellada por la casa vendedora indispensable el sello y fecha de com...

Страница 18: ...e equipment to an outlet on a circuit different from the receiver Consult the dealer or an experienced radio TV technician for help CE RE EMC LVD English This device complies with the requirements of directives 2014 53 EU and or 2004 108 EC 2006 95 EC The Declaration of Conformity for this product is available at Deutsch Dieses Gerät enspricht den Direktiven 2014 53 EU und oder 2004 108 EC 2006 95...

Страница 19: ......

Страница 20: ... IC Intracom All rights reserved Intellinet is a trademark of IC Intracom registered in the U S and other countries ...

Отзывы: