Intel NUC6i3SYH Скачать руководство пользователя страница 4

Intel NUC Kit NUC6i3SYH & NUC6i5SYH User Guide 


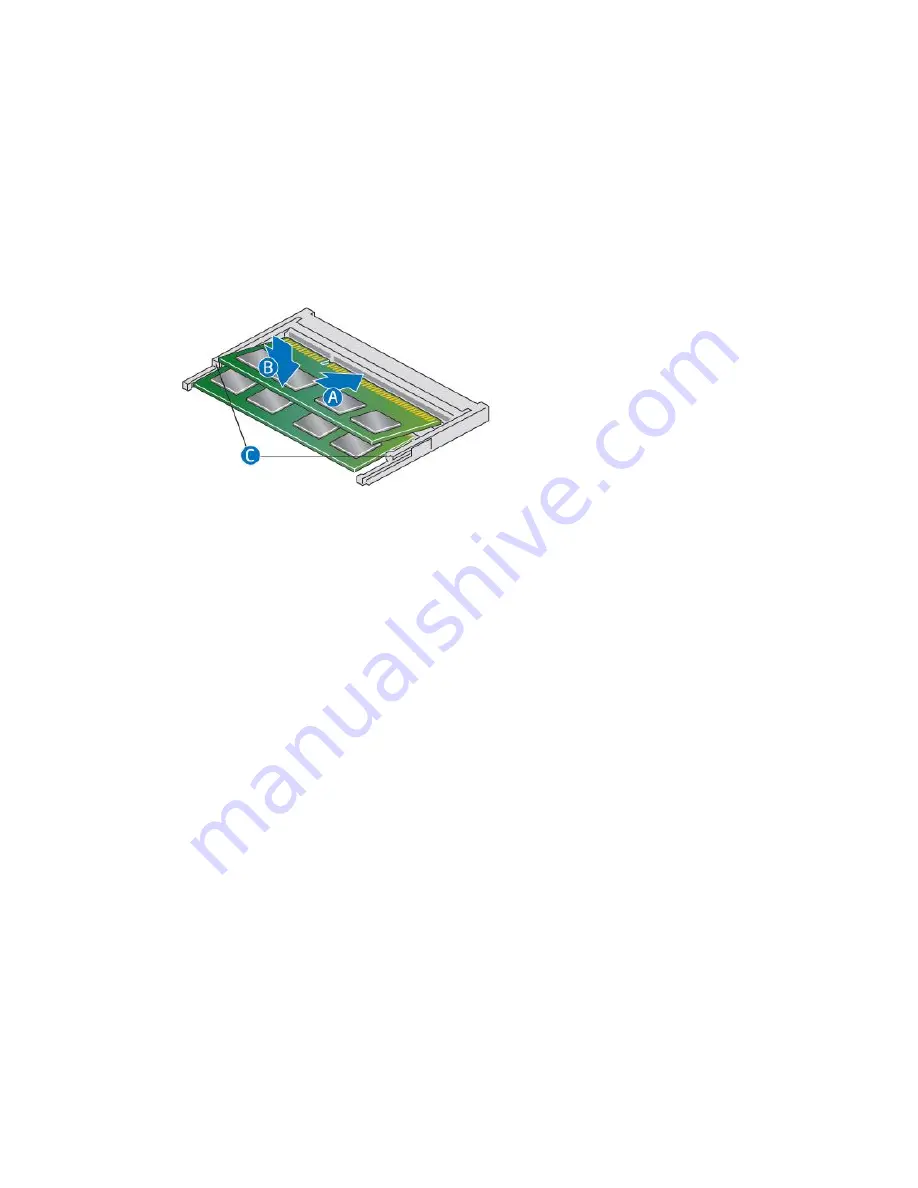
Install SO-DIMMs


If you plan to install just one SO-DIMM, install it in the lower memory socket. 

 
To install the SO-DIMMs, follow these steps: 

1.


Observe the precautions in "Before You Begin" on page 2. 

 
2.


Turn off all peripheral devices connected to the computer.  Turn off the computer and 
disconnect the AC power cord. 


3.


Align the small notch at the bottom edge of the SO-DIMM with the key in the socket. 

4.


Insert the bottom edge of the SO-DIMM into the socket. 

5.


When the SO-DIMM is inserted, push down on the outer edge of the SO-DIMM until the 
retaining clips snap into place.  Make sure the clips are firmly in place. 


Removing SO-DIMMs


To remove a SO-DIMM, follow these steps: 

1.


Observe the precautions in "Before You Begin" on page 2. 

2.


Turn off all peripheral devices connected to the computer.  Turn off the computer. 

3.


Remove the AC power cord from the computer. 

4.


Remove the 

computer’s cover.


5.


Gently spread the retaining clips at each end of the SO-DIMM socket.  The SO-DIMM pops out of 
the socket. 

 
6.


Hold the SO-DIMM by the edges, lift it away from the socket, and store it in an anti-static 
package. 

7.


Reinstall and reconnect any parts you removed or disconnected to reach the SO-DIMM sockets. 

8.


Replace the computer’s cover and

 reconnect the AC power cord. 


Содержание NUC6i3SYH

Страница 1: ...Intel NUC Kit NUC6i3SYH NUC6i5SYH User Guide 1 Intel NUC Kit NUC6i3SYH Intel NUC Kit NUC6i5SYH User Guide...

Страница 2: ...del serial numbers installed options and configuration information Electrostatic discharge ESD can damage components Perform the procedures described in this chapter only at an ESD workstation using a...

Страница 3: ...rivers and software Open the Intel NUC Chassis To open the Intel NUC chassis follow these steps 1 Unscrew the four corner screws on the bottom cover of the chassis and lift the cover Installing and Re...

Страница 4: ...he outer edge of the SO DIMM until the retaining clips snap into place Make sure the clips are firmly in place Removing SO DIMMs To remove a SO DIMM follow these steps 1 Observe the precautions in Bef...

Страница 5: ...ttom edge of the M 2 card with the key in the connector 3 Insert the bottom edge of the M 2 card into the connector B 4 Secure the card to the standoff with the small silver screw C If you are install...

Страница 6: ...5 hard drives go to the Intel Product Compatibility Tool NUC6i5SYH NUC6i3SYH Follow these instructions to install a 2 5 Solid State Drive SSD or Hard Disk Drive HDD 1 Slide the 2 5 drive into the dri...

Страница 7: ...l silver screws that were included in the box B Set the drive bay bracket down inside the chassis C Close the Chassis After all components have been installed close the Intel NUC chassis Intel recomme...

Страница 8: ...ions to attach and use the VESA mount bracket 1 Using the four small black screws that were included in the box attach the VESA bracket to the back of the monitor or TV 2 Attach the two slightly large...

Страница 9: ...ncluded in the Intel NUC Kit box 1 Choose the attachment for your region SKU Product codes Attachments in the box NUC6i5SYH NUC6i5SYHR NUC6i3SYH NUC6i3SYHR US United States UK United Kingdom EU Europe...

Страница 10: ...onto the power plug locking it into place A 3 Connect AC power Install an Operating System Refer to Supported Operating Systems for a list of Intel validated Windows operating systems as well as vers...

Страница 11: ...out of date drivers Manually download drivers BIOS and software from Download Center o NUC6i3SYH o NUC6i5SYH The following device drivers and software are available Intel Chipset Device Software Inte...

Отзывы: