background image

Intel NUC Kit NUC5i7RYH User Guide 


3.


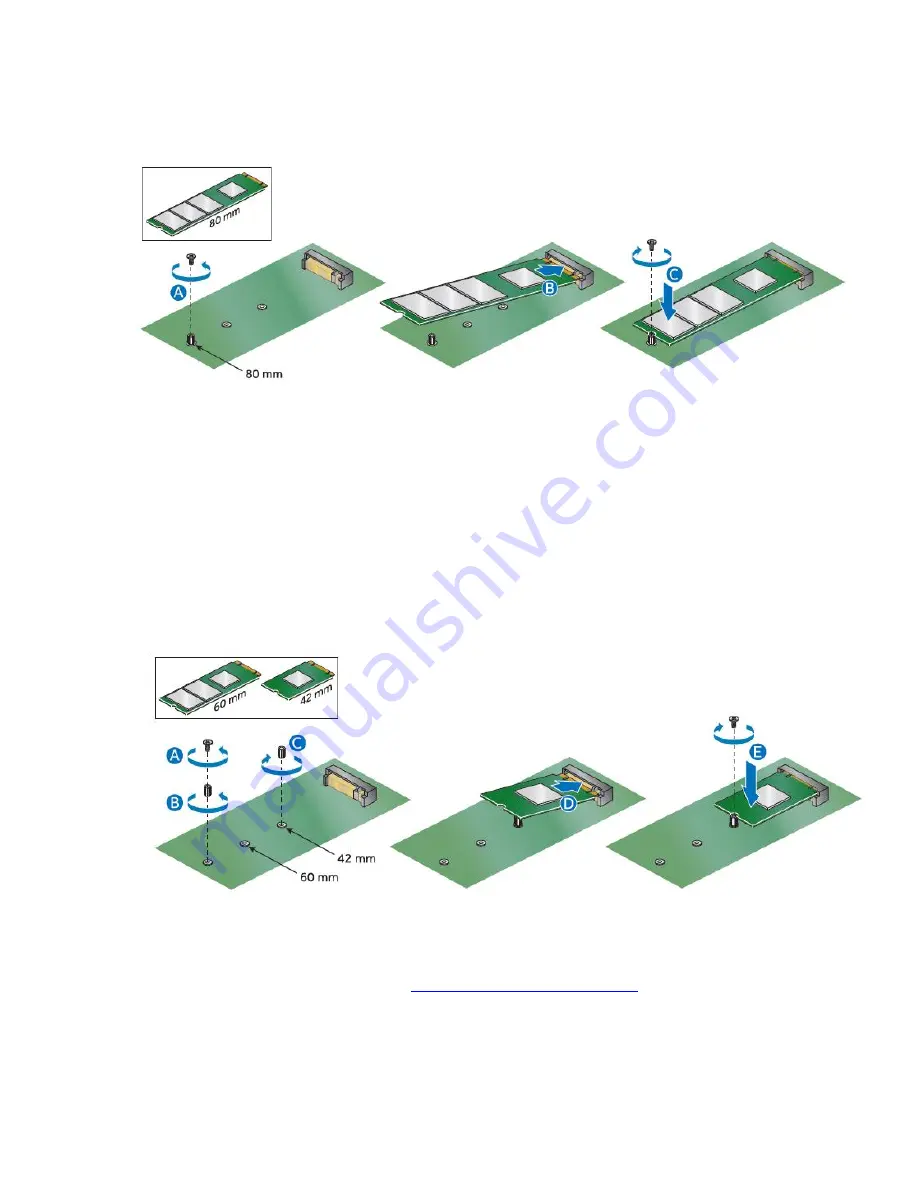
Insert the bottom edge of the M.2 card into the connector (B). 


4.


Secure the card to the standoff with the small silver screw (C). 


If you are installing a 60mm or 42mm M.2 SSD: 
 

1.


Remove the small silver screw from the metal standoff on the motherboard (A). 

 
2.


Move the standoff (B) from the 80mm position to either the 60mm or 42mm position (C). 


3.


Align the small notch at the bottom edge of the M.2 card with the key in the connector. 


4.


Insert the bottom edge of the M.2 card into the connector (D). 


5.


Secure the card to the standoff with the small silver screw (E). 


Install a 2.5” SSD or Hard Drive


For a list of tested 2.5” hard drives, 

go to the 

Intel® Product Compatibility Tool.


Follow these instructions to 

install a 2.5” Solid State Drive (SSD) or 

Hard Disk Drive (HDD): 

1.


Observe the precautions in "Before You Begin" on page 2. 


Содержание NUC5i7RYH

Страница 1: ...Intel NUC Kit NUC5i7RYH User Guide 1 Intel NUC Kit NUC5i7RYH User Guide...

Страница 2: ...erial numbers installed options and configuration information Electrostatic discharge ESD can damage components Perform the procedures described in this chapter only at an ESD workstation using an ant...

Страница 3: ...four corner screws on the bottom cover of the chassis and lift the cover Installing and Removing Memory The Intel NUC Kit NUC5i7RYH has two 204 pin DDR3L SO DIMM sockets Memory requirements 1 35V low...

Страница 4: ...ve the AC power cord from the computer 4 Remove the computer s cover 5 Gently spread the retaining clips at each end of the SO DIMM socket The SO DIMM pops out of the socket 6 Hold the SO DIMM by the...

Страница 5: ...m position to either the 60mm or 42mm position C 3 Align the small notch at the bottom edge of the M 2 card with the key in the connector 4 Insert the bottom edge of the M 2 card into the connector D...

Страница 6: ...TA connectors are fully seated into the connectors of the SATA daughter card A 3 Secure the drive into the drive bay with the two small silver screws that were included in the box B 4 Set the drive ba...

Страница 7: ...mends this be done by hand with a screwdriver to avoid over tightening and possibly damaging the screws Attach and Use the VESA Bracket Optional Follow these instructions to attach and use the VESA mo...

Страница 8: ...the Intel NUC onto the VESA mount bracket Install an Operating System Refer to Supported Operating Systems for a list of Intel validated Windows operating systems as well as versions of Linux that hav...

Страница 9: ...drivers Manually download drivers BIOS and software from Download Center The following device drivers and software are available Intel Chipset Device Software Intel HD Graphics Intel Management Engin...

Отзывы: