background image

Intel NUC Kit D54250WYKH & D34010WYKH User Guide 

10 


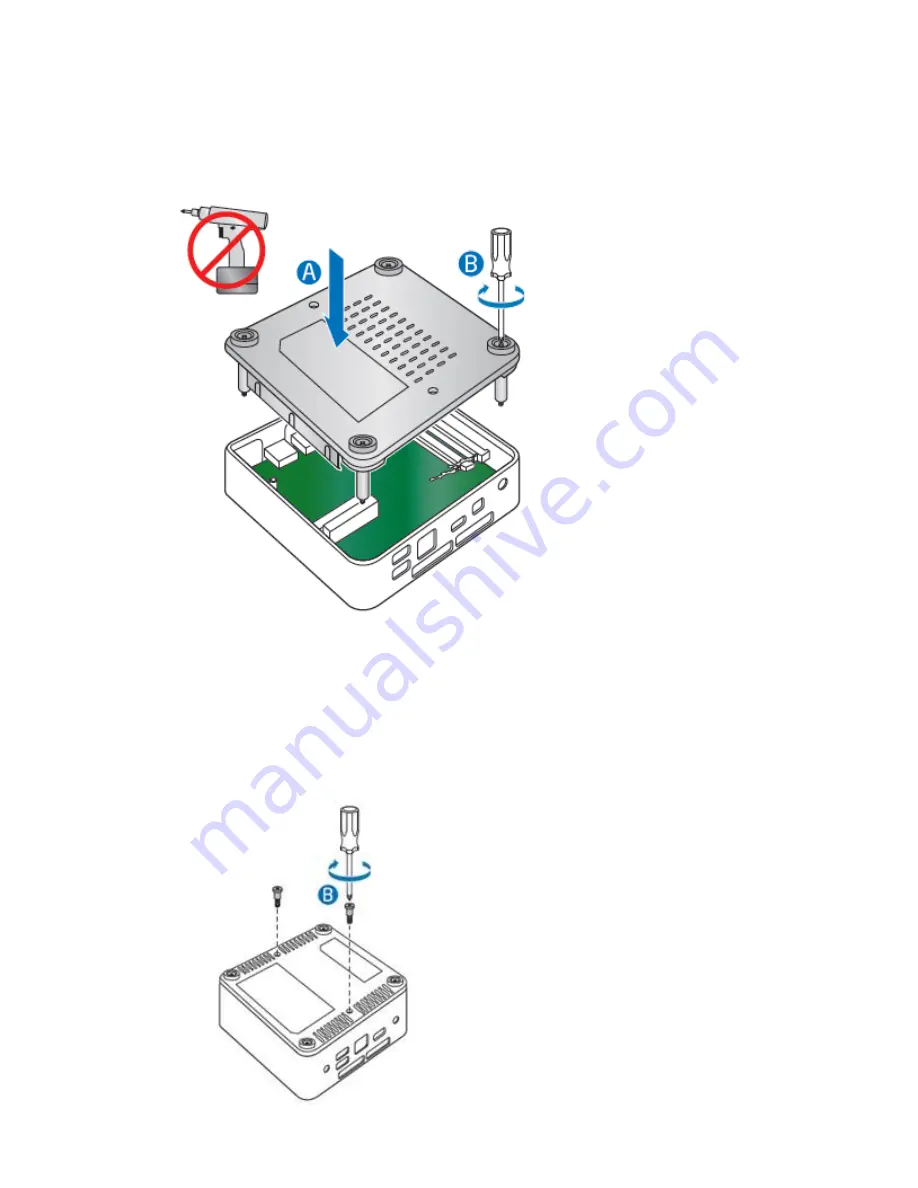
Close the Chassis


After all components have been installed, close the Intel NUC chassis. Intel recommends this be done by 
hand with a screwdriver to avoid over-tightening and possibly damaging the screws. 


Attach and Use the VESA Bracket (Optional) 


Follow these instructions to attach and use the VESA mount bracket: 
 

1.


Using the four small black screws that were included in the box, attach the VESA bracket to the 
back of the monitor or TV. 


Содержание NUC Kit D34010WYKH

Страница 1: ...Intel NUC Kit D54250WYKH D34010WYKH User Guide 1 Intel NUC Kit D54250WYKH Intel NUC Kit D34010WYKH User Guide...

Страница 2: ...odel serial numbers installed options and configuration information Electrostatic discharge ESD can damage components Perform the procedures described in this chapter only at an ESD workstation using...

Страница 3: ...all a wireless card Install an mSATA SSD Install a 2 5 drive Install a VESA mount bracket Install an operating system Install the latest drivers Open the Intel NUC Chassis To open the Intel NUC chassi...

Страница 4: ...3 MHz or 1600 MHz SO DIMMs Non ECC For a list of tested memory go to the System Memory page on the Support site System Memory for Intel NUC Kit D54250WYKH System Memory for Intel NUC Kit D34010WYKH In...

Страница 5: ...onnect the AC power cord Installing a Mini PCIe Wireless Adapter Only the following wireless adapters have been evaluated for regulatory compliance for use with the Intel NUC Kits D54250WYKH and D3401...

Страница 6: ...ve the precautions in Before You Begin on page 2 2 Remove the small silver screw from the metal standoff on the motherboard A 3 Align the small notch at the bottom edge of the wireless card with the k...

Страница 7: ...s D CAUTION Do not attempt to pull the plastic protectors off the ends of the antennas Doing so is likely to damage the metal leads of the antennas 8 Attach the antenna leads to the connectors on the...

Страница 8: ...connector 4 Insert the bottom edge of the mSATA card into the connector B 5 Secure the card to the standoff with the small silver screw C Install a 2 5 SSD or Hard Drive For a list of tested 2 5 hard...

Страница 9: ...the SATA connectors are fully seated into the connectors of the SATA daughter card A 3 Secure the drive into the drive bay with the two small silver screws that were included in the box B 4 Set the dr...

Страница 10: ...l recommends this be done by hand with a screwdriver to avoid over tightening and possibly damaging the screws Attach and Use the VESA Bracket Optional Follow these instructions to attach and use the...

Страница 11: ...Slide the Intel NUC onto the VESA mount bracket Install an Operating System Refer to Supported Operating Systems for a list of Intel validated Windows operating systems as well as versions of Linux t...

Страница 12: ...and BIOS updates go to Download Center Links Intel NUC Kit D54250WYKH Intel NUC Kit D34010WYKH Drivers are available for the following features Audio Chipset Consumer Infrared Graphics Intel ME Intel...

Отзывы:

Похожие инструкции для NUC Kit D34010WYKH