background image

39

EN

Before Activating the Connection to
CinemaNow / Blockbuster

After creating a CinemaNow / Blockbuster account, follow
the following procedure before activating the connection
to CinemaNow / Blockbuster.

1

Connect this unit to the Internet.

• Refer to “Network Connection with LAN” on page 20.

2

Set up the necessary network connection 
settings.

• Refer to “Network Connection” on pages 52-55.

Activating the Connection to
CinemaNow / Blockbuster

In order to watch movies and TV episodes streamed
instantly from CinemaNow / Blockbuster via the Internet,
you must activate the connection between this unit and
your CinemaNow / Blockbuster account.

1

On your PC, visit following website and log 
into your account to get the activation code.

• Follow the instruction given by the website.
• Take a note of the activation code which appears on 

the PC.

- For CinemaNow, visit 

www.cinemanow.com/activate

- For Blockbuster, visit 

www.blockbuster.com/Integra

g

//

2

On this unit, press [B] or [C] while 
opening screen is displayed.

• For opening screen, refer to page 12.
• Menu screen of CinemaNow or Blockbuster will appear.
• For the first time only, “Network Service Disclaimer” 

screen will appear. After confirming the content, use 

[

s

 / 

B

]

 to select “Agree”, then press 

[Enter]

.

3

Use [

s

 / 

B

] to select “Settings” 

(CinemaNow) or “Configure” 
(Blockbuster), then press [Enter].

• For CinemaNow, select “Activate” and press 

[Enter]

again in the next screen.

• Activation code input screen will appear.

Activate

Activate this device on your BLOCKBUSTER account.

To get started, please visit www.blockbuster.com/activate/

Use the numbers on your remote control.

e.g.) Blockbuster

4

Enter the activation code displayed on your PC 
using [

s

B

] and [the Number buttons], then 

select “Activate” and press [Enter].

• For CinemaNow, confirmation message will appear. 

Press 

[Enter]

to complete the setting.

Note

• The image of menu screen may change after 

updating the firmware.

•  You cannot create CinemaNow / Blockbuster  account 

on this unit.

•  To deactivate the connection to CinemaNow or

Blockbuster, select “Deactivate” in “Settings” 
(CinemaNow) or “Configure” (Blockbuster).

• For questions regarding CinemaNow service, visit 

www.cinemanow.com/support

pp

• For questions regarding Blockbuster service, visit

www.blockbuster.com/helpp

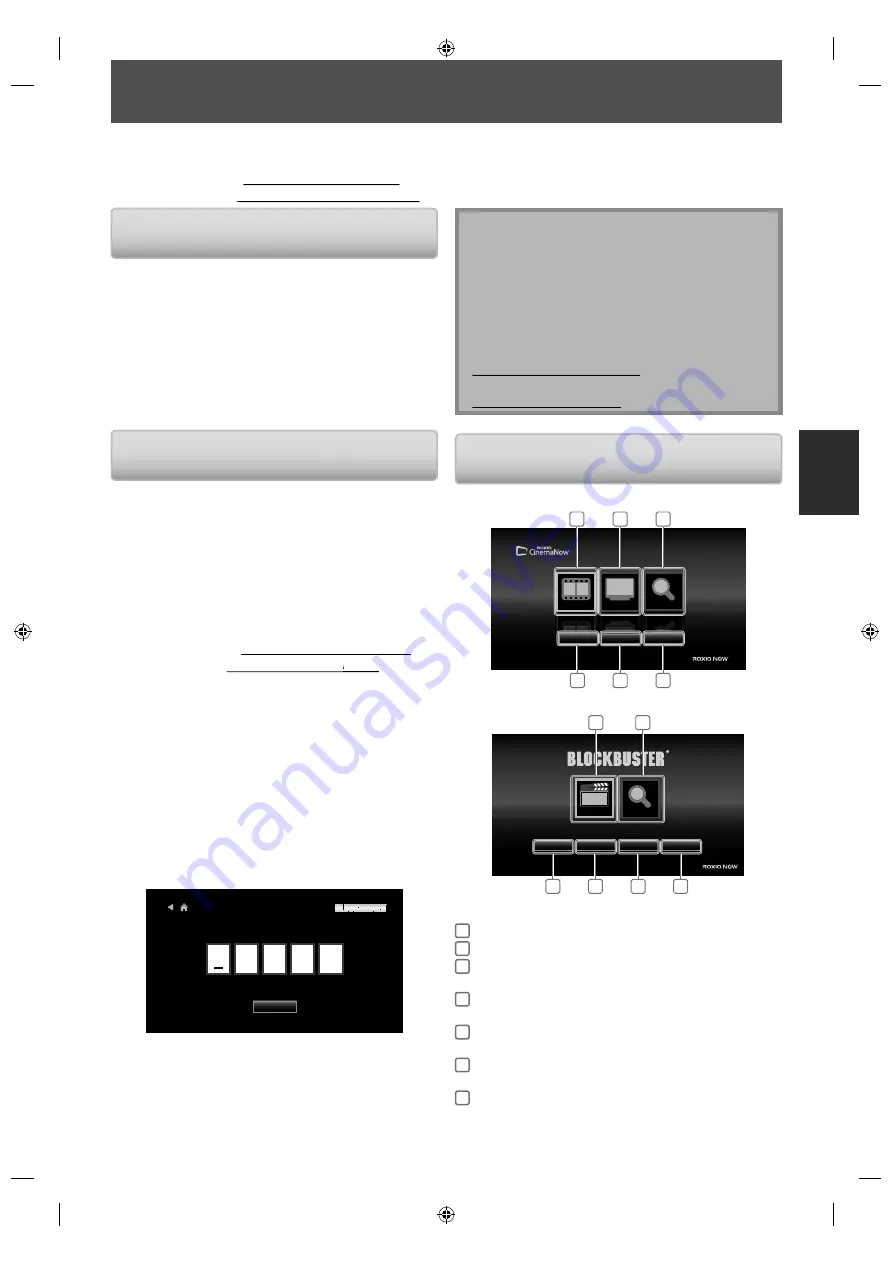
Guide to CinemaNow / Blockbuster 
Menu Screen

CinemaNow

Movies

TV Shows

Search All

Movies

TV Shows

Search All

Movies

TV Shows

Search All

My Videos

Wish List

Settings

POWERED BY

1

4

5

6

2

3

Blockbuster

Help

Configure

My Favorites

My Library

Browse

Search

1

4

5

6

7

3

POWERED BY

1

Movies / Browse : To access the movie list

2

TV Shows

: To access the TV show list

3

Search All / 
Search

: To access search screen

4

My Videos / 
My Library

: To access the list of rented or 

purchased  movies / TV  episodes

5

Wish List / 
My Favorites

: To  access  your wish list / favorite 

list

6

Settings / 
Configure 

: To access setting / configure menu

7

Help

: To access the help page

 CINEMANOW / BLOCKBUSTER OPERATIONS

With this unit, you can watch movies and TV episodes streamed instantly from CinemaNow / Blockbuster via the Internet.
In order to use this feature, you must visit the following website and create a CinemaNow / Blockbuster account.

- For CinemaNow, visit 

www.cinemanow.com/Login

g

- For Blockbuster, visit 

www.blockbuster.com/auth/login

g

E5SF0UD̲DBS50.2̲EN̲v2.indd   39

E5SF0UD̲DBS50.2̲EN̲v2.indd   39

2010/08/05   15:17:15

2010/08/05   15:17:15

Содержание DBS-50.2

Страница 1: ...DBS 50 2 E5SF0UD DBS50 2 EN v2 indd 1 E5SF0UD DBS50 2 EN v2 indd 1 2010 08 05 15 16 14 2010 08 05 15 16 14 ...

Страница 2: ...red by the operating instructions as an improper adjustment of other controls may result in damage and will often require extensive work by a qualified technician to restore the apparatus to its normal operation E If the apparatus has been dropped or damaged in any way and F When the apparatus exhibits a distinct change in performance this indicates a need for service 16 Object and Liquid Entry Ne...

Страница 3: ...ter prolonged use This is normal If you do not use this unit for a long time it may not work properly the next time you turn it on so be sure to use it occasionally When you ve finished using this unit remove all discs and turn off the power 9 Installing this Unit Install this unit in a well ventilated location Ensure that there s adequate ventilation all around this unit especially if it s instal...

Страница 4: ...on the rear panel 1 This unit is a CLASS 1 LASER PRODUCT and employs a laser inside the cabinet 2 To prevent the laser from being exposed do not remove the cover Refer servicing to qualified personnel For U S Models FCC Information for User CAUTION The user changes or modifications not expressly approved by the party responsible for compliance could void the user s authority to operate the equipme...

Страница 5: ...Box insert Netflix Box insert Note about Recycling This unit s packaging materials are recyclable and can be reused Please dispose of any materials in accordance with your local recycling regulations Batteries should never be thrown away or incinerated but disposed of in accordance with your local regulations concerning chemical wastes Maintenance Servicing g Please refer to relevant topics on TRO...

Страница 6: ...HDMI Licensing LLC in the United States and other countries Manufactured under license from Dolby Laboratories Dolby and the double D symbol are trademarks of Dolby Laboratories Manufactured under license under U S Patent s 5 451 942 5 956 674 5 974 380 5 978 762 6 226 616 6 487 535 7 392 195 7 272 567 7 333 929 7 212 872 other U S and worldwide patents issued pending DTS and the Symbol are regist...

Страница 7: ... 31 PIP Picture in Picture BONUSVIEW Setting 31 Program Playback 31 Random Playback k 32 Rapid Playback 33 Camera Angle 33 Enjoying BD Live Discs with Internet 33 SEARCH 34 SPECIAL SETTINGS 35 Switching Subtitles 35 Switching Audio Soundtrack k 35 Setting the BD Audio Mode 36 Adjusting the Picture 37 NETFLIX OPERATIONS 38 Before Activating the Connection to Netflix 38 Activating the Connection to ...

Страница 8: ...he pop up menu by pressing Pop Up Menu Menu Contents in the pop up menu vary depending on the disc Rapid playback Playback in slightly faster speed while keeping the sound output Rapid playback is available only on discs recorded in the Dolby Digital format HDMI Deep Color Deep Color reduces posterization effect of the playback image Refer to HDMI Deep Color in FUNCTION SETUP on page 43 HDMI 1080p...

Страница 9: ...on refers to BD RE R DVD RW R CD RW R and SD card with MP3 files Description refers to BD RE R DVD RW R CD RW R and SD card with Windows Media Audio files Description refers to BD RE R DVD RW R CD RW R and SD card with JPEG files Description refers to video files in the DLNA home server Description refers to music files in the DLNA home server Description refers to photo files in the DLNA home ser...

Страница 10: ... optical coaxial cable 3 VIDEO OUTPUT COMPONENT jacks Use to connect a TV with component video inputs with an RCA component video cable 4 VIDEO OUTPUT VIDEO jack Use to connect a TV an AV receiver or other device with an RCA video cable 5 IR IN jack A commercially available IR receiver can be connected to the IR IN jack allowing you to control the BD player when it s out of sight for example insta...

Страница 11: ...tton Press to open or close the disc tray 16 PIP button During BD playback Press to display the setting for picture in picture only applicable to BD video which supports the PIP function 17 Angle button Press to access various camera angles on the disc Press to rotate the JPEG files clockwise by 90 degrees 18 Repeat button Press to toggle between various repeat modes 19 Clear button Press to clear...

Страница 12: ...rge short circuit heat burn or disassemble batteries Using a Remote Control Keep in mind the following when using the remote control Make sure that there are no obstacles between the remote control and the infrared sensor window on the unit Remote operation may become unreliable if strong sunlight or fluorescent light is shining on the infrared sensor window of the unit Remote control for differen...

Страница 13: ...icon Mode Disc SD Memory Card Stop mode Pause mode Fast forward mode Slow forward mode Appears while repeat function is set Appears when DLNA home media server is active Example of Display Message Title is being played back Indicating the current title number and the elapsed time Loading a disc Current chapter is in chapter repeat mode Dolby Digital audio is being played back DTS audio is being pl...

Страница 14: ...able also known as HDMI category 2 cable is recommended for better compatibility Use an HDMI cable with the HDMI logo a certified HDMI cable for this connection Supplied cables used in this connection are as follows RCA audio cable L R x 1 RCA video cable x 1 Please purchase the rest of the necessary cables at your local store Note Connect this unit directly to the TV If the RCA audio video cables...

Страница 15: ...1080p24 frame material 60 frame image will be output unless 1080p24 is selected For AVCHD 24 frame film material will be output as 60 frame even if the connected device is compatible with 1080p24 frame input and HDMI Video Resolution is set to 1080p24 or Auto If the video is not properly from HDMI OUT jack after you set the HDMI Video Resolution setting change the HDMI video resolution to the comp...

Страница 16: ...M DLNA Music MP3 WMA LPCM 2ch PCM 2ch PCM 2ch PCM Netflix WMA 2ch PCM 2ch PCM 2ch PCM CinemaNow AAC 2ch AAC 2ch PCM 2ch PCM Blockbuster AAC 2ch AAC 2ch PCM 2ch PCM 1 Full decoded 2 Only the independent substream is decoded 3 Dolby TrueHD stream is decoded 4 Only the Dolby Digital substream is decoded 5 Only the core substream is decoded 6 When audio source is multi channel decoded as 7 1ch However...

Страница 17: ...s at your local store Note for Digital Audio Optical Cable Digital audio optical cable may be damaged when bent at sharp angles Endure cables are coiled in loops with a diameter of 6 inches 15cm or more when storing them Use a cable which is 9 8 feet 3m or shorter Insert cable plugs firmly into the connectors when making connections If a plug has dust or is dirty clean it with a soft cloth before ...

Страница 18: ... Downmix 2ch PCM Downmix 2ch PCM DVD video Dolby Digital Dolby Digital Downmix 2ch PCM DTS DTS Downmix 2ch PCM LPCM 2ch PCM 2ch PCM Audio CD PCM 2ch PCM 2ch PCM DTS CD DTS DTS Downmix 2ch PCM AVCHD Dolby Digital Dolby Digital Downmix 2ch PCM LPCM Downmix 2ch PCM Downmix 2ch PCM MP3 MP3 2ch PCM 2ch PCM WMA WMA 2ch PCM 2ch PCM DLNA Video Dolby Digital Dolby Digital Downmix 2ch PCM MP2 2ch PCM 2ch PC...

Страница 19: ...antech Controlling Other Out of Range AV Components If another AV component is out of range of its remote controller you can use a commercially available IR emitter to retransmit the remote controller signals received at this unit s IR IN jack as shown below IR IN IR OUT Connecting block Signal flow Remote controller This unit IR emitter Other component Connect the IR emitter to this unit s IR OUT...

Страница 20: ... After connecting to the Internet set up necessary network settings Do not insert any cable other than a LAN cable to the ETHERNET terminal to avoid damaging the unit If your telecommunications equipment modem etc does not have broadband router functions connect a broadband router If your telecommunications equipment modem etc has broadband router functions but there is no vacant port use a hub Fo...

Страница 21: ... V V video mode V V audio CD V V MP3 WMA V V V V V V V V V V V V JPEG V V V V V V V V V V V V MPEG1 MPEG2 V V AVCHD V V V V Picture in picture commentary subtitles or other extras for BD ROM ver 2 Profile 2 0 Profile 1 1 V V V V Supported Note for SD Memory Cards Do not remove the SD Memory Card or turn the unit to the standby mode while the contents of the card is in playback It may result in mal...

Страница 22: ...can only be played back in the unit with the same region code Structure of Disc SD Memory Card Contents The contents of BD DVD are generally divided into titles Titles may be further subdivided into chapters BD DVD AVCHD title 1 title 2 chapter 1 chapter 1 chapter 2 chapter 2 chapter 3 BD video INFORMATION ON PLAYBACK Audio CDs are divided into tracks audio CD track 1 track 2 track 3 track 4 track...

Страница 23: ...lby Digital 1 1 Decoding format Track File information SD 1 14 0 00 51 B 1 3 4 2 G 1 Current track file number Total number of track file 2 Elapsed time of the current track or file or remaining time of the current track or file except for JPEG files 3 Indication of SD Memory Card playback 4 Current repeat setting Only when repeat setting is active T Track File repeat G Group repeat A All repeat A...

Страница 24: ...disc 6 Playback may start automatically If not press Play B Some discs may show a title or a disc menu In this case refer to Operations Using Title Menu Disc Menu and Pop up Menu on page 25 To pause playback Press Pause F To return to the normal playback Press Play B To stop playback Press Stop C Playback will be in Resume On Stop mode Resume On Stop mode If a playback is in Resume On Stop mode wh...

Страница 25: ...efore you begin make sure the correct media mode is selected Set Mode Select to Disc CD MP3 1 Insert an audio CD or a disc with MP3 WMA JPEG files Media filter screen will appear For audio CD and a disc contains only one type of file skip to step 3 To return to the first item Press Top Menu To return to the track file played last Press Pop Up Menu Menu 2 Select the type of the file you want to pla...

Страница 26: ...ections may not be recognized For the SD Memory Card playback refer to Reading the SD Memory Card on page 26 If a disc contains AVCHD files the playback of other files which are in the same disc is not available Note for JPEG Playback Every press on Angle will turn the image clockwise by 90 degrees when an image is displayed To change the visual effect for switching the playback image press Mode o...

Страница 27: ...then press Enter Quick Disc SD Card Network Mode Select This will set the unit to SD Card mode To play back the contents in any discs exit SD Card mode by selecting Disc 5 Press Setup to exit Even if you turn the unit to the standby mode in SD Card mode it will be in Disc mode the next time you turn it on Reading an SD Memory Card 1 Insert an SD Memory Card with the label side facing up into the S...

Страница 28: ...ction Skip j i Skip to the previous next file during playback or in pause mode Pause F Pause the playback Play B Return to the normal playback Stop C Stop the playback For video files playback will be in Resume On Stop mode Resume On Stop mode for video files Playback will start from the point where it is stopped next time you press Play B If you press Enter instead of Play B playback will start f...

Страница 29: ... MPEG2 Layer3 Mono 8 80kbps Stereo 16 160kbps MP3 MPEG2 5 Layer3 Mono 8 80kbps Stereo 8 160kbps WMA 8 48kHz Stereo 5 320kbps Image file JPEG Exif Ver 2 21 Error Code appears in the error screen when the unit detects an error as shown below The code is used to specifically determine the cause of error Error message Error Code Network Error Cannot connect to server Please check your settings Press E...

Страница 30: ...ss Pause F repeatedly Every time you press Pause F playback will advance one step at a time 2 Press Play B to return to normal playback Note Only step by step forward is available Set Still Mode setting to Field in Video menu if pictures in step by step playback mode are blurred refer to page 44 Repeat Playback Available repeat functions vary depending the discs 1 During playback press Repeat repe...

Страница 31: ...fer to SwitchingAudioSoundtrack onpage35and Setting the BD Audio Mode on page 36 Program Playback CD MP3 You can play back the disc in your desired order 1 In stop mode press Mode The program screen will appear 2 Use K L to select a track folder file then press Enter e g audio CD 0 26 24 CD_DA 0 36 1 14 0 45 0 50 0 53 0 20 0 54 8 9 10 11 12 13 14 1 14 0 50 1 14 0 50 0 53 0 54 0 36 2 4 9 11 12 14 8...

Страница 32: ...s Mode twice The random screen will appear 1 13 29 CD_DA 1 0 36 1 14 0 45 0 50 0 53 0 20 0 54 2 3 4 5 6 7 16 1 6 2 3 4 5 l a t o T m o d n a R Page Down e g audio CD 1 audio CD Track information MP3 WMA JPEG File information 2 audio CD CD DA will be displayed MP3 WMA JPEG Current disc SD Memory Card or folder name will be displayed 3 Track File list Track File list in the original order 4 Operatio...

Страница 33: ...ing special video data may be played back How to Activate the BD Live Function 1 Insert the disc with BD Live function 2 Insert an SD card with enough capacity SD card of 1GB or more is recommended Make sure to use the SD card with the supported file system Refer to Note for SD Memory Cards on page 21 3 Press Top Menu to access the disc menu 4 Select BD Live then press Play B or Enter Make sure th...

Страница 34: ...ear to erase an incorrect input Note During program and random playback search functions are not available except the search using Skip H G Time search is available only in the same track file or title For BD AVCHD chapter and time search are available only during playback For some video files on DLNA home server time search may not function Using the Number buttons Direct Search Title Search In s...

Страница 35: ...track When playing back video material recorded with 2 or more soundtracks these are often in different audio languages or audio formats you can switch them during playback BD V 1 During playback press Audio 2 Use K L to select Primary or Secondary audio to set then press Enter 3 3 Primary 1 ENG Secondary 1 ENG Multi ch Multi ch Dolby D Dolby D Primary Sets the audio for the primary video Secondar...

Страница 36: ...s mode in order to output Dolby Digital Dolby Digital Plus Dolby TrueHD DTS or DTS HD audio of BD through HDMI connection 3 Press Return to exit You can also set BD Audio Mode from the setup menu Refer to page 45 Note In Mix Audio Output mode if there is no secondary and interactive audio the audio will be output as HD Audio Output mode In Mix Audio Output mode even if you set HDMI Multi Normal in...

Страница 37: ... of the picture 9 Hue 7 to 7 0 Adjusts the balance between the green and red 10 Black Level Adjusts the black level Off Middle High Off On 11 Noise Reduction Off 1to 3 Reduces noise in the luminance signal and chroma signal 12 MPEG NR Off 1to 3 Reduces block noise and mosquito noise 13 Edge Enhancer Off Soft Middle Strong Emphasizes the edge of the picture 14 Qdeo True Color Off Low Middle High Ad...

Страница 38: ...5 You can deactivate the connection to Netflix by setting the Netflix Deactivate to Yes Refer to page 56 The screen image of Netflix may change after updating the firmware For questions regarding the Netflix service visit netflix com Help p When you contact the Netflix customer service you may be asked for the ESN number which is a serial number to identify this unit by Netflix You can check the E...

Страница 39: ...rs on your remote control e g Blockbuster 4 EntertheactivationcodedisplayedonyourPC using s B and the Number buttons then select Activate andpress Enter For CinemaNow confirmation message will appear Press Enter to complete the setting Note The image of menu screen may change after updating the firmware You cannot create CinemaNow Blockbuster account on this unit To deactivate the connection to Ci...

Страница 40: ...odes by entering search words 1 Follow step 1 in Renting or Purchasing Movies TV Episodes on page 40 2 Use K L to select Search All or Search then press Enter Keypad screen will appear 3 Use K L s B to select characters then press Enter When you enter a letter titles that start with the letter will be displayed on the right side of the screen 4 Use K L s B to select a desired title from the search...

Страница 41: ...items 1 Press Enter 2 Use K L to select options then press Enter Use s or Return to go back to the previous screen 5 Press Setup to exit Custom Custom menu contains all the setting items 1 In stop mode press Setup 2 Use K L to select then press Enter 3 Use K L to select your desired setting category then press Enter Language Video Audio Parental Others For Parental menu follow the procedure on pag...

Страница 42: ...age for disc menu or pop up menu English French Spanish German Italian Swedish Dutch Russian Chinese Japanese Korean Danish Finnish Norwegian Icelandic Hungarian Romanian Turkish Greek k Irish Portuguese Polish Czech Slovak k Bulgarian Other Player Menu Sets the language for OSD on screen display Auto XXXX 1 English Français Español Settings with are the default 1 Auto activates the Get Set Menu L...

Страница 43: ... Setting Sets the digital RGB image range data range output from the HDMI OUT jack Normal Output as 16 black to 235 white Enhanced Output as 0 black to 255 white Depending on the display device you are using the black colors may seem to stand out when using HDMI connections If so set to Enhanced HDMI Auto Format Makes the setting of the Auto for HDMI Video Resolution Max The maximum resolution tha...

Страница 44: ...orded by 1080p24 frame or for DVD a video resolution supported by the disc and the display device will be output instead of 1080p24 frame If the picture is not output properly to the TV because of HDMI Video Resolution or Component Output setting press and hold Play B on the front panel for more than 5 seconds Both settings will be reset to the default automatically For HDMI RGB Setting select Enh...

Страница 45: ... 1ch Audio Out Sets the audio format for the audio output from the AUDIO OUTPUT ANALOG 7 1ch jacks Multi Channel The multi audio signals are output from the AUDIO OUTPUT ANALOG 7 1ch jacks Refer to pages 46 48 for speaker setting options 2 Channel Down mixed 2 channel audio signals are output from the AUDIO OUTPUT ANALOG 7 1ch jacks Down Sampling Sets the digital audio output from AUDIO OUTPUT DIG...

Страница 46: ... channel surround sound such as 7 1 channel 5 1 channel surround Front left and right speakers Centre speaker Subwoofer Surround left and right speakers Surround back left and right speakers e g basic layout with 7 1 channel surround system To make the most of its feature set up your speakers appropriately by referring to the following table Speaker setting options are available at the following l...

Страница 47: ...f Subwoofer If connected device is not compatible with subwoofer Subwoofer will be displayed in gray Small Center Large Small Subwoofer On Surround Large Small Surround Back Large Small Default Select Default then press Enter to reset Speaker Size setting to the default Channel Level Tests or sets the volume for each speaker Test Tone Test Tone is the test tone which can be output from the speaker...

Страница 48: ...tings of each speaker size may be adjusted automatically corresponding to each setting e g If Front is set to Small you cannot set Center Surround and Surround Back to Large For Delay Time the difference between the value of the Front Surround and Surround Back setting cannot exceed 15 ft and the difference between the value of the Front and Center setting cannot exceed 5 ft For Delay Time the val...

Страница 49: ...desired option then press Enter All To release the limitation Age Setting To set the age limitation After selecting Age Setting use the Number buttons to enter the age from 0 254 e g for age 15 press 0 1 5 3 Press Setup to exit B DVD Rating Level 1 Use K L to select DVD Rating Level then press Enter 2 Use K L to select your desired level then press Enter 3 Press Setup to exit RATING EXPLANATIONS A...

Страница 50: ...n On Off Mode Select Selects the media to playback Setting will be back to Disc when you turn the unit to the standby mode Disc Select this when you play back a disc SD Card Select this when you play back an SD Memory Card Network Select this when you use DLNA home media server or Netflix CinemaNow Blockbuster feature Network Connection Connection Test Perform the network connection test After you...

Страница 51: ... Settings with are the default HDMI CEC allows integrated system control over HDMI and is part of the HDMI standard In addition to Integra Onkyo AV components it allows interoperability with CEC compatible AV components and TVs made by other manufacturers When HDMI CEC setting is set to On functions listed below will be available Direct Change When this unit is turned on the TV also is turned on a...

Страница 52: ...in Network Connection Enable Easy Network settings are set to the following settings initially In most cases you can connect to the Internet without making any changes to the default settings IP Address Setting Auto DHCP DNS Setting Auto DHCP Proxy Setting Do Not Use Connection Speed Auto BD Live Setting Allow If you want to set the network settings back to the default settings as above except BD ...

Страница 53: ... LAN cable and assign the same number 3 d After you enter all correctly press Enter Confirmation message will appear Select Yes to complete the settings Others DNS Setting Is Setting OK Primary DNS Secondary DNS No Yes xxx xxx xxx xxx xxx xxx xxx xxx 4 Press Return to go back to the previous screen or press Setup to exit Note The range of input numbers is between 0 and 255 If you enter a number la...

Страница 54: ...depending on your network environment Connection Speed p You can set connection speed as your preference The default setting is Auto 1 Follow steps 1 to 4 in Connection Test on page 52 2 Use K L to select Enable Custom then press Enter 3 Use K L to select Connection Speed then press Enter 4 Use K L to select the desired setting then press Enter Auto Set the appropriate connection speed automatical...

Страница 55: ... display 7 After the disc update finishes this unit will restart and eject the disc Note Please do not unplug the AC power cord while executing the Disc Update All settings will remain the same even if you update the firmware version The version of Netflix will also be updated if newer version of Netflix is available when updating the firmware Network Update You can update the software by connecti...

Страница 56: ... Erase Saved BD ROM Data SD Card Available only when an SD Memory Card is inserted Clears the supplemental data for the BD ROM playback such as subtitle data from the SD Memory Card Network Settings Resets the Network Settings menu to the default Netflix Deactivate Deactivate the connection to Netflix Initialize Setup Format SD Card Erase Saved BD ROM Data Player Erase Saved BD ROM Data SD Card Ne...

Страница 57: ...ly Check the HDMI connections Check the settings in Audio menu Picture freezes momentarily during playback Check the disc for fingerprints scratches and clean with a soft cloth wiping from center to edge Clean the disc Disc cannot be played back Clean the disc Ensure the disc label is facing up Check if the disc is defective by trying another disc Cancel the ratings control or change the control l...

Страница 58: ... instant Queue Visit netflix com on your PC Adding movies or TV episodes on this unit is not available Even though the speed of the Internet connection improves during playback the picture quality of Netflix streaming movie does not improve The picture quality does not change during playback The picture quality differs depending on the speed of Internet connection at the time of loading The pictur...

Страница 59: ...s close to natural ones without color streak Digital Audio g An indirect representation of sound by numbers During recording the sound is measured at discrete intervals 44 100 times a second for CD audio by an analog to digital converter generating a stream of numbers On playback a digital to analog converter generates an analog signal based on these numbers See also Sampling Frequency and Analog ...

Страница 60: ... which acts as an intermediary between a workstation user and the Internet to ensure security Region Code g Regions associate discs and players with particular areas of the world This unit will only play back discs that have compatible region codes You can find the region code of your unit by looking on the rear panel Some discs are compatible with more than one region or all regions Router A netw...

Страница 61: ...957 Malagasy 5953 Malay 5965 Malayalam 5958 Maltese 5966 Maori 5955 Marathi 5964 Moldavian 5961 Mongolian 5960 Nauru 6047 Nepali 6051 Norwegian NOR 6061 O R Occitan 6149 Oriya 6164 Oromo Afan 6159 Panjabi 6247 Pashto Pushto 6265 Persian 5247 Polish POL 6258 Portuguese POR 6266 Quechua 6367 Rhaeto Romance 6459 Romanian RUM 6461 Russian RUS 6467 S Samoan 6559 Sangho 6553 Sanskrit 6547 Scots Gaelic 5...

Страница 62: ...0 005 1 kHz Terminals Rear Audio output Analog RCA jack x 2 RCA jack x 8 L R 2Vrms output impedance more than 1kΩ FRONT L R CENTER SURR L R SURR BACK L R 2Vrms output impedance more than 1kΩ SUB WOOFER 1 1Vrms output impedance more than 1kΩ Video output RCA jack x 1 1Vp p 75Ω Component video output RCA jack x 3 Y 1Vp p 75Ω PB 700mVp p 75Ω PR 700mVp p 75Ω Audio output Digital RCA jack x 1 Optical j...

Страница 63: ...ARTICULAR PURPOSE ACCURACY VALIDITY TIMELINESS LEGALITY SUITABILITY OR QUALITY OF ANY CONTENT OR SERVICE MADE AVAILABLE THROUGH THIS PRODUCT IN NO EVENT SHALL COMPANY BE LIABLE FOR ANY DAMAGES WHETHER ARISING IN CONTRACT OR TORT INCLUDING WITHOUT LIMITATION ANY DIRECT INDIRECT INCIDENTAL SPECIAL OR CONSEQUENTIAL DAMAGES LOST PROFITS ATTORNEY FEES EXPENSES OR ANY OTHER DAMAGES ARISING OUT OF OR IN ...

Страница 64: ...ra Division of ONKYO CORPORATION Sales Product Planning Div 2 1 Nisshin cho Neyagawa shi OSAKA 572 8540 JAPAN Tel 072 831 8023 Fax 072 831 8163 SN 29400494A C Copyright 2010 ONKYO CORPORATION Japan All rights reserved En Printed in China E5SF0UD 1VMN29853A 1 V M N 2 9 8 5 3 A E5SF0UD DBS50 2 EN v2 indd 64 E5SF0UD DBS50 2 EN v2 indd 64 2010 08 05 15 17 41 2010 08 05 15 17 41 ...

Отзывы: