www.insigniashowers.com
Last Modified: 07/10/2021
12
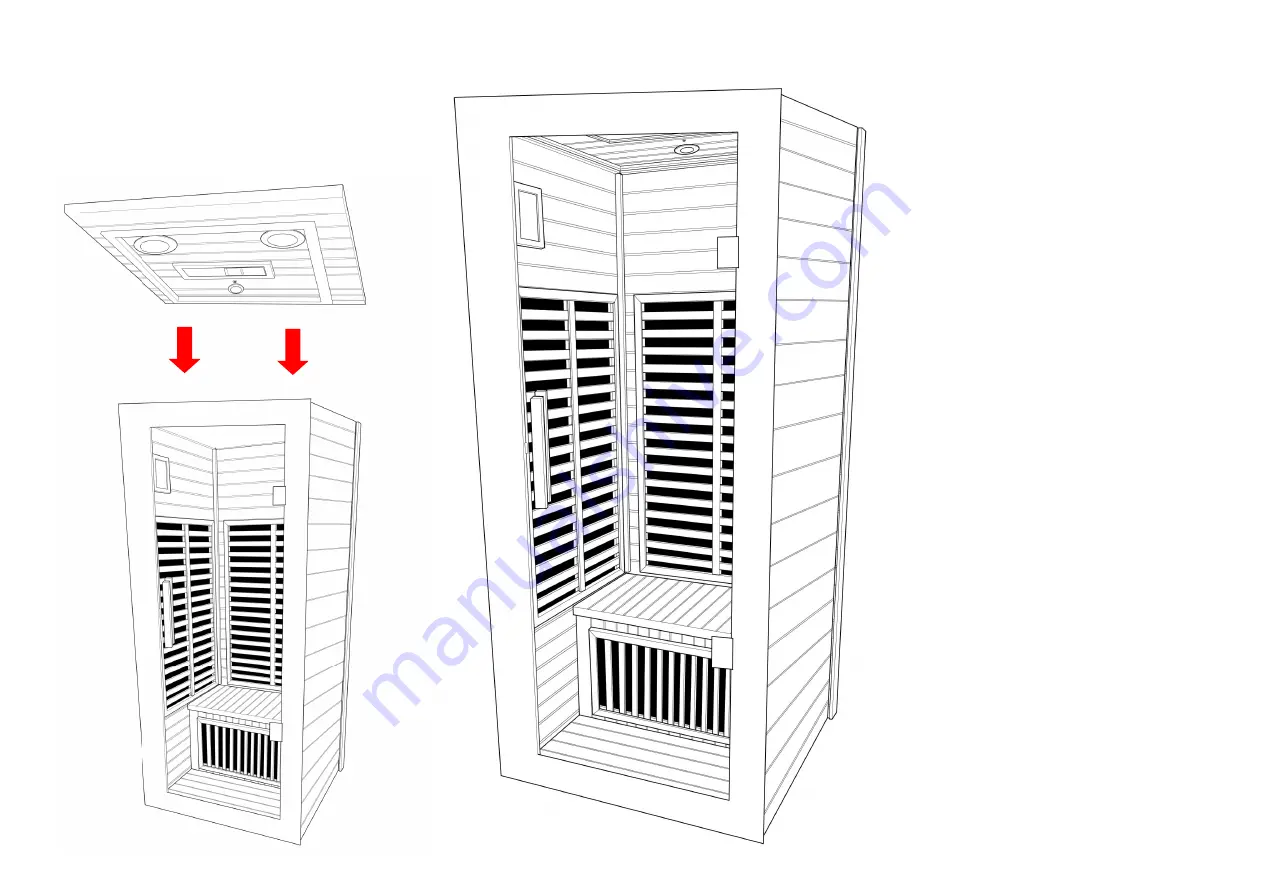
Step 7 —
Installing the Roof
The roof simply slots into position.
Now the Sauna is assembled, take the wooden dowels and insert over any screw to give the Sauna a sleek and neat finish.
Страница 1: ...hnical support for aiding your installation Replacements Parts Inside of your warranty period visit https www insigniashowers com click support and make a warranty claim Spares Replacements Parts Outs...
Страница 2: ...Tool requirements 4 Box contents 5 Back Panel to Base Install 6 Left Side Panel Install 7 Bench Heater Install 8 Bench Install 9 Right Side Panel Install 10 Door Install 11 Roof Install 12 Connecting...
Страница 3: ...this booklet with great care to ensure you get the best out of your build and have a Sauna that will last for many years to come Like everything in order to obtain a first class product that will ser...
Страница 4: ...es with pre fitted RCD unit We leave it this way for you to connect it your own way due to continued additions to current regulations 1 Connect within current laws and IP directives Subject to room lo...
Страница 5: ...w Wooden Dowel 17 18 VERY IMPORTANT Have you got everything If not please contact the Insignia directly on 01908 317 512 Remember NEVER book your tradesman until everything has arrived been checked an...
Страница 6: ...www insigniashowers com Last Modified 07 10 2021 06 Step 1 Placing the base and back panel in position...
Страница 7: ...www insigniashowers com Last Modified 07 10 2021 07 Step 2 Connecting the left side panel to the back panel 3x 40mm Screws Please Note Screws connect on the interior of the Sauna...
Страница 8: ...www insigniashowers com Last Modified 07 10 2021 08 Step 3 Installing bench heater Connect heater panel to back panel using the wires below Slide the bench heater up against the wooden strut...
Страница 9: ...www insigniashowers com Last Modified 07 10 2021 09 Step 4 Installing the seat Slide the top of the seat into position resting on the wooden struts...
Страница 10: ...www insigniashowers com Last Modified 07 10 2021 10 Step 5 Installing the right side panel 3x 40mm Screws Please Note Screws connect on the interior of the Sauna...
Страница 11: ...www insigniashowers com Last Modified 07 10 2021 11 Step 6 Installing the door 8x 40mm Screws Please Note Screws connect on the interior of the Sauna...
Страница 12: ...ers com Last Modified 07 10 2021 12 Step 7 Installing the Roof The roof simply slots into position Now the Sauna is assembled take the wooden dowels and insert over any screw to give the Sauna a sleek...
Страница 13: ...x is located on the roof Take all power cables from the panel heaters and the control panel and connect together Connect the control panel to the lights and speakers located in the roof Also take the...
Страница 14: ...na Use this button to start the heaters for the sauna session Button 8 Audio function Use to toggle between radio Bluetooth and USB audio preferences Button 9 10 Mode Use to change the volume the musi...
Страница 15: ...have a heart condition have low or high blood pressure If you re unsure consult your GP before use 8 If you have any underlying health conditions which you feel could be aggravated by an increase in...
Страница 16: ...ommon crossed out wheelie bin label We accept returns of all products carrying the Insignia brand All other products are either considered outside the scope of WEEE or Insignia is not technically the...
Страница 17: ...www insigniashowers com Last Modified 07 10 2021 17...