background image

27

Insignia NS-LTDVD19-09CA 19” LCD TV/DVD Combo

www.insignia-products.com

Using the DVD equalizer

You can select preset graphic equalizer patterns 
according to the genre of the music being 
played. You can also adjust the equalizer 
settings.

To use the equalizer:

1

While your TV is in DVD mode, press 

SETUP

The 

Setup Menu

 opens.

2

Press 

/

 to select the 

Audio

 icon 

then press 

ENTER

. The 

Audio Setup Page


opens.

3

Press 

/

 to highlight 

CHANNEL 

EQUALIZER,

 then press 

ENTER

. The 

Channel Equalizer Page

 opens.

4

Press 

/

 to highlight 

EQ TYPE

, then 

press 

ENTER

.

5

Press 

/

 to select one of the following 

preset equalizer patterns, then press 

ENTER

:

NONE

ROCK

POP

LIVE

DANCE

TECHNO

CLASSIC

SOFT

6

Press 


one or more times to go back to the 

previous menu.

7

To close the menu, press 


to highlight the 

Exit

 icon, then press 

ENTER

.

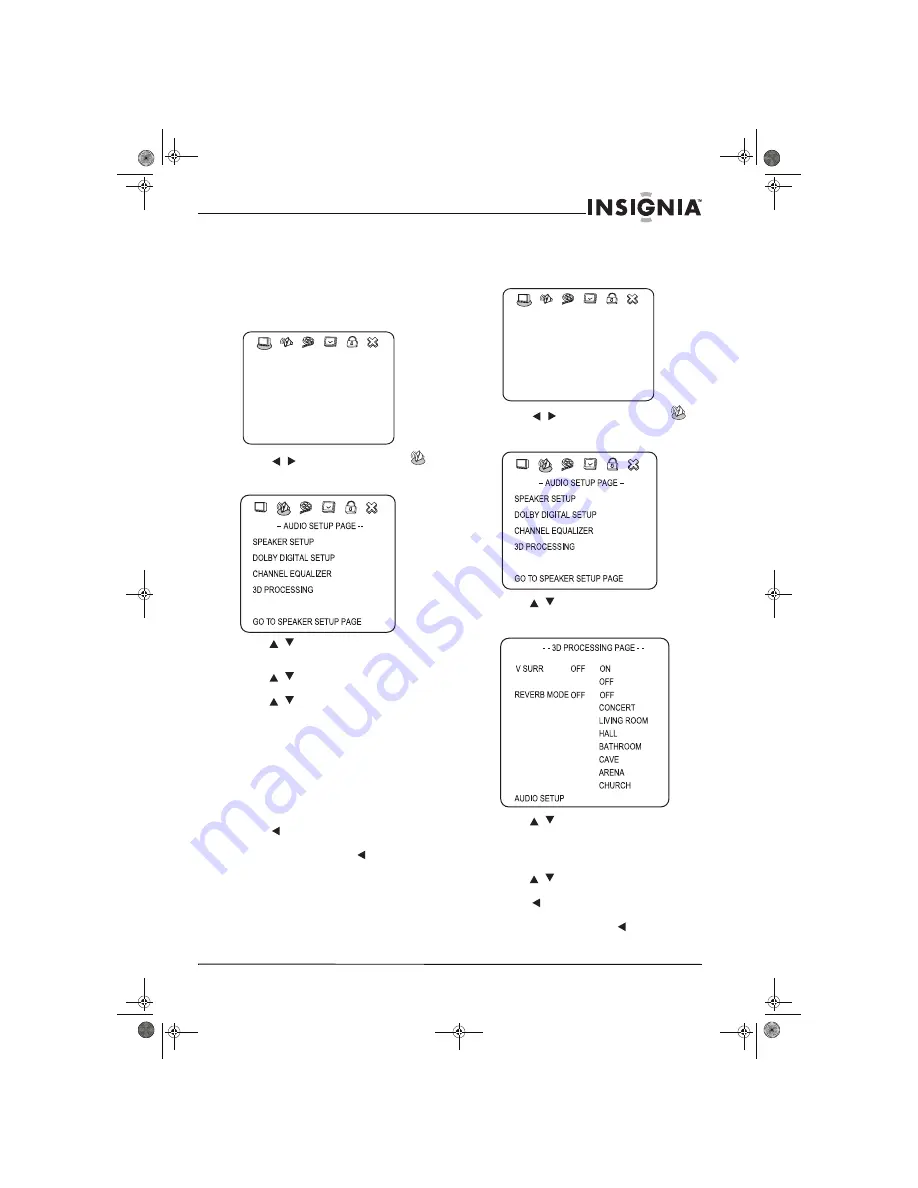
Setting up DVD 3D sound

To set up 3D sound:

1

While your TV is in DVD mode, press 

SETUP

The 

Setup Menu

 opens.

2

Press 

/

 to select the 

Audio

 icon 

then press 

ENTER

. The 

Audio Setup Page


opens.

3

Press 

/

 to highlight 

3D PROCESSING

then press 

ENTER

. The 

3D Processing Page


opens.

4

Press 

/

 to select one of the following 

options, then press 

ENTER

:

V SURR

-Turns virtual surround sound on 

and off.

REVERB MODE

-Select a reverb mode.

5

Press 

/

 to select from the options for the 

mode you have chosen, then press 

ENTER

.

6

Press 


one or more times to go back to the 

previous menu.

7

To close the menu, press 


to highlight the 

Exit

 icon, then press 

ENTER

.

--  GENERAL SETUP PAGE --

LAST MEMORY

TV DISPLAY
CAPTIONS
SCREEN SAVER

GOTO GENERAL SETUP PAGE

ON

ON

OFF

WIDE

--  GENERAL SETUP PAGE --

LAST MEMORY

TV DISPLAY
CAPTIONS
SCREEN SAVER

GOTO GENERAL SETUP PAGE

ON

ON

OFF

WIDE

08-1154 NS-LTDVD19-09CA - ENG.fm  Page 27  Monday, April 28, 2008  10:03 AM

Содержание NS-LTDVD19-09CA

Страница 1: ...19 LCD TV DVD Combo NS LTDVD19 09CA User Guide 08 1154 NS LTDVD19 09CA ENG fm Page 1 Monday April 28 2008 10 03 AM ...

Страница 2: ...08 1154 NS LTDVD19 09CA ENG fm Page 2 Monday April 28 2008 10 03 AM ...

Страница 3: ...r computer s video resolution 21 Using the DVD player 22 Playing a DVD 22 Playing an audio CD 22 Using DVD repeat play 22 Using CD repeat play 22 Using a DVD title menu 22 Using a DVD menu 23 Searching for a DVD title or chapter 23 Searching for a specified time on a DVD 23 Searching for a specific track on a CD 23 Searching for a specified time on a CD track 23 Changing the DVD audio language 23 ...

Страница 4: ...hing a program especially on a larger than life TV Make sure that you place or install the TV where it cannot be pushed pulled over or knocked down Make sure that you route all cords and cables so that they cannot be pulled or grabbed by curious children Wall mounting If you decide to wall mount your TV remember One size of wall mount does not fit all Use only a wall mount rated for the weight of ...

Страница 5: ... on an unstable cart stand tripod bracket or table Your TV may fall causing serious personal injury and serious damage to your TV Use only with a cart stand tripod bracket or table recommended by the manufacturer or sold with your TV If you mount your TV to the wall follow the manufacturer s instructions and use a mounting accessory recommended by the manufacturer Your TV and cart combination shou...

Страница 6: ...ny way When your TV exhibits a distinct change in performance Safety check After completing any service or repair to this TV ask the service technician to perform routine safety checks to determine that your TV is in correct operating condition Power source Operate your TV only from the type of power source indicated on the marking label If you are not sure of the type of power supplied to your ho...

Страница 7: ...utton Press to eject the disc in the disc slot OPEN CLOSE PREV NEXT PLAY PAUSE STOP 1 2c m Disc O n l y DISC IN POWER VOL VOL INPUT MENU CH CH 7 1 2 3 4 5 6 13 12 10 11 14 8 9 Disc label towards front 8 Power Standby indicator Lights when your TV is plugged into a power outlet When your TV is on the indicator is blue When your TV is in standby mode the indicator is red 9 IR sensor Receives signals...

Страница 8: ... chapter or track Press to skip to the next chapter or track 14 STOP Press to stop DVD or CD playback 15 DVD TITLE Press to open the DVD title menu 16 DVD MENU Press to open the DVD menu 17 REPEAT Press to repeat a section of a DVD or CD 18 AUDIO Press to change the DVD audio language 19 Open Press to eject the disc from the disc slot 20 INPUT Press to open the source input menu 21 ZOOM Press to c...

Страница 9: ...he charge is depleted Battery chemicals can cause a rash If the batteries leak clean the battery compartment with a cloth If chemicals touch your skin wash immediately If the remote control is not going to be used for an extended period of time remove the batteries Caution Do not expose the remote control to liquids direct sunlight or shock Do not mix batteries of different types Notes Objects bet...

Страница 10: ...to select AV1 To connect a standard video device to the AV2 INPUT jacks 1 Plug an RCA video cable 5 into a standard video source 7 and into the VIDEO2 jack on the back of your TV 2 Plug the RCA audio cables 6 into the video device s audio output jack and into the lower AUDIO L and AUDIO R jacks on the back of your TV 3 Turn on your TV 4 Press INPUT then press to select AV2 To connect a standard S ...

Страница 11: ...ug a VGA cable 3 into the VGA port on the computer 5 and into the VGA INPUT port on the back of your TV 2 Plug an audio cable 4 into the audio jack on the computer 5 and into the AUDIO VGA INPUT port on the back of your TV 3 Turn on your TV 4 Press INPUT then press to select VGA To connect to a computer or other HDMI device using the HDMI jack 1 Plug an HDMI cable 2 into the HDMI port on the HDMI ...

Страница 12: ...he CH or CH on the remote control To enter a channel number directly Press the number buttons on the remote control To go to the previous channel Press RECALL Using the on screen menus Use your remote control to navigate in the on screen menus To use the on screen menus 1 Press INPUT on the remote control to select the video source 2 Press TV MENU on the remote control The on screen menu appears 3...

Страница 13: ...Tune your TV to a channel you want to skip using the number buttons 2 Press TV MENU on the remote control then press to highlight the Tuning icon The Tuning menu opens 3 Press or ENTER to enter the Tuning menu 4 Press to select Skip then press to highlight On 5 Press TV MENU one or more times to close the menu The channel number will be skipped when you search for channels with the CH buttons To r...

Страница 14: ...n function is deactivated 5 Press TV MENU one or more times to close the menu Adjusting picture settings To adjust picture settings 1 Press TV MENU on the remote control then press to highlight the Picture icon The Picture menu opens 2 Press or ENTER to enter the Picture menu 3 Press to select one of the following settings then press to change the setting You can select Picture Mode Standard Brigh...

Страница 15: ...er settings To adjust equalizer settings 1 Press TV MENU on the remote control then press to highlight the Audio icon The Audio menu opens 2 Press or ENTER to enter the Audio menu 3 Press to select Equalizer then press to enter the Equalizer sub menu 4 Press to select one of the equalizer settings then press to adjust the setting 5 Press TV MENU one or more times to close the menu A u d i o Sound ...

Страница 16: ...he remote control then press to highlight the Function icon The Function menu opens 2 Press or ENTER to enter the Function menu 3 Press to select Parental Controls then press or ENTER to enter the Parental Controls sub menu The Enter Password screen opens 4 Enter the password with the number buttons on the remote control the default password is 0000 The Parental Control sub menu opens 5 Press to s...

Страница 17: ...ol sub menu opens 5 Press to select Change Password then press or ENTER The Change Password screen opens 6 Press the number buttons to input the new password The cursor moves to Confirm Password 7 Press the number buttons to input the new password again The message Password Changed appears on the menu 8 Press TV MENU one or more times to close the menu Setting parental control levels Movie ratings...

Страница 18: ...reen opens Rating Description G General audiences PG Parental guidance suggested Some material may not be suitable for children F u n c t i o n Enter Password _ _ _ _ Adjust Select Exit F u n c t i o n Change Password System Lock Movie Rating TV Rating Canada Eng Canada Fre Off Adjust Select Exit F u n c t i o n Movie Rating G PG PG 13 R NC 17 X Adjust Select Exit PG 13 Parental guidance strongly ...

Страница 19: ...er the Parental Controls sub menu The Enter Password screen opens Rating Description TV Y All children TV Y7 Children over seven years of age TV G General audiences TV PG Parental guidance suggested TV 14 Parents strongly cautioned TV MA Mature audiences only Rating Description FV Fantasy violence L Adult language S Sexual situations V Violence D Sexually suggestive dialog F u n c t i o n Change P...

Страница 20: ...een opens 4 Enter the password with the number buttons on the remote control the default password is 0000 The Parental Control sub menu opens Rating Description C Children C8 Children 8 years and above G General audience PG Parental guidance suggested 14 14 years old and above 18 Adult programming Note If System Lock is not set to On the configuration settings do not work You can view blocked prog...

Страница 21: ...deo resolution The following example shows Windows XP settings Even if you use a different Windows operating system the basic setup methods are similar For changing video resolution on a Macintosh computer refer to your Macintosh documentation To change your computer s video resolution 1 Click Start Control Panel then double click Display The Display Properties dialog box opens 2 Click the Setting...

Страница 22: ...emove the CD To select a specific track for playback After you insert a CD and your TV finishes reading the disc press the number buttons to enter the track number you want to play then press ENTER Using DVD repeat play You can repeat chapters titles or the entire DVD To use repeat play 1 While the DVD is playing press REPEAT to select what you want to repeat You can select CHAPTER repeats the cur...

Страница 23: ... for a specific track on a CD To search for a specific track 1 After inserting a CD press T SEARCH one or more times until the following box opens 2 Press a number button for the track then press ENTER Searching for a specified time on a CD track To search for a specified time on a CD track 1 After inserting a CD press T SEARCH one or more times until one of the following boxes opens 2 Use the num...

Страница 24: ...lighted 2 Press ENTER The General Setup Page opens 3 Press to select TV DISPLAY then press ENTER 4 Press to highlight the type of display you want then press ENTER NORMAL PS Widescreen images are shown on the screen but with some parts automatically cut off the sides GENERAL SETUP PAGE LAST MEMORY TV DISPLAY CAPTIONS SCREEN SAVER GOTO GENERAL SETUP PAGE ON ON OFF WIDE GENERAL SETUP PAGE TV DISPLAY...

Страница 25: ...es at the point where it stopped To use last memory 1 While your TV is in DVD mode press SETUP The General Setup icon is highlighted 2 Press ENTER The General Setup Page opens 3 Press to highlight LAST MEMORY then press ENTER 4 Press to highlight ON or OFF then press ENTER 5 Press one or more times to go back to the previous menu 6 To close the menu press to highlight the Exit icon then press ENTE...

Страница 26: ...de press SETUP The Setup Menu opens 2 Press to select the Audio icon then press ENTER The Audio Setup Page opens 3 Press to highlight DOLBY DIGITAL SETUP then press ENTER The Dolby Digital Setup Page opens 4 Press to highlight DUAL MONO or D R C then press ENTER DUAL MONO This is the output mode for the left and right signals of the selected audio output If it is set to MIXED MONO the function onl...

Страница 27: ...press to highlight the Exit icon then press ENTER Setting up DVD 3D sound To set up 3D sound 1 While your TV is in DVD mode press SETUP The Setup Menu opens 2 Press to select the Audio icon then press ENTER The Audio Setup Page opens 3 Press to highlight 3D PROCESSING then press ENTER The 3D Processing Page opens 4 Press to select one of the following options then press ENTER V SURR Turns virtual ...

Страница 28: ...up Menu opens 2 Press to select the Password Setup icon then press ENTER The Password Setup Page opens 3 Press to select one of the following options then press ENTER PW MODE Select ON to turn on the password feature PARENTAL is dim and cannot be selected Select OFF to turn off the password feature PARENTAL can be selected PASSWORD CHANGE Select to change the password The preset factory password i...

Страница 29: ... for the disc menu If the language you select is available on the DVD the disc menu is displayed in that language If the language you select is not available on the DVD the disc menu is displayed in the original language DEFAULT Resets the DVD player settings to the default settings 4 Press to select from the options for the item you have chosen then press ENTER 5 Press one or more times to go bac...

Страница 30: ...ng clean the disc with a clean cloth Wipe the disc from the center out Do not use strong solvents such as alcohol benzine thinner commercially available cleaners or anti static spray intended for older vinyl records Troubleshooting TV 2 2 2 2 1 1 Note Never operate this product immediately after moving it from a cold location to a warm location Leave it for two or three hours without operating it ...

Страница 31: ...just the phase control Image is not centered Adjust the horizontal control Picture has a few bright or dark dots A few bright or dark dots on an LCD screen is normal It does not affect the operation of this TV Problem Solution No sound Make sure that your TV or amplifier is working correctly Make sure that the amplifier is set to receive DVD signal output No image Make sure that your TV is working...

Страница 32: ... packaging To obtain in home warranty service for a television with a screen 25 inches or larger call 1 888 BESTBUY Call agents will diagnose and correct the issue over the phone or will have an Insignia approved repair person dispatched to your home Where is the warranty valid This warranty is valid only to the original purchaser of the product in the United States and Canada What does the warran...

Страница 33: ...33 Insignia NS LTDVD19 09CA 19 LCD TV DVD Combo www insignia products com 08 1154 NS LTDVD19 09CA ENG fm Page 33 Monday April 28 2008 10 03 AM ...

Страница 34: ...34 Insignia NS LTDVD19 09CA 19 LCD TV DVD Combo www insignia products com 08 1154 NS LTDVD19 09CA ENG fm Page 34 Monday April 28 2008 10 03 AM ...

Страница 35: ...35 Insignia NS LTDVD19 09CA 19 LCD TV DVD Combo www insignia products com 08 1154 NS LTDVD19 09CA ENG fm Page 35 Monday April 28 2008 10 03 AM ...

Страница 36: ... Richfield MN USA 55423 3645 2008 Best Buy Enterprise Services Inc All rights reserved INSIGNIA is a trademark of Best Buy Enterprise Services Inc Registered in some countries All other products and brand names are trademarks of their respective owners 08 1154 NS LTDVD19 09CA ENG fm Page 36 Monday April 28 2008 10 03 AM ...

Отзывы: