background image

17

Insignia NS-LCD32-09CA 32" LCD TV 720p

www.insignia-products.com

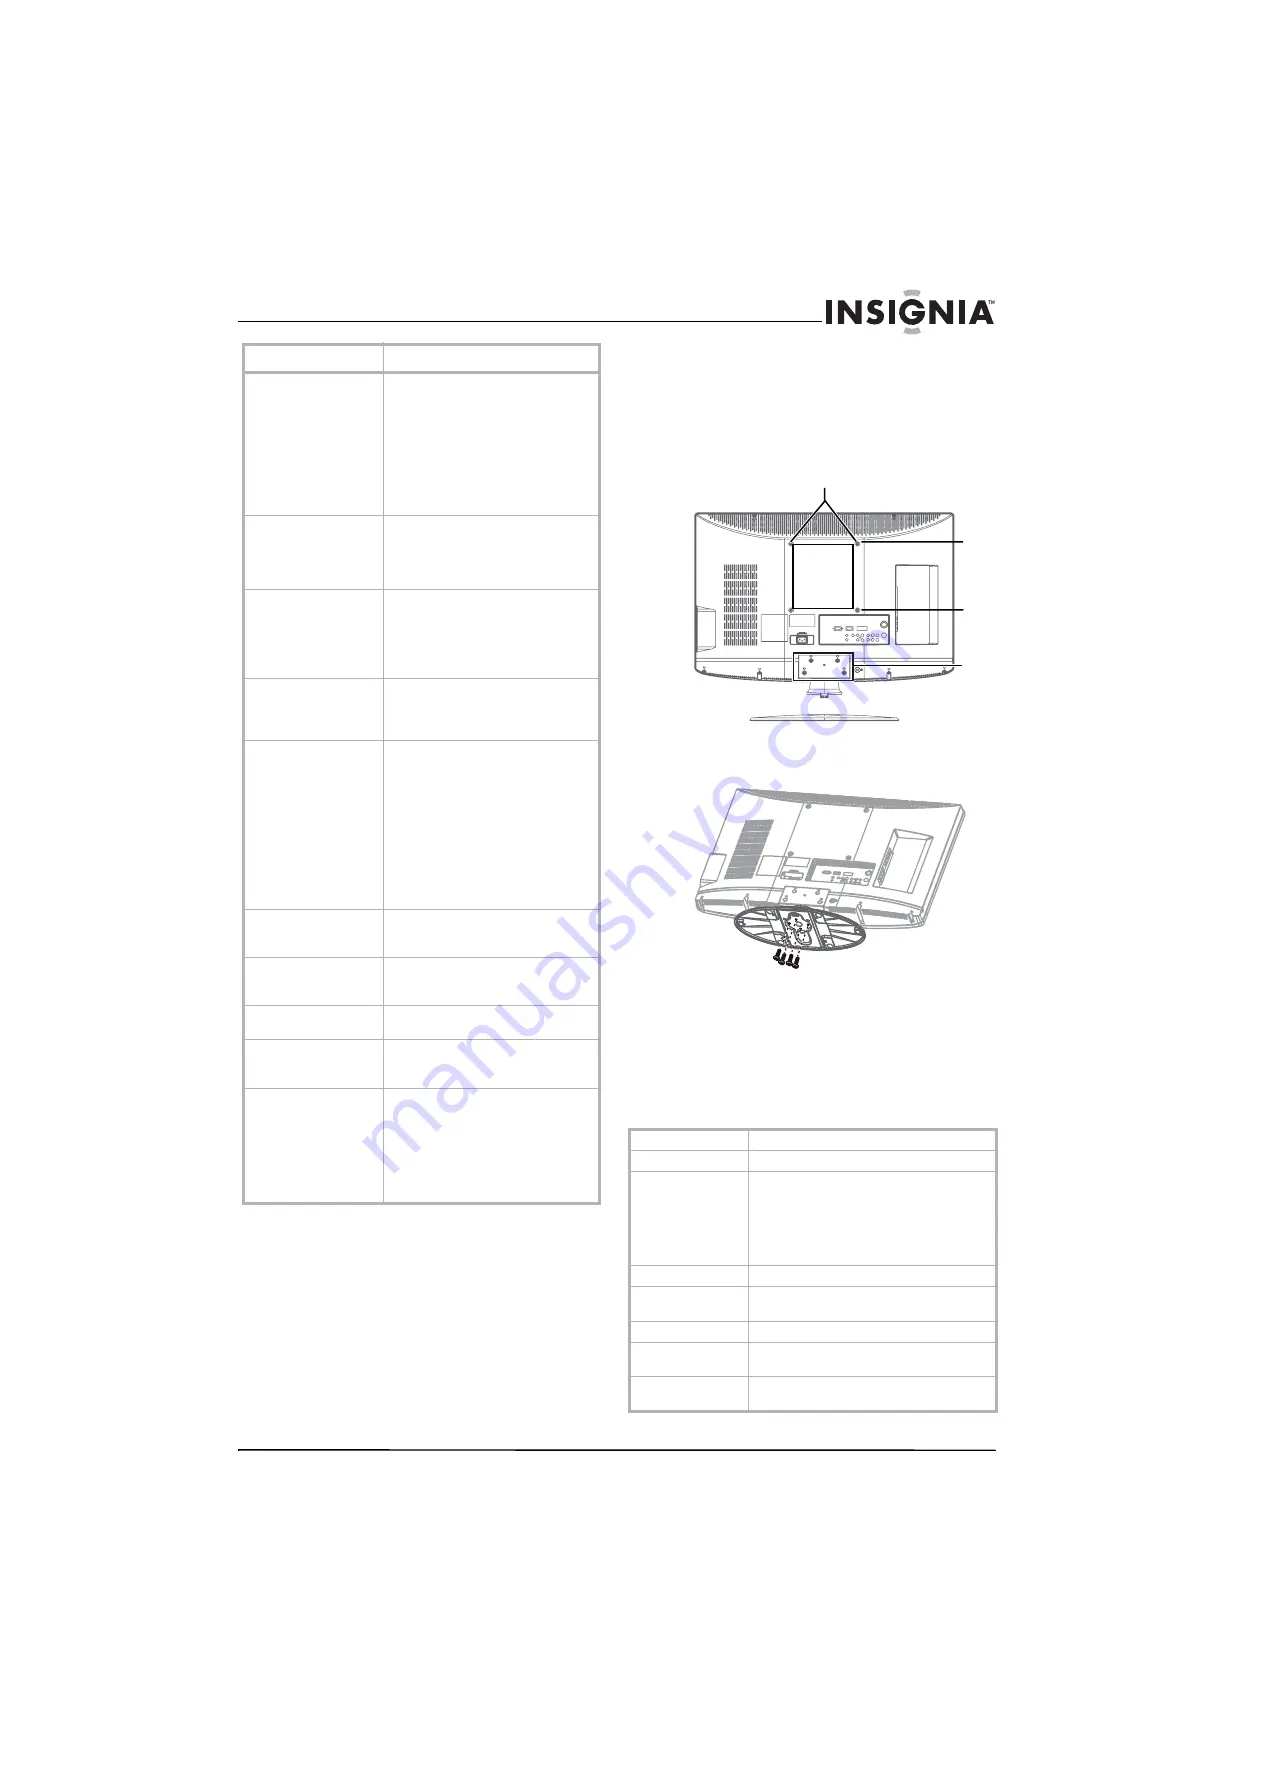
Wall-mounting your TV

Wall-mount hardware (sold separately) lets you 
mount your TV on a wall. For detailed 
information on mounting your TV on a wall, see 
the instructions provided with the wall-mount 
hardware.
Contact a technician for assistance when 
installing the wall-mount bracket. Best Buy is not 
responsible for any damage to your TV or injury 
to yourself or others. 

We suggest that you keep your TV at least 
2.36 inches (60 mm) from the wall to prevent 
cable interference.

To attach a wall-mount bracket to your TV:

1

Remove the two T4 and two M4 screws 
holding your TV to the stand.

2

Remove the four screws from the bottom of 
the stand.

3

Secure the wall-mount bracket to the back of 
your TV using four M6 screws as indicated in 
the illustration in Step 1.

Specifications

Design and specifications are subject to change 
without notice.

Poor picture

• Make sure that the room is not 

too bright. Light reflecting off 
the screen can make the picture 
difficult to see.

• If an S-VHS camera or a 

camcorder is connected while 
another connected device is 
turned on, the picture may be 
poor. Turn off one or more 
devices.

Horizontal dotted line

• Your TV may be too close to 

another electrical device, such 
as a hair dryer or neon light. 
Turn off the device or move 
your TV.

“Ghost” or double image

• This may be caused by 

obstructions to the antenna, 
such as high-rise buildings or 
hills. Using a highly directional 
antenna may improve the 
picture quality.

Picture has a few bright 
or dark dots

• A few bright or dark dots on an 

LCD screen is normal. It does 
not affect the operation of this 
TV.

Remote control does not 
work

• Press 

TV

.

• Replace the batteries. Make 

sure that the + and – symbols 
on the batteries align with the + 
and – symbols in the battery 
compartment.

• Clean the remote sensor on the 

front of your TV.

• Bright or fluorescent lighting 

may interfere with the remote 
control signal. Turn off the light 
or move your TV.

Snowy picture or noise

• Make sure that the A/V and 

antenna cables are connected 
correctly and securely.

VGA picture is not stable 
or synchronized

• Make sure that you have 

selected the correct VGA mode 
on your computer.

No output from one of 
the speakers

• Adjust the balance in the 

Sound 

menu.

Control buttons do not 
work

• Unplug the power cord, wait a 

few seconds, then plug the cord 
back in and turn on your TV.

After images appear

• Do not display a still image, 

such as a logo, game, or 
computer image, for an 
extended period of time. This 
can cause a permanent after 
image to be burned into the 
screen. This type of damage is 
not covered by your warranty.

Symptom

Possible solution

Analog standard

NTSC

Screen

32-inch

Channel coverage

VHF: 2-13
UHF: 14-69
CATV: Mid band - A-8 ~ A-1, A ~ I

Super band - J ~ W
Hyper band - AA ~ ZZ, AAA, BBB
Ultra band - 65 ~ 94, 100 ~ 135

Power source

AC 100~240 V 50/60 Hz

Power consumption <200 W

<1 W in standby mode

Audio power

5 W + 5 W internal speaker

S-Video input

Y: 1 V(p-p), 75 ohm, negative sync
C: 0.286 V(p-p) (burst signal), 75 ohm

Video/audio input

Video: 1 V(p-p), 75 ohm, negative sync
Audio: 500 mV(rms)

7.88 inches
(20 cm)

7.

88 inches

(20 cm)

Attach 
bracket 
here

Remove T4 
screws

Remove M4 
screws

Remove stand

Remove four stand screws

Содержание NS-LCD32-09CA

Страница 1: ...32 LCD TV 720p Téléviseur ACL de 32 po 720p NS LCD32 09CA User Guide Guide de l utilisateur ...

Страница 2: ......

Страница 3: ...g the video input source 12 Adjusting the volume 12 Displaying status information 12 Selecting a picture mode 12 Adjusting the backlight 12 Reducing video noise 12 Improving the video image 13 Adjusting the color temperature 13 Selecting the aspect ratio 13 Selecting the audio mode 13 Selecting the on screen menu language 14 Setting the sleep timer 14 Turning the blue screen on or off 14 Selecting...

Страница 4: ...ren can become excited while watching a program especially on a larger than life TV Make sure that you place or install the TV where it cannot be pushed pulled over or knocked down Make sure that you route all cords and cables so that they cannot be pulled or grabbed by curious children Wall mounting If you decide to wall mount your TV always One size of wall mount does not fit all Use only a wall...

Страница 5: ...rd replaced with an exact replacement part by an authorized service person Protect the power cord from physical or mechanical abuse such as being twisted kinked pinched closed in a door or walked upon Pay particular attention to plugs wall outlets and the point where the cord exits your TV 16 Ensure that you connect the earth ground wire to prevent possible electric shock If grounding methods are ...

Страница 6: ... Description 1 HDMI 1 HDMI 2 Connect HDMI devices to these jacks You can connect a DVI device to either of these jacks by using an HDMI to DVI adapter For more information see Connecting an HDMI device on page 7 2 PC IN AUDIO Connect the audio for a computer to this jack For more information see Connecting a computer on page 10 3 headphone Connect headphones to this jack For more information see C...

Страница 7: ... 12 Press to move up down left or right in the on screen menu 13 ENTER Press to confirm changes or turn options on or off in the on screen menu 14 P LOCK Press to open the password box After you enter the password you can adjust parental controls For more information see Setting parental controls on page 15 15 VGA ADJ Press to open the VGA adjustment menu You can select Auto adjust H position V po...

Страница 8: ...rter descrambler box you can connect your cable TV directly to your TV If you have a converter descrambler box you can connect your cable TV using an RF switch not supplied For more information about connecting a converter descrambler box contact your cable TV provider To connect cable TV without a converter descrambler box 1 Connect one end of a 75 ohm cable to the coaxial jack on the back of you...

Страница 9: ...our TV 2 Connect the other end of the cable to the COMPONENT OUT video jacks on the video device 3 Connect an audio cable to the COMPONENT L and R audio jacks on the back of your TV Note To connect a DVI device such as a computer connect an HDMI to DVI adapter to the HDMI cable then connect the DVI end of the cable to the DVI device RF switch Cable converter descrambler box Two set signal splitter...

Страница 10: ...e AV IN 1 S VIDEO or AV IN 2 S VIDEO jack on the back of your TV AV IN 1 S VIDEO AV IN 2 S VIDEO 2 Connect the other end of the cable to the S VIDEO OUT jack on the video device 3 Connect an audio cable to the AV IN 1 L and R audio or AV IN 2 L and R audio jacks depending on which S VIDEO jack you used 4 Connect the other end of the audio cable to the AUDIO OUT jacks on the video device 5 Turn on ...

Страница 11: ...a VCR for recording To connect a VCR for recording 1 Connect one end of a composite standard video cable to the AV OUT VIDEO jack on the back of your TV 2 Connect the other end of the cable to the VIDEO IN jack on the VCR 3 Connect an audio cable to the AV OUT L and R jacks on the back of your TV 4 Connect the other end of the cable to the AUDIO IN jacks on the VCR 5 Turn on your TV press SOURCE o...

Страница 12: ...phones Plug the headphone cable into the headphone jack on the back of your TV Note If you connect your TV to an HDMI jack on the computer you do not need to connect an audio cable If you connect your TV to a DVI jack on the computer using an HDMI to DVI adapter you need to connect an audio cable 750 S VIDEO R L VIDEO Pr Pb Y AUDIO HDMI 1 PC IN AV 1 IN AV OUT COMPONENT VGA HDMI 2 R L VIDEO R L HDM...

Страница 13: ...cally set up the channel list 1 Press MENU The on screen menu opens with VIDEO highlighted 2 Press or to highlight SETUP then press The SETUP menu opens 3 Press or to highlight AUTO SEARCH then press ENTER or to start the channel search Manually adding or deleting channels from the channel list After you create a channel list using the AUTO SEARCH option you can manually add or delete channels fro...

Страница 14: ... range is 0 to 100 SATURATION Adjusts the color saturation The range is 0 to 100 TINT When using the NTSC color system adjusts the color The range is 0 to 100 The NTSC color system is used in the United States and Canada SHARPNESS Adjusts the image sharpness The range is 0 to 10 4 Press MENU or EXIT to close the menu Adjusting the backlight To adjust the backlight 1 Press MENU The on screen menu o...

Страница 15: ...or EXIT to close the menu Selecting the audio mode To select the audio mode 1 Press MENU The on screen menu opens with VIDEO highlighted 2 Press or to highlight AUDIO then press The AUDIO menu opens 3 Press or to highlight PRESET then press or to select an audio mode You can select VOICE MUSIC THEATER PERSONAL Note You can also press COLOR TEMP to adjust the color temperature ENTER ENTER EXIT EXIT...

Страница 16: ...TV your TV can display a blue screen in TV AV S Video or HDTV mode If the blue screen feature is turned off your TV displays a snowy screen in TV mode or a black screen in other input modes To turn the blue screen on or off 1 Press MENU The on screen menu opens with VIDEO highlighted 2 Press or to highlight OPTION then press The OPTION menu opens 3 Press or to highlight BLUE SCREEN then press or t...

Страница 17: ...ress the number buttons to enter a four digit password Press or to move from digit to digit If you have not set up a password enter 0000 5 Press or to highlight SET PASSWORD then press the number buttons to enter a four digit password Press or to move from digit to digit To set the parental controls 1 Press MENU The on screen menu opens with VIDEO highlighted 2 Press or to highlight OPTION then pr...

Страница 18: ...for children under 17 years of age unless accompanied by a parent or guardian NC 17 Not suitable for children under 17 years of age X Adults only Rating Description E Not rated C Children C8 Children 8 years and above G General audience PG Parental guidance suggested 14 14 years old and above 18 Adult programming X Adults only Rating Description E Not rated G General audience 8 Children 8 years an...

Страница 19: ...uality Picture has a few bright or dark dots A few bright or dark dots on an LCD screen is normal It does not affect the operation of this TV Remote control does not work Press TV Replace the batteries Make sure that the and symbols on the batteries align with the and symbols in the battery compartment Clean the remote sensor on the front of your TV Bright or fluorescent lighting may interfere wit...

Страница 20: ...he equipment into an outlet on a circuit different from that to which the receiver is connected Consult the dealer or an experienced technician for help FCC warning Changes or modifications not expressly approved by the party responsible for compliance with the FCC Rules could void the user s authority to operate this equipment Cables Connections to this device must be made with shielded cables wi...

Страница 21: ...elevision with a screen 25 inches or larger call 1 888 BESTBUY Call agents will diagnose and correct the issue over the phone or will have an Insignia approved repair person dispatched to your home Where is the warranty valid This warranty is valid only to the original purchaser of the product in the United States and Canada What does the warranty not cover This warranty does not cover Customer in...

Страница 22: ...20 Insignia NS LCD32 09CA 32 LCD TV 720p www insignia products com ...

Страница 23: ... 33 Création de la liste des canaux 33 Changement de canal TV 33 Sélection de la source d entrée vidéo 33 Réglage du volume 34 Affichage des informations d état 34 Sélection du mode de l image 34 Réglage du rétroéclairage 34 Réduction du bruit vidéo 34 Amélioration de l image vidéo 35 Réglage de la température de la couleur 35 Sélection du format d écran 35 Sélection du mode audio 35 Sélection de ...

Страница 24: ...at children can become excited while watching a program especially on a larger than life TV Make sure that you place or install the TV where it cannot be pushed pulled over or knocked down Make sure that you route all cords and cables so that they cannot be pulled or grabbed by curious children Wall mounting If you decide to wall mount your TV always One size of wall mount does not fit all Use onl...

Страница 25: ...des rallonges des cordons effilochés ou des isolations de fils endommagées ou craquelées sont dangereux N importe quelle situation de ce type peut être la cause d un choc électrique ou d un incendie Examiner régulièrement le cordon d alimentation de l appareil et en présence de signes de dommage ou de détérioration débrancher l appareil et ne plus l utiliser tant qu un réparateur agréé n a pas rem...

Страница 26: ...ssible du point d entrée du câble Avertissement relatif aux téléphones cellulaires Pour éviter des interférences avec l image et le son du téléviseur des problèmes de fonctionnement voire même des dommages conserver les téléphones cellulaires et sans fil à l écart du téléviseur Fonctionnalités Face avant 1 Équipement de la compagnie d électricité 2 Système de mise à la terre des électrodes de la c...

Страница 27: ...o d un ordinateur à cette prise Pour plus d informations voir Connexion à un ordinateur à la page 31 8 ENTRÉE AV 1 VIDÉO Prise pour connecter un périphérique avec vidéo composite Pour plus d informations voir Connexion d un périphérique à vidéo composite à la page 30 750 S VIDEO R L VIDEO Pr Pb Y AUDIO HDMI 1 PC IN AV 1 IN AV OUT COMPONENT VGA HDMI 2 R L VIDEO R L 7 4 8 5 6 9 10 11 12 9 ENTRÉE AV ...

Страница 28: ...rmet de confirmer les modifications ou d activer ou de désactiver les options dans le menu d écran 14 VERROUILLAGE PARENTAL Permet d ouvrir la boîte de dialogue du mot de passe Quand le mot de passe a été saisi il est possible de régler les options du contrôle parental Pour plus d informations voir Configuration des contrôles parentaux à la page 37 15 Réglage VGA Permet d accéder au menu de réglag...

Страница 29: ...dine Pour plus d informations voir Visualisation des sous titres codés à la page 37 27 TEMPÉRATURE DE LA COULEUR Permet de régler la température de la couleur Pour plus d informations voir Réglage de la température de la couleur à la page 35 28 AUDIO Permet de sélectionner le mode audio Il est possible de sélectionner MUSIC Musique THEATRE Théâtre PERSONAL Personnalisé ou VOICE Voix Pour plus d in...

Страница 30: ...s HDMI tels qu un décodeur lecteur DVD R ou DVD ou un dispositif avec port DVI tel qu un ordinateur Pour connecter un périphérique HDMI 1 Connecter une extrémité du câble HDMI non fourni à la prise HDMI 1 ou HDMI 2 au dos du téléviseur 2 Connecter l autre extrémité du câble à la prise de sortie HDMI HDMI OUT au périphérique vidéo 3 Appuyer de façon répétée sur HDMI pour sélectionner le mode d affi...

Страница 31: ...on répétée sur SOURCE à l avant du téléviseur ou INPUT Entrée de la télécommande pour sélectionner Component Composantes Connexion d un périphérique avec S Vidéo Ce téléviseur a deux prises S Vidéo S Video Il est possible de connecter un périphérique avec S Vidéo à l une de ces prises Une connexion S Vidéo fournit une image vidéo meilleure qu une connexion vidéo composite Pour connecter un périphé...

Страница 32: ...INPUT Entrée de la télécommande pour sélectionner S Vidéo 1 S Video1 ou S Vidéo 2 S Video2 Connexion d un périphérique à vidéo composite Ce téléviseur a deux prises vidéo composites standard Il est possible de connecter un périphérique vidéo à l une de ces prises Une connexion vidéo composite fournit une image vidéo correcte Pour connecter un périphérique à vidéo composite 1 Connecter un câble vid...

Страница 33: ... sous tension puis appuyer de façon répétée sur SOURCE à l avant du téléviseur ou INPUT Entrée de la télécommande pour sélectionner TV puis syntoniser le canal à enregistrer 6 Mettre le magnétoscope sous tension y insérer une bande vidéo et appuyer sur la touche d enregistrement du magnétoscope Connexion à un ordinateur Il est possible de connecter un ordinateur au téléviseur en utilisant la prise...

Страница 34: ... téléviseur Mise sous et hors tension du téléviseur Pour mettre le téléviseur en marche 1 Brancher le cordon d alimentation du téléviseur sur une prise secteur Le téléviseur se met en mode attente et le témoin d alimentation s allume en rouge 2 Appuyer sur POWER Marche Arrêt Le téléviseur est mis sous tension et le témoin d alimentation devient bleu 3 Appuyer de nouveau sur POWER pour remettre le ...

Страница 35: ...iste des canaux à partir de l option Recherche automatique des canaux AUTO SEARCH il est possible d ajouter ou de supprimer manuellement des canaux de la liste Pour ajouter ou supprimer des canaux 1 Appuyer sur MENU Le menu d écran OSD s affiche avec VIDEO Vidéo en surbrillance 2 Appuyer sur ou pour mettre en surbrillance SETUP Configuration puis appuyer sur Le menu SETUP s affiche 3 Appuyer sur o...

Страница 36: ...tandard couleur NTSC permet de régler la couleur La plage de réglage s étend de 0 à 100 le standard couleur NTSC est utilisé aux États Unis et au Canada SHARPNESS Netteté Permet de régler la netteté de l image La plage de réglage s étend de 0 à 10 4 Appuyer sur MENU ou sur EXIT Quitter pour fermer le menu Réglage du rétroéclairage Pour régler le rétroéclairage 1 Appuyer sur MENU Le menu d écran OS...

Страница 37: ... d image Sélections possibles WIDE Panoramique ZOOM CINEMA Cinéma NORMAL Normale 4 Appuyer sur MENU ou sur EXIT Quitter pour fermer le menu Sélection du mode audio Pour sélectionner le mode audio 1 Appuyer sur MENU Le menu d écran OSD s affiche avec VIDEO Vidéo en surbrillance 2 Appuyer sur ou pour mettre en surbrillance AUDIO puis sur Le menu AUDIO s affiche 3 Appuyer sur ou pour mettre en surbri...

Страница 38: ...a durée avant la mise hors tension automatique du téléviseur Il est possible de sélectionner 5 min 10 min 15 min 30 min 45 min 60 min 90 min 120 min 180 min ou 240 min 4 Pour désactiver l arrêt différé sélectionner Off 5 Appuyer sur MENU ou sur EXIT Quitter pour fermer le menu Activation ou désactivation de l écran bleu Quand le téléviseur ne reçoit aucun signal il peut afficher un écran bleu en m...

Страница 39: ...par les enfants Le contrôle parental inclut deux classifications MPAA en fonction de l âge et les directives parentales TV en fonction de l âge et du contenu Un programme TV pouvant utiliser soit les niveaux MPAA ou les directives parentales TV les deux classifications doivent être réglées pour un contrôle total Avant de sélectionner les classifications il est nécessaire de configurer le mot de pa...

Страница 40: ...aîner un fonctionnement défectueux Température de stockage 32 à 122 F 0 à 50 C Température de fonctionnement 41 à 104 F 5 à 40 C Ne pas exposer le téléviseur à la lumière solaire directe ou le disposer à proximité d une source de chaleur Classification Description OFF Désactivée Non classifié TV Y Enfants de tous âges TV Y7 Enfants de 7 ans et plus TV G Tous publics TV PG Surveillance parentale su...

Страница 41: ...onne image mais pas de son Augmenter le volume Vérifier que le son n est pas mis en sourdine Vérifier que le mode audio correct est sélectionné Bonne qualité du son mais les couleurs sont médiocres Régler le contraste la couleur et la luminosité Image de mauvaise qualité Vérifier que la luminosité de la pièce n est pas trop forte La lumière reflétée par l écran peut rendre l image difficile à voir...

Страница 42: ...n de l une ou de plusieurs des mesures suivantes Réorienter ou déplacer l antenne réceptrice Augmenter la distance entre l équipement et le récepteur Brancher l équipement sur la prise électrique d un circuit différent de celui auquel le récepteur est relié Contacter le revendeur ou un technicien qualifié pour toute assistance Avertissement de la FCC Tous changements ou toutes modifications qui ne...

Страница 43: ...onformité avec la réglementation de la FCC Déclaration NMB 003 du Canada This Class B digital apparatus complies with Canadian ICES 003 Cet appareil numérique de la classe B est conforme à la norme NMB 003 du Canada Cable compatible Television Apparatus Télévision câblocompatible Canada Droit d auteur HDMI le logo HDMI et High Definition Multimedia Interface Interface multimédia haute définition s...

Страница 44: ...42 Insignia NS LCD32 09CA Téléviseur ACL de 32 po 720p www insignia products com ...

Страница 45: ... agréé par Insignia pour la réparation à domicile Où cette garantie s applique t elle Cette garantie ne s applique qu à l acheteur original du produit aux États Unis et au Canada Ce qui n est pas couvert par cette garantie limitée La présente garantie ne couvre pas la formation du client Installation les réglages de configuration les dommages esthétiques les dommages résultants de catastrophes nat...

Страница 46: ...44 Insignia NS LCD32 09CA Téléviseur ACL de 32 po 720p www insignia products com ...

Страница 47: ......

Страница 48: ...gistered in some countries All other products and brand names are trademarks of their respective owners Distribué par Best Buy Purchasing LLC 7601 Penn Avenue South Richfield MN USA 55423 3645 2007 Best Buy Enterprise Services Inc Tous droits réservés INSIGNIA est une marque de Best Buy Enterprise Services Inc Déposée dans certains pays Tous les autres produits ou noms de marques sont des marques ...

Отзывы: