background image

14

INSTALLATION INSTRUCTIONS

www.insigniaproducts.com

Exhaust hood types

If you install your dryer into an existing exhaust system you must make sure that:
• The exhaust system meets all local, state, and national codes.
• You do not use a flexible plastic duct.
• You inspect and clean all lint buildup from inside the existing duct.
• The duct is not dented or crushed.
• The exhaust hood damper opens and closes freely.
For best results, the static pressure in any exhaust system should be between .3 to .8 inches of water column, and it 
cannot be less than 0 under any circumstances with an installed duct with a four inch diameter. 

Electric requirements—Canada only

• You need a 120/240 volt, 60Hz AC approved electrical service fused through a 30-ampere fuse or circuit breaker 

on both sides of the line.

• All Canadian models are shipped with the power cord attached. The power cord should be plugged into a 

30-ampere receptacle.

• In Canada, you may not convert a dryer to 208 volts.

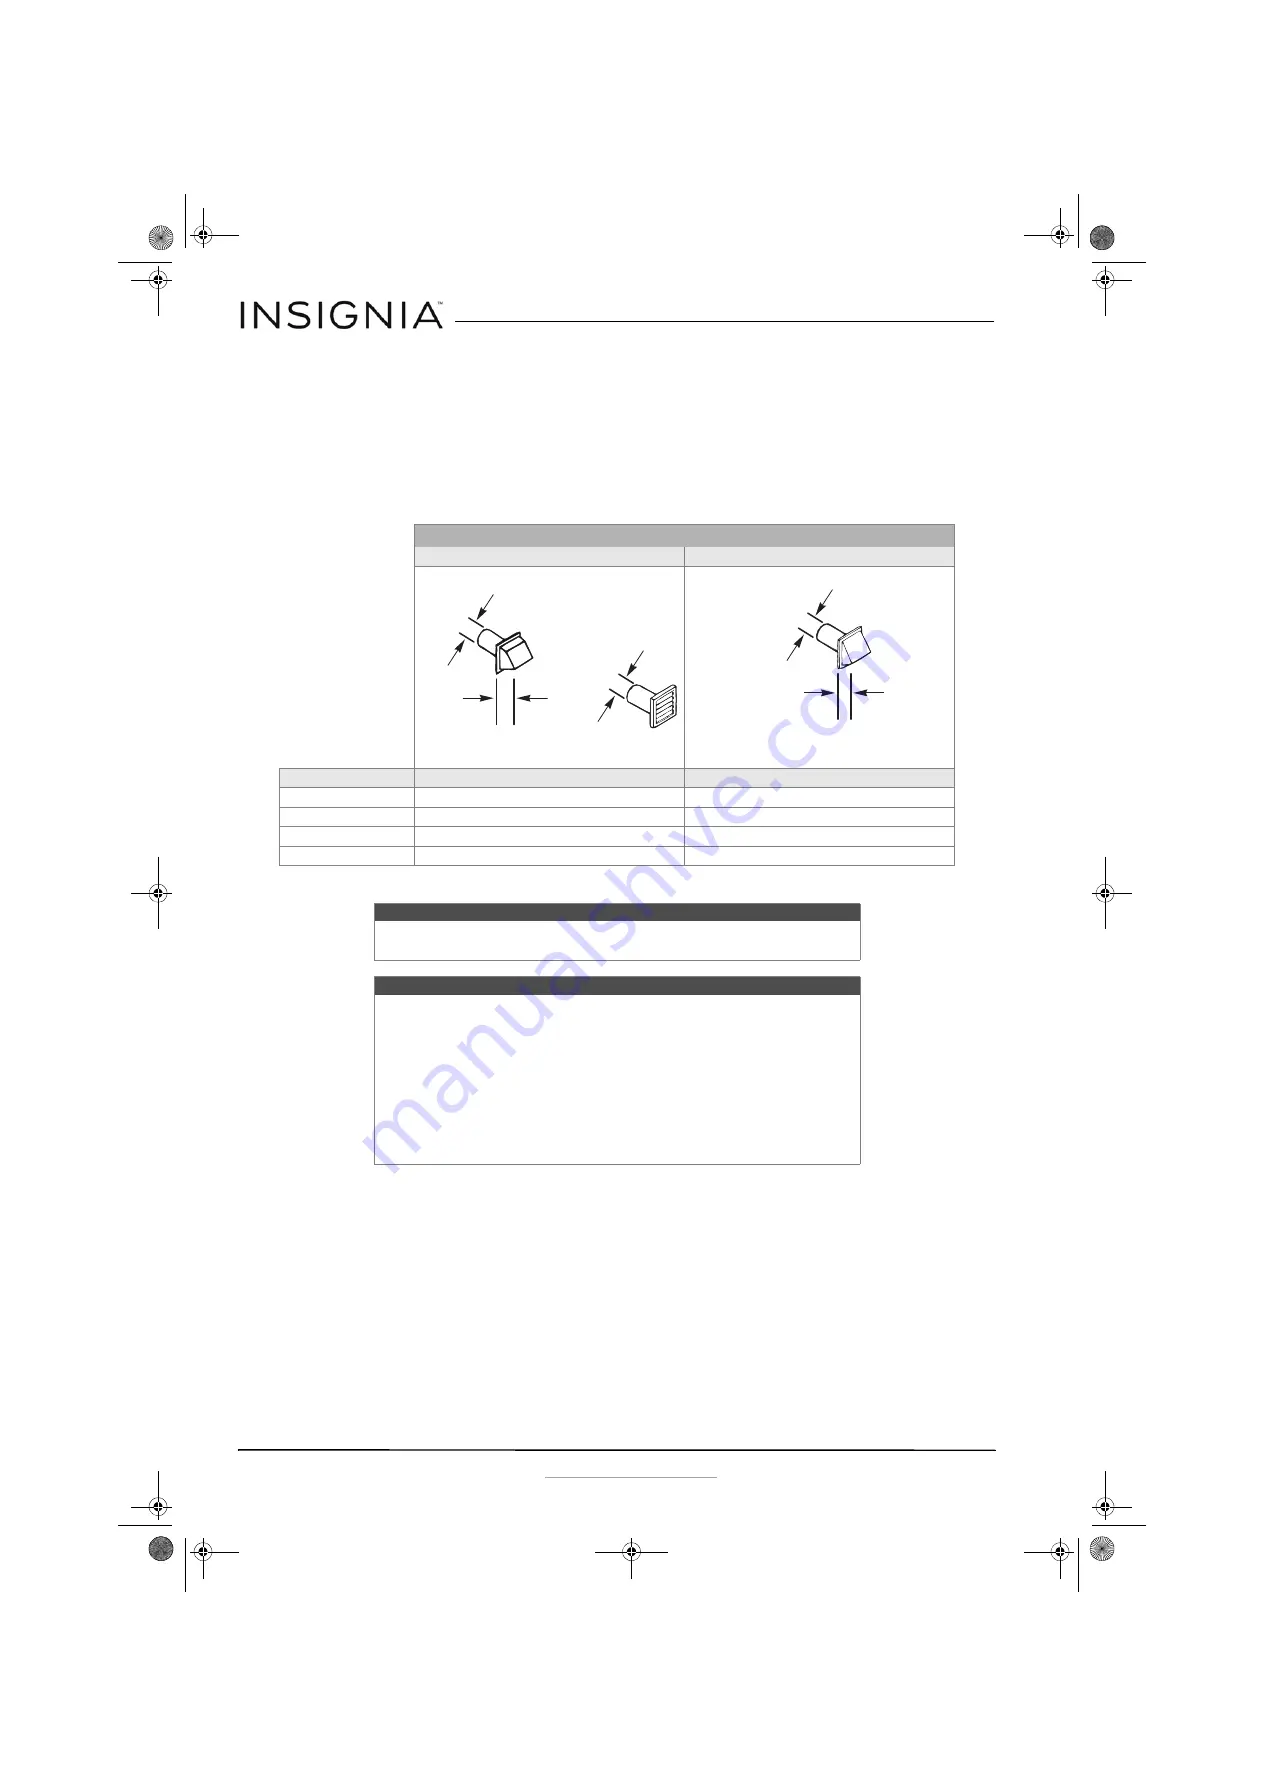
WEATHER HOOD TYPES

Recommended

Use only for short-run installation

# of 90° elbows

Rigid Metallic

Rigid Metallic

0

90 ft. (27.4 m)

60 ft. (18.3 m)

1

60 ft. (18.3 m)

45 ft. (13.7 m)

2

45 ft. (13.7 m)

35 ft. (10.7 m)

3

35 ft. (10.7 m)

25 ft. (7.6 m)

Note

For products sold in Canada, your dryer has a power cord with an 
equipment-grounding conductor and a grounding plug.

Warning

• The power cord plug must be plugged into an appropriate outlet that is 

properly installed and grounded in accordance with all local codes and 
ordinances.

• Do not modify the plug provided with your dryer. If the plug does not fit 

the outlet, have a proper outlet installed by a qualified electrician.

• If you permanently wire your dryer instead of using a power cord, your 

dryer must be connected to a permanently grounded metal wiring 
system, or an equipment grounding conductor must be run with the 
circuit conductors and connected to the equipment grounding terminal 
or lead on the dryer. 

in

. (

10

.2

 c

m

)

4 in. 

(10.2 cm)

in

. (

10

.2

 c

m

)

in

. (

10

.2

 c

m

)

2.5 inch. 

(6.4 cm)

NS-FDRE67WH8A-C_NS-FDRE67WH8A_NS-FDRG67WH8A_17-0815_MAN_V5_EN.fm  Page 14  Wednesday, November 15, 2017  12:25 PM

Содержание NS-FDRE67WH8A

Страница 1: ...ese instructions to prevent any damage USER GUIDE 6 7 Cu Ft Front Load Electric and Gas Dryers NS FDRE67WH8A C NS FDRE67WH8A NS FDRG67WH8A NS FDRE67WH8A C_NS FDRE67WH8A_NS FDRG67WH8A_17 0815_MAN_V5_EN fm Page 1 Wednesday November 15 2017 12 25 PM ...

Страница 2: ...nloading your dryer 23 Setting the child lock 24 Cleaning the lint filter 24 Dryer options and settings 25 Special laundry tips 26 Maintaining your dryer 26 Cleaning the exterior 26 Cleaning the drum 26 Cleaning the control panel 26 Cleaning and inspecting the exhaust system 27 Troubleshooting 27 Understanding the error codes 28 Specifications 28 ONE YEAR LIMITED WARRANTY 29 Introduction Congratul...

Страница 3: ...ents or other flammable or explosive substances They emit vapors that could ignite or explode Any material that has been in contact with a cleaning solvent or flammable liquids or solids should not be placed in your dryer until all traces of these flammable liquids or solids and their fumes have been removed CAUTION RISK OF ELECTRIC SHOCK DO NOT OPEN This indicates that hazards or unsafe practices...

Страница 4: ...5 Packaging material can be dangerous for children There is a risk of suffocation Keep all packaging away from children 16 Always check the inside of the dryer for foreign objects before loading laundry Keep the door closed when not in use 17 Do not use fabric softeners or products to eliminate static unless recommended by the manufacturer of the fabric softener or product 18 Clean the lint screen...

Страница 5: ...tified by the appliance manufacturer as suitable for use with clothes dryer Flexible venting materials are known to collapse be easily crushed and trap lint These conditions will obstruct with the clothes dryer s airflow and increase the risk of fire 5 To reduce the risk of severe injury or death follow all installation instructions Features Package contents 6 7 Cu Ft Front Load Electric or Gas Dr...

Страница 6: ...insigniaproducts com Back components Wiring box Back venting hole Power cord gas dryer only Gas inlet Gas Dryer Electric Dryer NS FDRE67WH8A C_NS FDRE67WH8A_NS FDRG67WH8A_17 0815_MAN_V5_EN fm Page 6 Wednesday November 15 2017 12 25 PM ...

Страница 7: ...any time during the Wrinkle Prevent cycle 6 START PAUSE button Press to start or pause the drying cycle When you pause the cycle you can add items to the dryer but your cannot change any settings 7 Cycle status indicators Indicate what stage in the drying cycle your dryer is in For example when your dryer is in the cooling down stage of the cycle the Cooling indicator lights When the cycle is comp...

Страница 8: ...ll out of the reach of children Do not operate your dryer on the foam base cushion Doing so will result in serious vibration which could cause equipment damage or result in physical injury Important to installer Read the following instructions carefully before installing the dryer These instructions should be kept for future reference The dryer is not suitable for installation in a mobile home Rem...

Страница 9: ...eather Keep the dryer area clear of combustible materials gasoline and other flammable vapors and liquids Your dryer produces combustible lint Keep the area around the dryer lint free 27 in 42 9 in 109 0 cm 68 6 cm 29 in 73 6 cm 1 8 in 4 6 cm 42 9 in 109 0 cm 48 6 in 123 5 cm NS FDRE67WH8A C_NS FDRE67WH8A_NS FDRG67WH8A_17 0815_MAN_V5_EN fm Page 9 Wednesday November 15 2017 12 25 PM ...

Страница 10: ...en your appliances and from any surrounding walls If your washer is a top loading washer make sure that you have enough room to open the washer lid 24 in 61 cm 5 in 12 7 cm 1 in 2 5 cm 27 in 68 6 cm 2 in 5 1 cm 1 in 2 5 cm NS FDRE67WH8A C_NS FDRE67WH8A_NS FDRG67WH8A_17 0815_MAN_V5_EN fm Page 10 Wednesday November 15 2017 12 25 PM ...

Страница 11: ... clearance is acceptable Minimum clearances between your dryer and adjacent walls or other surfaces are Either side 1 in 2 5 cm Rear 5 in 12 7 cm Top 24 in 61 cm Front 2 in 5 1 cm Warning You must exhaust your dryer to the outside to reduce the risk of fire when installed any place inside the house Do NOT install another fuel burning appliance in the same closet as your dryer For information about...

Страница 12: ...n result if the flexible metal duct is bent too sharply Never install any type of flexible duct in walls ceilings or other concealed spaces Keep the exhaust duct as straight and short as possible Secure joints with duct tape Do not use screws Plastic flexible ducts can kink sag be punctured reduce airflow extend drying times and affect your dryer s operation Exhaust systems longer than recommended...

Страница 13: ...nometer at the point where the exhaust duct connects to the dryer 3 Make sure that the lint filter is clean 4 Set your dryer to the no heat setting then turn on your dryer A Dryer B 10 in 25 4 cm minimum of straight pipe measure back pressure from the center C To vent system D Location on back pressure measurement E Inclined manometer NS FDRE67WH8A C_NS FDRE67WH8A_NS FDRG67WH8A_17 0815_MAN_V5_EN f...

Страница 14: ...a dryer to 208 volts WEATHER HOOD TYPES Recommended Use only for short run installation of 90 elbows Rigid Metallic Rigid Metallic 0 90 ft 27 4 m 60 ft 18 3 m 1 60 ft 18 3 m 45 ft 13 7 m 2 45 ft 13 7 m 35 ft 10 7 m 3 35 ft 10 7 m 25 ft 7 6 m Note For products sold in Canada your dryer has a power cord with an equipment grounding conductor and a grounding plug Warning The power cord plug must be pl...

Страница 15: ...ructions on page 17 for instructions on how to connect a power cord to your dryer Note For products sold in the U S your dryer has an optional cord with an equipment grounding conductor and a grounding plug which is sold separately Warning The power cord plug must be plugged into an appropriate outlet that is correctly installed and grounded in accordance with all local codes and ordinances If you...

Страница 16: ...es or in the absence of local codes with the National Electrical Code ANSI NFPA No 70 Latest Revision for the U S or the Canadian Electrical Code CSA C22 1 Latest Revisions and local codes and ordinances for Canada You are responsible for providing adequate electrical services for your dryer All gas installations must be done in accordance with the National Fuel Code ANSI Z2231 Latest Revision for...

Страница 17: ...Step 1 Make sure that the floor is a solid level surface Use a level to make sure that the floor where you are installing your dryer is level This helps minimize vibration noise and unwanted movement Step 2 Move your dryer to the location you selected Move your dryer to the location you selected but do not push your dryer all the way back into the location You need to connect the power cord and du...

Страница 18: ...dryer with a poor exhaust system DO NOT use unnecessarily long ducts that have many elbows DO NOT use plastic flexible exhaust material Use a 4 in 10 2 cm diameter rigid metal duct Tape all joints including at the dryer DO NOT use sheet metal screws that can accumulate lint when assembling the ducting Joints should be taped DO NOT let the duct tape cover the ventilation slots on the back of your d...

Страница 19: ...n the strain relief screws 5 Insert the tab of the terminal block cover into your dryer s rear panel slot then secure the cover with a screw Four wire outlet 1 Remove the center terminal block screw 2 Connect the ground wire green or unwrapped of the power cord to the external ground conductor screw Important Before you connect the power cord review the electric requirements in Electric requiremen...

Страница 20: ... your dryer Extend the feet only as much as is necessary If the feet are extended too much your dryer may vibrate Step 6 Plug in your dryer Make sure that all exhaust and electrical connections are complete then plug your dryer into the electrical outlet Step 7 Check the final installation Before you use your dryer make sure that Your dryer is plugged into an electrical outlet and is properly grou...

Страница 21: ...he right side of the dryer and the screws for the locker cover on the left side of the dryer 4 Install the locker onto the right side of the dryer with the screws you just removed then install the locker cover on the left side of the dryer 5 Remove the screws around the door Remove the screws Remove the screws Caution Be careful not to drop the door when removing the screws Remove the locker cover...

Страница 22: ...with the screws you removed previously 8 Install the hinges onto the left side of the dryer 9 Align the hinges on the door with the hinge screw holes on the front of your dryer then secure the door with the four screws you previously removed Inside door board Outside door board Screws NS FDRE67WH8A C_NS FDRE67WH8A_NS FDRG67WH8A_17 0815_MAN_V5_EN fm Page 22 Wednesday November 15 2017 12 25 PM ...

Страница 23: ...ontrol panel buttons like Wrinkle Prevent to customize the drying cycle For descriptions of buttons see Control panel on page 7 For information about which buttons are available for each cycle type see Dryer options and settings on page 25 3 Optional After you select a drying cycle and customize the cycle press and hold the MY CYCLE button for three seconds to save your settings The light next to ...

Страница 24: ...ess and Temp buttons for three seconds Cleaning the lint filter Gently pull the lint filter out of the slot at the bottom of the drum Remove the accumulated lint then insert the filter back into the slot Note You should clean the lint filter after every load to avoid lint buildup and to make sure that your dryer is running efficiently See Cleaning the lint filter on page 24 Warning Do not operate ...

Страница 25: ... Time adjust Default time Maximum Amount Normal Cotton Underwear Linen High Very More Normal Less Damp 50 min Delicates Sensitive items Low Very More Normal Less Damp 34 min Casual Wrinkle free cottons Synthetic fabrics Knits Medium Very More Normal Less Damp 27 min Towels Towels Heavy cottons High Very More Normal Less Damp 58 min Sanitize Towels Bedding Children s clothing High Very 60 min Heavy...

Страница 26: ...dried Blankets Use the Normal cycle and dry only one blanket at a time for best tumbling action Make sure that the item is thoroughly dry before using or storing During the drying cycle you may need to reposition the item to make sure that it is completely dried Curtains and draperies Use the Casual cycle Medium temperature setting and Less dryness level to help minimize wrinkling Dry these in sma...

Страница 27: ...ad Dry heavy items and lightweight items separately If you are drying large bulky items like blankets or comforters try repositioning the load to ensure even drying The load may be too small to tumble correctly Add a few towels Clean the lint filter and exhaust duct Check the circuit breaker and fuses for your dryer s electrical connection Make sure that the outside exhaust hood opens and closes f...

Страница 28: ... can clog the filter Some fabrics are lint producers like a fuzzy white cotton towel and they should be dried separately from clothes that are lint trappers like a pair of black linen pants Divide larger loads into smaller loads for drying PROBLEM SOLUTION ERROR CODE POSSIBLE CAUSE SOLUTIONS C9 The PCBs failed Contact authorized service personnel for help DO NOT use your dryer E4 The humidity sens...

Страница 29: ...nts Cosmetic damage Damage due to weather lightning and other acts of God such as power surges Accidental damage Misuse Abuse Negligence Commercial purposes use including but not limited to use in a place of business or in communal areas of a multiple dwelling condominium or apartment complex or otherwise used in a place of other than a private home Modification of any part of the Product includin...

Страница 30: ...y and its affiliated companies Distributed by Best Buy Purchasing LLC 7601 Penn Ave South Richfield MN 55423 U S A 2017 Best Buy All rights reserved Made in China V5 ENGLISH 17 0815 NS FDRE67WH8A C_NS FDRE67WH8A_NS FDRG67WH8A_17 0815_MAN_V5_EN fm Page 32 Wednesday November 15 2017 12 25 PM ...

Отзывы: