background image

21

NS-DVDR1 DVD Recorder

www.insignia-products.com

Viewing and recording a CATV channel

To view or record a CATV channel:

Tune the TV to the recorder output channel 

(CH 3 or 4).

Set the recorder channel selector to the cable 

output channel. (Example: CH3)

Select a channel using the cable converter.

I

ns

t

ant t

i

mer recording

Instant Timer Recording lets you make a 
recording easily of a preset length without using 
the program timer.

To make an instant timer recording:

Follow Steps 1-4 in 

“Recording from a TV” on 

page 20.

Press  

REC repeatedly to select the 

recording time length. Recording starts after 
the first press. Each subsequent press 
increases the recording time by 10 minutes.

Checking the recording time

To check the recording time:

Press 

 REC or DISPLAY once to check 

the total recording time and the time left for 
the recording.

Extending the recording time

To extend the recording time:

The recording time can be extended anytime 
by pressing 

 REC.

Each subsequent press increases the 
recording time by 10 minutes.

Pausing the recording

To pause the recording:

Press PAUSE/STEP (

) to pause the 

recording.

When you want to continue recording, press 

PAUSE/STEP  (

)  or 


REC.

Timer recording

The timer recording function lets you record up 
to 16 programs within a period of one month.

To use timer recording:

Press HOME. The Home menu opens.
Select TVTimer Record, then press 

ENTER.

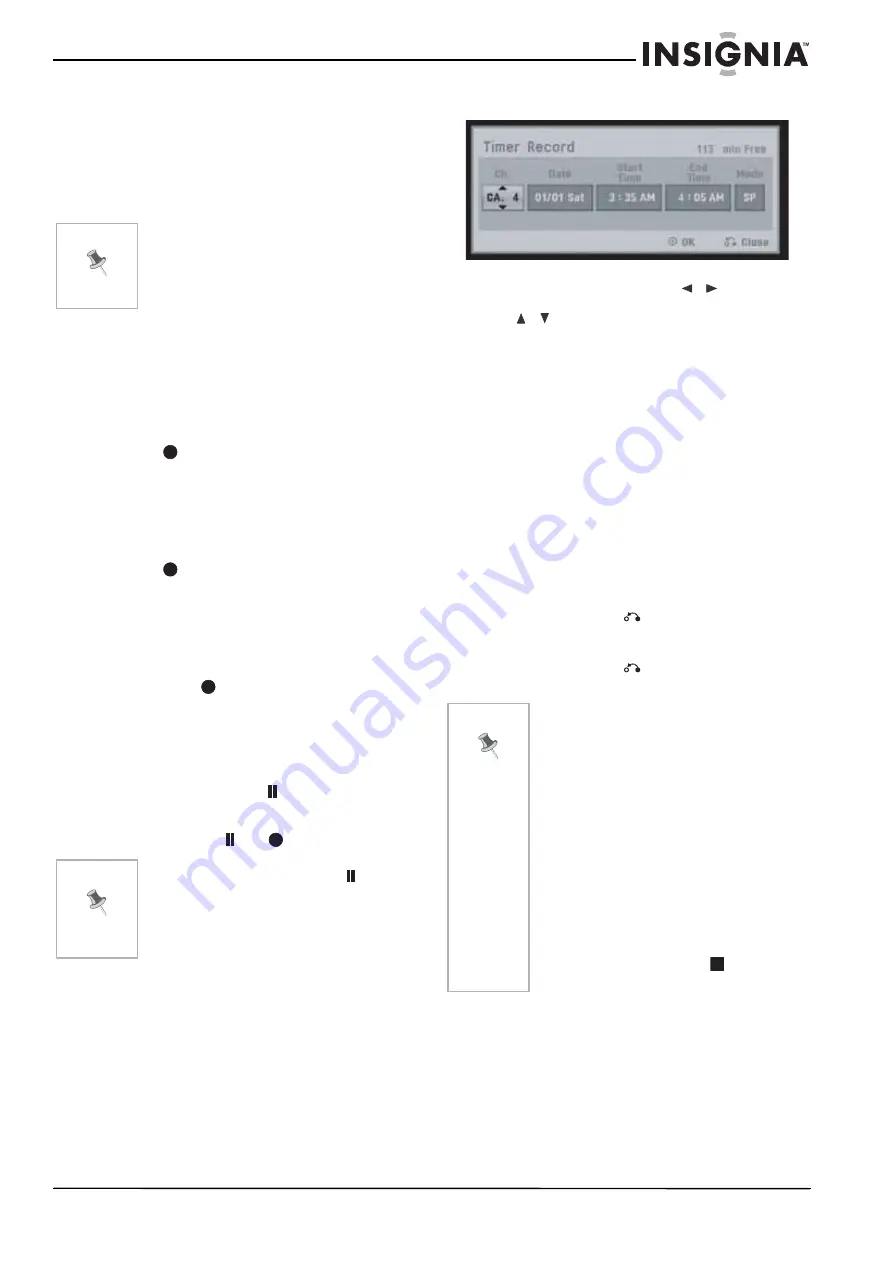
Select NEW, then press ENTER. The Timer 

Record menu opens.

Enter the necessary information for your 

timer recording(s). Press 

/

 (left/right) to 

move the cursor left or right, and press 

/

 (up/down) to change the setting at the 

current cursor position.

Ch. – Choose a channel (2-69 or 1-125 for 
antenna or cable channels respectively, 
excluding skipped channels), or one of the 
external inputs from which to record (AV1 
or AV2).

Date – Choose a date up to 1 month in 
advance, or select a daily or weekly 
program.

Start Time – Set the recording start time.

End Time – Set the recording end time.

Mode – Choose a record mode.
DVD: EP, LP, SP, XP, or AT (Auto)
AT(Auto) mode determines how much 
time is available on the disc and switches 
record mode, if necessary, to complete 
recording the program.

Press RETURN (

) to exit the Timer Record 

menu.

Press ENTER to save the record settings.
Press RETURN (

) to exit the Timer Record 

List.

Note

With this connection, you cannot record one 
program while viewing another.
If you are using a cable box to tune 
channels, it is not necessary to do Auto 
Channel Set. 

Note

• If you press PAUSE/STEP (

) during 

the instant timer recording, the 
recording will be canceled.

• Your recorder will automatically power 

off when the instant timer recording 
ends.

Note

• You must insert a recordable disc.
• The Timer indicator lights on the front 

panel display.

• The recorder will record the audio 

according to the current TV tuner 
setting (Stereo, Mono or SAP). Press 
the AUDIO button to set the audio 
before switching the recorder to 
Standby mode.

• The recorder will automatically power 

off when the Timer Recording ends.

• There is a short delay when a timer 

recording finishes to confirm the 
recorded program. If two timer 
recordings are set to record 
sequentially (one right after the other), 
the very beginning of the later program 
may not be recorded.

• You must press STOP (

) to stop the 

timer recording.

Содержание NS-DVDR1

Страница 1: ...DVD Recorder Graveur de DVD Grabadora DVD NS DVDR1 ...

Страница 2: ......

Страница 3: ...rupted service and that for some specific reason such as the possibility of the loss of an authorization code for a CATV converter is not intended to be unplugged by the user for cleaning or any other purpose may exclude the reference to unplugging your recorder in the cleaning description otherwise required in this instruction Attachments Do not use attachments not recommended by your recorder ma...

Страница 4: ...gs convenience receptacles and the point where they exit from your recorder Outdoor antenna grounding If an outside antenna or cable system is connected to your recorder make sure that the antenna or cable system is grounded so as to provide some protection against voltage surges and built up static charges Article 810 of the National Electrical Code ANSI NFPA No 70 provides information with respe...

Страница 5: ...rs stoves or other products including amplifiers that produce heat Introduction To ensure correct use of your recorder read this owner s manual carefully and retain for future reference About the symbol The symbol may appear on your TV display during operation and indicates that the function is not permitted by the recorder or specific media Symbols used in this manual A section whose title has on...

Страница 6: ...sc Characteristics DVD 8 cm 12 cm disc DVDs such as movies that can be purchased or rented Audio CD 8 cm 12 cm disc Music CDs or CD Rs CD RWs in music CD format that can be purchased CD R CD RW 8 cm 12 cm disc CD R CD RWs that contain audio titles MP3 WMA JPEG or DivX files Note Depending on the conditions of the recording equipment or the CD R RW or DVD R RW disc itself some CD R RW or DVD R RW d...

Страница 7: ...n and off 2 Disc tray DVD deck Place a disc on the tray when it opens 3 Display window Shows the current status of the recorder lights when the recorder is in timer recording or when a timer recording is programmed lights when the recorder is recording indicates total playing time elapsed time remaining time or current deck status 4 OPEN CLOSE button Press to open or close the disc tray 5 PROGRESS...

Страница 8: ...rature 7 AC power cord Plug into an AC power outlet 8 RF OUT Connect to the RF coaxial input on a TV 9 S VIDEO OUT Connect to the S Video input jack on a TV 10 COMPONENT PROGRESSIVE SCAN VIDEO OUT Y Pb Pr Connect to the component input jacks on a TV if available Caution Do not touch the inner pins of the jacks on the back panel Electrostatic discharge may cause permanent damage to the recorder Ite...

Страница 9: ...Press to select the record mode SP LP EP or XP 22 AUDIO Press to select an audio language or audio channel Item Button Function 23 SUBTITLE Press to select a subtitle language 24 DISPLAY Press to open the on screen display which provides current status information and where you can change settings and options 25 Direction Press to select menu options 26 CH or Press to select a channel or adjust th...

Страница 10: ...he jack marked ANT IN on your recorder OR If your antenna cable is flat connect it to a 300 ohm to 75 ohm antenna adapter not supplied and slip the adapter over the ANT IN jack Do not try to screw it into to the recorder To connect the recorder to cable TV If your cable connection has no converter or descrambler unscrew the cable from your TV and attach it to the ANT IN jack on the recorder OR If ...

Страница 11: ...ecting to an amplifier To connect two channel analog stereo or Dolby Pro Logic II Pro Logic Connect the Left and Right AUDIO OUT or AV AUDIO OUT jacks on the recorder to the audio left and right in jacks on your amplifier receiver or stereo system using the audio cables supplied Note If you use this connection you must set the recorder s RF output channel then set the TV to receive this channel Se...

Страница 12: ...ry component such as a VCR or camcorder using the optional audio video cables Refer to Recording from external components on page 22 Connecting a digital camcorder Use a DV cable not supplied to connect the DV in out jack of your DV digital camcorder to the front panel DV IN jack of your recorder Note Due to the DTS Licensing agreement the digital output will be in DTS digital out when DTS audio s...

Страница 13: ...pens so you can set the language channels and clock To set up your recorder with the Setup Wizard 1 Use to select a language for the Setup menu and on screen display then press ENTER 2 Check your antenna connections then press 3 Press ENTER to begin the channel search 4 Select Auto or Manual to set the clock then press ENTER Auto Press to choose your Time Zone Press to choose the Daylight Savings ...

Страница 14: ...ard or forward DVD 5 steps DivX audio CD 3 steps In PAUSE mode press for slow motion playback 4 steps SKIP Press during playback to go to the next chapter or track or to return to the beginning of the current chapter or track Press SKIP twice briefly to step back to the previous chapter or track To go directly to any chapter during DVD playback press DISPLAY twice and press to select the chapter i...

Страница 15: ...D ALL ACD RWVR ACD MP3 WMA MP3 WMA DVD ALL AUDIO Press AUDIO then press the buttons repeatedly repeatedly to hear a different audio language or audio track Note Some discs feature both Dolby Digital and DTS soundtracks There is no analog audio output when DTS is selected To listen to the DTS soundtrack connect your recorder to a DTS decoder through one of the digital outputs See To connect a two c...

Страница 16: ...ctures with less flickering If you are using the Component Video Out Progressive Scan jacks but are connecting the recorder to a standard analog television set Progressive Scan to OFF If you are using the Component Video Out Progressive Scan jacks for connection to a TV or monitor that is compatible with a progressive scan signal set Progressive Scan to ON Caution Once the setting for progressive ...

Страница 17: ...to rate the DVD see Area code list on page 30 Recording Settings Disc Record Mode You can set the picture quality for recording a DVD XP excellent SP standard LP low EP extended DV Record Audio You can set this to choose which of two digital camcorder soundtracks to use Audio 1 to use the sound that was recorded when a recording was made or Audio 2 to use the overdubbed sound Auto Chapter You can ...

Страница 18: ...red point on the disc The Marker icon briefly appears on the TV screen 2 Repeat to enter up to six markers To recall or clear a marked scene 1 During disc playback press SEARCH The marker search menu appears on the screen 2 Press to select a marked scene that you want to recall or clear 3 Press ENTER Playback starts from the marked scene OR Press CLEAR and press to select OK then press ENTER to de...

Страница 19: ...48kHz WMA Bit rate within 8 320kbps MP3 32 192kbps WMA CD R Format ISO 9660 and JOLIET DVD R RW Format ISO 9660 UDF Bridge format Maximum Files Disc Less than 1999 total number of files and folders Playing an audio CD or MP3 WMA files Your recorder can play audio CDs and MP3 WMA files Before playing MP3 WMA files read the following MP3 WMA audio file requirement MP3 WMA audio file requirement File...

Страница 20: ...t an option such as rotate previous or next then press ENTER 5 Press to select Full Screen then press ENTER The selected image is displayed in full screen 6 To stop viewing at any time press STOP Tip Press DISPLAY to view ID3 Tag information for the MP3 file If ID3 Tag information is not present MP3 ID3 tag None will appear If you select a folder the number of subfolders and number of MP3 WMA file...

Страница 21: ... Video format then the recording mode is Video mode except for DVD Video which is not recordable and so does not have a recording mode These can be changed as required for each recording and determine the picture quality and how much space the recording will take up on the disc General information for recording The recording times shown are not exact because the recorder uses variable bit rate vid...

Страница 22: ...s can only be played on players that are specifically compatible with CPRM Copying copyrighted material You should only use recording equipment for lawful copying Make sure that you follow legal guidelines in your area Copying of copyrighted material such as films or music is unlawful unless permitted by a legal exception or consented to by the rights owner This product incorporates copyright prot...

Страница 23: ... move the cursor left or right and press up down to change the setting at the current cursor position Ch Choose a channel 2 69 or 1 125 for antenna or cable channels respectively excluding skipped channels or one of the external inputs from which to record AV1 or AV2 Date Choose a date up to 1 month in advance or select a daily or weekly program Start Time Set the recording start time End Time Set...

Страница 24: ...ke sure that the component you want to record from is connected correctly to the recorder 2 Press INPUT repeatedly to select the external input to record from AV1 Audio Video Input on the back panel AV2 Audio Video Input on the front panel DV DV Input on the front panel 3 Load a recordable disc 4 Set a recording mode as necessary by pressing REC MODE repeatedly Options include XP SP LP or EP 5 Pre...

Страница 25: ... Title List and Chapter List menu overview Using the Title List menu you can edit video content The editing features available in the Title List menu depend on whether you are editing video on DVD and whether you are editing original content or a playlist There are two ways to edit VR mode DVD RWs You can directly edit the original content of the disc or you can create and edit a playlist The play...

Страница 26: ... To display menu option select a title or chapter then press ENTER The options displayed differ depending on the disc type Play Start playback of the selected title or chapter The hidden titles and chapters on a DVD R RW cannot be play back Search Chapter Displays the Chapter List of the Title Time Search for the starting time of the title Delete Deletes the title or chapter Move Moves chapter pos...

Страница 27: ...the Title List Original menu Deleting an original or playlist title or chapter When you erase a title or chapter from the Playlist menu you only remove it from the playlist The title or chapter remains in the original menu If you choose to delete a title or chapter from the original title or chapter menu the title or chapter is actually deleted from the disc and the remaining time available for re...

Страница 28: ...responding to the selected column DISC MENU LIST DISPLAY Switches the keyboard type 4 Select OK then press ENTER to confirm the name and return to the previous menu screen 5 Press RETURN repeatedly to exit the menu Time searching You can select the start point of the title To select the starting point of the title 1 Press to choose a title on the TITLE LIST menu then press ENTER The options appear...

Страница 29: ... two adjacent chapters into one To combine two chapters into one 1 On the Chapter List menu select the second chapter of the two chapters you want to combine then press ENTER The menu options appear on the left side of the screen 2 Press to select Combine from the options The combine indicator appears between the two chapters you want to combine 3 Repeat steps 1 2 to combine additional chapters 4 ...

Страница 30: ...uttons Controlling other TVs with the multi brand remote control You can control the sound level input source and power switch of non LG TVs as well Enter the appropriate manufacturer code from the table below To enter the manufacturer code 1 While holding down the TV POWER button press the number buttons to select the manufacturer code for your TV Refer to table 2 Release the TV POWER button The ...

Страница 31: ... 6678 Nepali 7869 Bhutani 6890 Norwegian 7879 Bihari 6672 Oriya 7982 Breton 6682 Panjabi 8065 Bulgarian 6671 Pashto Pushto 8083 Burmese 7789 Persian 7065 Byelorussian 6669 Polish 8076 Cambodian 7577 Portuguese 8084 Catalan 6765 Quechua 8185 Chinese 9072 Rhaeto Romance 8277 Corsican 6779 Rumanian 8279 Croatian 7282 Russian 8285 Czech 6783 Samoan 8377 Danish 6865 Sanskrit 8365 Dutch 7876 Scots Gaeli...

Страница 32: ... The power cord is disconnected Plug the power cord into the wall outlet securely Abnormal or no picture The TV is not set to receive recorder signal output Select the appropriate video input mode on the TV so the picture from the recorder appears on the TV screen The video cable is not connected securely Connect the video cable to the jacks securely The recorder output setting and the TV resoluti...

Страница 33: ... off the recorder to enable the timer Picture or sound of a channel is weak or missing Antenna or cables are loose Tighten connections or replace the cable Wrong tuning band is selected in the Recorder Setup menu Try Tuning Band Select options See Using the Setup Menu on page 14 Cannot play disc a recorded on your recorder on another DVD player The disc was recorded in Video mode Finalize the disc...

Страница 34: ... plug the power cord again after more than five seconds Specifications General Power requirements AC 120V 60 Hz Power consumption 25W Dimensions approx 16 9 2 1 10 4 in w h d 430 54 275 mm Mass approx 9 03 lbs 4 1 kg Operating temperature 41 F to 95 F 5 C to 35 C Operating humidity 5 to 90 Television system NTSC color system Signal system NTSC Recording Recording format DVD VideoRecording DVD VIDE...

Страница 35: ...to your nearest retail store location of the store or online web site from which you purchased the Product This warranty does not cover cosmetic damage or damage due to acts of God lightning strikes accident misuse abuse negligence commercial use or modification of or to any part of the Product including the antenna This warranty does not cover damage due to improper operation or maintenance conne...

Страница 36: ...r modification is made If this equipment does cause harmful interference to radio or television reception which can be determined by turning the equipment off and on the user is encouraged to try to correct the interference by one or more of the following measures Reorient or relocate the receiving antenna Increase the separation between the equipment and receiver Connect the equipment into an out...

Страница 37: ...rver tous les avertissements figurant sur l appareil ainsi que dans les instructions d utilisation Suivre les instructions Toutes les instructions d utilisation doivent être appliquées Nettoyage Débrancher l appareil de la prise murale avant tout nettoyage Ne pas utiliser de nettoyants liquides ou en aérosol Utiliser un chiffon humide pour le nettoyage CAUTION TO REDUCE THE RISK OF ELECTRIC SHOCK ...

Страница 38: ...iser uniquement le type d alimentation électrique indiqué sur la plaque signalétique En cas d incertitude sur la tension d alimentation électrique de la maison consulter le revendeur ou la compagnie d électricité Pour les appareils fonctionnant sur piles ou d autres sources d alimentation électrique consulter les instructions d utilisation Mise à la terre ou polarisation Cet appareil est équipé d ...

Страница 39: ...à l eau Si l appareil fonctionne anormalement en appliquant les instructions d utilisation Ne régler que les commandes décrites dans les instructions d utilisation en effet un réglage incorrect d autres commandes pourrait provoquer des détériorations entraînant souvent d importantes réparations par un technicien qualifié afin de rétablir un fonctionnement normal Si l appareil est tombé ou s il est...

Страница 40: ... sur lecteurs de DVD ordinaires après finalisation Fonctionnalités d édition limitées Recommandés Mitsubishi 4x Verbatim 4x JVC 4x Victor 4x Maxell 4x DVD R DVD inscriptibles Il n est possible que d enregistrer une seule fois sur ces disques DVD Après avoir finalisé un disque DVD R il n est plus possible d enregistrer sur ce disque ni de l éditer Les disques DVD R ne sont formatables qu en mode vi...

Страница 41: ...fectuée certains disques enregistrés CD R RW ou DVD R RW peuvent ne pas être lisibles Les disques DVD R RW DVD R RW et CD R RW enregistrés à l aide d un PC ou d un graveur de DVD ou de CD risquent de ne pas être lisibles si le disque est endommagé ou sale ou si de la saleté ou de la condensation se trouve sur la lentille du graveur Un disque enregistré à l aide d un PC même si l enregistrement a é...

Страница 42: ...he Lecture Pause Pour commencer la lecture Au cours de la lecture d un disque de DVD ou d une cassette vidéo appuyer sur cette touche pour arrêter momentanément la lecture Appuyer de nouveau sur cette touche pour reprendre la lecture 7 Bouton Arrêt Pour arrêter la lecture d un DVD ou d une cassette vidéo REC 8 Touche Enregistrer Appuyer sur cette touche pour commencer l enregistrement Appuyer plus...

Страница 43: ...on à la prise d entrée S Vidéo d un téléviseur 9 SORTIE VIDÉO À BALAYAGE PROGRESSIF COMPOSANTE Y Pb Pr Pour la connexion aux prises d entrée composantes d un téléviseur si disponible 10 Prise OPTIQUE SORTIE AUDIO NUMÉRIQUE Pour la connexion de la prise optique audio numérique d un amplificateur externe décodeur Dolby Digital Précaution Ne pas toucher les broches internes des prises sur le panneau ...

Страница 44: ...ture 20 Enregistrer Appuyer sur cette touche pour commencer l enregistrement Appuyer plusieurs fois sur cette touche pour paramétrer le temps d enregistrement durée 21 MODE Enregistrement Pour sélectionner le mode d enregistrement SP LP EP ou XP Élément Touche Fonction 22 AUDIO Pour sélectionner une langue audio ou un canal audio 23 SUBTITLE Sous titres Pour sélectionner la langue des sous titres ...

Страница 45: ...fonctionner normalement Connexion à une antenne ou à la télévision câblée Il existe diverses façons de connecter l appareil en fonction du téléviseur et d autres équipements Consulter les manuels du téléviseur magnétoscope système stéréo ou autres périphériques pour des informations complémentaires Avertissement Le système est doté d une fiche CA polarisée avec un plot large et un plot étroit Cett...

Страница 46: ...téléviseur Effectuer l un des branchements suivants en fonction des caractéristiques du téléviseur Connexion coaxiale RF Pour la connexion au téléviseur à l aide d un câble coaxial RF Brancher la prise RF OUT Sortie RF de l appareil sur la prise d entrée de l antenne du téléviseur à l aide du câble coaxial de 75 ohms fourni Connexion vidéo Pour la connexion au téléviseur à l aide d un câble vidéo ...

Страница 47: ...n récepteur A V avec décodeur multicanal 1 Brancher l une des prises optique ou coaxiale DIGITAL AUDIO OUT Sortie audio numérique de l appareil sur la prise d entrée correspondante de l amplificateur Utiliser un câble audio numérique optique ou coaxial en option 2 Activer la sortie numérique de l appareil voir Réglages audio page 51 Son multicanal numérique Une connexion multicanal numérique fourn...

Страница 48: ...e du compartiment des piles et ouvrir le compartiment des piles 2 Placer deux piles AAA dans le compartiment en respectant les symboles de la polarité et représentés dans le compartiment des piles 3 Fermer le couvercle du compartiment des piles Remarque En raison de l accord de licence DTS la sortie numérique est dans le format sortie numérique DTS lorsque le mode audio DTS est sélectionné Si le f...

Страница 49: ...hage sur l écran puis appuyer sur ENTER Entrée 2 Vérifier les connexions de l antenne puis appuyer sur 3 Appuyer sur ENTER pour lancer la recherche des canaux 4 Sélectionner Auto ou Manual Manuel pour configurer l horloge puis appuyer sur ENTER Auto Appuyer sur pour choisir le fuseau horaire Appuyer sur pour choisir l option d heure d été Appuyer sur pour choisir Auto ON ou OFF Auto Activer ou Dés...

Страница 50: ...ssible d utiliser les touches pour retourner en arrière ou avancer tout en étant en mode PAUSE BALAYAGE ou Au cours de la lecture appuyer plusieurs fois pour sélectionner la vitesse de balayage arrière ou avant DVD 5 étapes DivX CD audio 3 étapes En mode PAUSE appuyer sur cette touche pour une lecture au ralenti 4 étapes DVD ALL DVD ALL DivX ACD SKIP Saut Pendant la lecture ces touches permettent ...

Страница 51: ...l sélectionne un autre titre ou piste et reprend la lecture en mode aléatoire Touches Fonctionnement Disques DVD ALL ACD DVD ALL DVD ALL ACD RWVR ACD MP3 WMA MP3 WMA DVD ALL AUDIO Appuyer sur AUDIO puis sur les touches à plusieurs reprise pour entendre une langue audio ou une piste audio différente Remarque Certains disques prennent en charge à la fois Dolby Digital et les pistes sonore DTS Il n e...

Страница 52: ...ins éléments requièrent des étapes supplémentaires 6 Appuyer sur RETURN Retour ou HOME Accueil pour quitter le menu Setup Configuration Menu Options disponibles CONFIGURATION Start Démarrage Affiche le menu Setup Configuration TV Auto Ch Scan Balayage automatique des canaux Pour afficher le menu Auto Channel Set Configuration du balayage automatique des canaux Voir Configuration générale page 51 C...

Страница 53: ...er Save sur ON pour activer un mode économiseur d énergie Factory Set Paramètres d usine Il est possible de réinitialiser l appareil aux paramètres d usine Paramétrage de la langue Menu d affichage Il est possible de sélectionner une langue pour le menu de configuration et l affichage d informations Menu de disque Il est possible de sélectionner une langue pour le menu DVD Audio de disque Il est p...

Страница 54: ...un ordinateur équipé d un lecteur de DVD ROM approprié Précautions Après finalisation d un disque DVD R ou DVD R il n est plus possible d éditer ou d enregistrer quoi que ce soit sur le disque Disc Label Étiquette de disque Pour attribuer un nom au DVD Voir Nom d un titre page 67 pour des informations sur l utilisation du menu de clavier Disc Protect Protection du disque Il est possible de protége...

Страница 55: ...mbre total d angles de prise de vues Sound Son mode sonore sélectionné Changement du canal audio TV Certaines émissions de télévision sont diffusées avec une trame audio principale et une trame audio secondaire SAP Il est possible de modifier la trame audio du téléviseur Pour modifier la trame audio du téléviseur Appuyer plusieurs fois sur AUDIO pour sélectionner une autre option audio TV parmi le...

Страница 56: ...uel apparaît sur l écran 3D surround sound Son ambiophonique 3D Cet appareil peut produire un son ambiophonique 3D qui simule la lecture audio multicanal à partir de deux haut parleurs stéréo conventionnels au lieu des cinq haut parleurs ou plus généralement requis pour écouter un programme audio multicanal à partir d un système de cinéma maison Pour activer un son ambiophonique 3D 1 Appuyer deux ...

Страница 57: ... CD audio et les fichiers MP3 WMA Avant de lire des fichiers MP3 WMA prendre connaissance de la configuration de fichier audio MP3 WMA requise Configuration requise des fichiers MP3 WMA Extensions de fichier MP3 WMA Fréquence d échantillonnage dans la fourchette des 8 à 48 kHz MP3 dans la fourchette des 32 à 48 kHz WMA Débit binaire fourchette 8 à 320 kbps MP3 32 à 192 kbps WMA Format CD R ISO 966...

Страница 58: ...ont pas pris en charge Lecture de fichiers JPEG 1 Appuyer sur la touche HOME Accueil Le menu Home s affiche 2 Sélectionner Photo DISC Disque puis appuyer sur ENTER Entrée 3 Appuyer sur pour sélectionner un fichier ou un dossier puis appuyer sur ENTER En cas de sélection d un dossier répéter cette étape pour sélectionner un fichier 4 Appuyer sur pour sélectionner une option telle que Rotation Précé...

Страница 59: ... Arrêt pour arrêter le diaporama et revenir au menu Photo Enregistrements Remarque Si l icône apparaît dans le menu Photo List c est qu il est impossible de visionner ces fichiers JPEG Il est possible de visualiser un canal TV ou la source d entrée vidéo an appuyant sur RETURN Retour Pour revenir au menu Photo appuyer sur DISC MENU LIST Menu liste du disque Pour revenir à liste Folder Dossiers la ...

Страница 60: ...ou mode VR avant d enregistrer quoi que ce soit sur le disque Voir Paramètres de disque page 52 Initialisation sur la marche à suivre Dans le cas d un disque DVD R ou DVD R il est possible d enregistrer jusqu à ce que le disque soit plein ou finalisé Avant d ouvrir un session d enregistrement vérifier la durée d enregistrement restante sur le disque En cas d utilisation d un disque DVD RW en mode ...

Страница 61: ...nal TV est réglée sur le graveur 2 Régler le mode d enregistrement selon le besoin en appuyant plusieurs fois sur REC MODE Mode d enregistrement Les options comprennent XP SP LP ou EP 3 Sélectionner le canal de TV à enregistrer 4 Appuyer sur AUDIO pour sélectionner le canal audio à enregistrer Le tableau ci après indique ce qui sera enregistré compte tenu des paramètres différents selon le type d ...

Страница 62: ...istrement programmé 1 Appuyer sur la touche HOME Le menu Home Accueil s affiche à l écran 2 Sélectionner TV Timer Record Enregistrement programmé puis appuyer sur ENTER Entrée 3 Sélectionner NEW Nouveau puis appuyer sur ENTER Le menu Timer Record Enregistrement programmé s ouvre 4 Saisir les informations nécessaires à l enregistrement ou aux enregistrements programmés Appuyer sur gauche droite pou...

Страница 63: ... un enregistrement à une heure déjà passée Il existe déjà 16 enregistrements programmés Si deux ou plusieurs enregistrements programmés se chevauchent L enregistrement programmé le plus ancien a priorité Lorsque l enregistrement programmé le plus ancien s achève celui de plus récent commence Si deux enregistrements programmés sont réglés pour démarrer exactement en même temps la programmation en p...

Страница 64: ...is deux graveurs Il peut ne pas être possible de commander un caméscope connecté par l intermédiaire de la prise DV IN Entrée vidéo numérique Les caméscopes numériques peuvent généralement enregistrer un signal audio en stéréo 16 bits 48 kHz ou sous forme de pistes stéréo jumelées de 12 bits 32 kHz L appareil ne peut enregistrer qu une piste audio stéréo Régler l option DV Record Audio Audio pour ...

Страница 65: ...ertain temps après l arrêt de l enregistrement Problèmes et solutions S il n est pas possible d obtenir une image ou un signal audio par l intermédiaire de la prise DV IN Entrée vidéo numérique vérifier les points suivants Vérifier que le câble DV est correctement branché Essayer d éteindre l équipement raccordé et de le rallumer Essayer de changer l entrée audio Montage des enregistrements Présen...

Страница 66: ... une option puis appuyer sur ENTER Entrée pour confirmer la sélection 3 Pour quitter le menu TITLE LIST Liste de titres appuyer à plusieurs reprises sur RETURN Retour 7 1 2 3 4 6 5 Élément Description Fonction 1 Options du menu Pour afficher une option de menu sélectionner un titre ou un chapitre puis appuyer sur ENTER Entrée Les options affichées diffèrent en fonction du type de disque Play Lectu...

Страница 67: ...titre ou de ce chapitre Cependant il est possible de sélectionner une autre image au sein du titre Appuyer sur THUMBNAIL Vignette pour que l image actuellement affichée devienne celle qui apparaît dans le menu Title List Liste de titres L image sélectionnée apparaît alors à la fois dans le menu Original et dans le menu Playlist Liste de lecture Création d une nouvelle liste de lecture Utiliser cet...

Страница 68: ...istrement augmente Les titres ou chapitres supprimés de l original sont également supprimés de la liste de lecture Pour supprimer un chapitre ou un titre 1 Appuyer sur pour choisir un chapitre ou un titre à supprimer dans le menu TITLE LIST Liste de titres ou Chapter List Liste de chapitres puis appuyer sur ENTER Entrée Les options du menu apparaissent sur le côté gauche de l écran 2 Sélectionner ...

Страница 69: ...r 0 9 Entre le caractère correspondant à la colonne sélectionnée DISC MENU LIST DISPLAY Menu liste du disque Affichage Change le type de clavier 4 Sélectionner OK puis appuyer sur ENTER Entrée pour confirmer le nom et revenir à l écran du menu précédent 5 Appuyer à plusieurs reprises sur RETURN Retour pour quitter le menu Recherche horaire Il est possible de sélectionner le point de début du titre...

Страница 70: ... Entrée Les options du menu apparaissent sur le côté gauche de l écran 2 Sélectionner Edit Modifier Divide Diviser puis appuyer sur ENTER Entrée Le menu Edit Divide Modifier Diviser s affiche 3 Utiliser PAUSE STEP Image par image SEARCH Recherche et SLOW MOTION Ralenti pour trouver le point souhaité pour diviser le titre 4 Sélectionner l option Divide Diviser puis appuyer sur ENTER Entrée Pour réi...

Страница 71: ... non Consulter le manuel livré avec l autre lecteur pour déterminer les formats qu il peut lire La finalisation fixe les enregistrements et modifications en place de sorte que le disque peut être lu sur un lecteur de DVD ordinaire ou un ordinateur équipé d un lecteur de DVD ROM approprié La finalisation d un disque en mode vidéo crée un écran de menu permettant de naviguer le disque Le menu est ac...

Страница 72: ...audio sous titres et menu du disque Appuyer Pour MARCHE Allumer ou éteindre le téléviseur ENTRÉE Alterner la source d entrée du téléviseur entre le téléviseur et d autres sources d entrée CH Parcourir les canaux mémorisés de façon croissante ou décroissante VOL Régler le volume du téléviseur SOURDIN E Met le téléviseur temporairement en sourdine Appuyer de nouveau sur la touche pour continuer Rema...

Страница 73: ...ada 7578 Ouzbek 8590 Cachemiri 7583 Vietnamien 8673 Kazakh 7575 Volapük 8679 Kirghiz 7589 Gallois 6789 Coréen 7579 Wolof 8779 Kurde 7585 Xhosa 8872 Laotien 7679 Yiddish 7473 Latin 7665 Yorouba 8979 Letton 7686 Zoulou 9085 Langue N de code Langue N de code Code Code Code Code Afghanistan AF Malaisie MY Argentine AR Maldives MV Australie AU Mexique MX Autriche AT Monaco MC Belgique BE Mongolie MN Bh...

Страница 74: ...fonction CH Les canaux sautés ont été supprimés à l aide de la fonction CH Add Del Ajout Suppression de canaux Utiliser la fonction CH Add Del pour restaurer les canaux Voir Configuration générale page 51 L appareil ne démarre pas la lecture Aucun disque n a été chargé Insérer un disque vérifier que le témoin de disque s allume dans la fenêtre d affichage Le disque inséré est illisible Insérer un ...

Страница 75: ...teurs ne peuvent pas lire même un disque finalisé qui a été enregistré en mode Vidéo Aucune solution L enregistrement du disque s est effectué en mode VR L autre lecteur doit être compatible avec les disques RW pour pouvoir lire ce disque Les disques sur lesquels sont enregistrés du contenu à copie unique ne peuvent pas être lus sur d autres lecteurs Aucune solution Ne peut pas enregistrer ou n a ...

Страница 76: ...c c 75 ohms DV IN Entrée DV 4 broches norme IEEE 1394 Sorties VIDEO OUT 1 V c c 75 ohms Sortie vidéo sync nég prise RCA 1 S VIDEO OUT Y 1 V c c Sortie S Vidéo 75 ohms sync nég Prise mini à 4 broches DIN 1 C 0 286 V c c 75 ohms COMPOSANTES VIDÉO Y 1 V c c OUT Sortie 75 ohms sync nég prise RCA 1 Pb Pr 0 7 V c c 75 ohms prise RCA 2 Sortie audio numérique 0 5 V c c 75 ohms prise RCA 1 Sortie audio opt...

Страница 77: ... ou d une province à l autre Pour le service à la clientèle appeler le 1 877 467 4289 www insignia products com Insignia Products Richfield Minnesota U S A Avis juridiques Déclaration de conformité FCC Cet équipement a été testé et déclaré conforme aux limitations prévues dans le cadre de la catégorie B des appareils numériques définie par l article 15 du règlement de la FCC Ces limites ont été ét...

Страница 78: ...as Preste atención a todas las advertencias sobre su grabadora y las instrucciones de operación Siga las instrucciones Siga todas las instrucciones de operación y uso CAUTION TO REDUCE THE RISK OF ELECTRIC SHOCK DO NOT REMOVE COVER OR BACK NO USER SERVICEABLE PARTS INSIDE REFER SERVICING TO QUALIFIED SERVICE PERSONNEL The lightning flash with arrowhead symbol within an equilateral triangle is inte...

Страница 79: ...ricante Fuentes de alimentación eléctrica Use sólo el tipo de alimentación eléctrica indicado en la etiqueta de marca Si no esta seguro del tipo de fuente de energía en su casa consulte con el vendedor de la grabadora o la compañía local de energía Para grabadoras diseñadas para funcionar con baterías u otras fuentes consulte las instrucciones de operación respectivas Conexión a tierra o polarizac...

Страница 80: ... sido expuesta a la lluvia o al agua Si la grabadora no funciona normalmente aún siguiendo las instrucciones de operación Ajuste únicamente los controles que están cubiertos en las instrucciones de operación ya que el ajuste incorrecto de otros controles puede resultar en daño y frecuentemente requerirá trabajo intensivo de un técnico calificado para restaurar la operación normal de la grabadora S...

Страница 81: ... tras su finalización Modo Video Reproducible en reproductores de DVD normales tras su finalización Características de edición limitadas Se recomienda Mitsubishi 4x Verbatim 4x JVC 4x Victor 4x Maxell 4x DVD R DVD grabable Estos DVD pueden grabarse sólo una vez Después de finalizar un DVD R no puede volver a grabar en él ni editarlo Los discos DVD R sólo pueden formatearse en modo Video Reproducib...

Страница 82: ...abación y del proceso de finalización es posible que algunos discos grabados CD R RW o DVD R RW no puedan reproducirse DVD R RW DVD R RW Los discos CD R RW grabados con una computadora personal o una grabadora de discos DVD o CD puede que no funcionen si están dañados o sucios o si existe suciedad o condensación en el lente de la grabadora Si graba un disco con una computadora personal aún si lo g...

Страница 83: ... Botón Reproducir Pausa Presione para empezar a reproducir Cuando se está reproduciendo un cassette de video o un DVD presione este botón para detener momentáneamente la reproducción Presione el botón de nuevo para reanudar la reproducción REC 7 Botón STOP Detener Presione este botón para detener la reproducción del cassette de video o del DVD 8 Botón REC Grabar Presione este botón para empezar a ...

Страница 84: ...TV 8 S VIDEO OUT Salida de S Video Conecte el conector de entrada de S Video en un TV 9 COMPONENT PROGRESSIVE SCAN VIDEO OUT Y Pb Pr Salida de video para componentes barrido progresivo Conecte a los conectores de entrada de componentes en un TV si está disponible 10 Conector ÓPTICO DIGITAL AUDIO OUT Salida de audio digital Conecte a un conector óptico de sonido digital en un amplificador externo t...

Страница 85: ...nar el modo de reproducción 20 REC Grabar Presione este botón para empezar a grabar Presione varias veces para configurar el tiempo de grabación duración 21 REC MODE Modo de grabación Presione para seleccionar el modo de grabación SP LP EP o XP 22 AUDIO Presione para seleccionar un idioma de audio o un canal de audio Número Botón Función 23 SUBTITLE Presione para seleccionar el idioma de los subtí...

Страница 86: ...r del TV e identifique el cable de la antena Si el cable de la antena es un cable coaxial redondo de 75 ohmios conéctelo directamente al conector marcado ANT IN Entrada de antena en su grabadora O Si el cable de la antena es plano conéctelo a un adaptador de antena de 300 ohmios a 75 ohmios no suministrado y deslice el adaptador sobre el conector ANT IN Entrada de antena No intente atornillarlo en...

Страница 87: ... video de componentes Conecte los conectores COMPONENT PROGRESSIVE SCAN VIDEO OUT Salida de video de componentes barrido progresivo en la grabadora a los conectores de entrada correspondientes en el TV mediante un cable Y Pb Pr opcional Conexión de audio Para conectar a su TV con una fuente de audio Conecte los conectores AUDIO OUT Salida de audio izquierdo y derecho de la grabadora a los conector...

Страница 88: ...Digital Out son marcas comerciales de Digital Theater Systems Inc Conexiones de audio video A V de accesorios Para conectar la grabadora a un componente auxiliar Conecte los conectores AV IN 1 o AV 2 IN de la grabadora a los conectores de salida de audio video en el componente auxiliar tal como un VCR o una cámara de video mediante los cables de audio video opcionales consulte Grabación desde comp...

Страница 89: ...l canal seleccionado para poder ver el Asistente de configuración y los distintos menús utilizados para configurar la grabadora Para configurar el canal de salida de RF de la grabadora 1 Con la grabadora apagada presione y mantenga presionado CH en el panel frontal durante más de cinco segundos Aparece RF03 o RF04 en la pantalla 2 Presione CH para cambiar el canal de salida de RF RF03 o RF04 3 Sin...

Страница 90: ...Ponga el disco en la bandeja con el lado de reproducción hacia abajo 4 Presione OPEN CLOSE para cerrar la bandeja La reproducción empieza automáticamente Si la reproducción no empieza presione PLAY o iníciela mediante el menú HOME Inicio 5 Para detener la reproducción presione STOP La grabadora graba el punto de parada dependiendo del disco En la pantalla aparece brevemente Presione PLAY para rean...

Страница 91: ...isco en la pantalla SUBTITLE Durante la reproducción presione SUBTITLE Subtítulo y luego presione los botones repetidamente para seleccionar el idioma de subtítulos que desea I SKIP Presione repetidamente durante la reproducción para saltar hacia delante 30 segundos Botones Operaciones Discos DivX ACD MP3 WMA DVD ALL DVD DVD DVD DivX DVD ALL PLAY MODE Presione repetidamente durante la reproducción...

Страница 92: ... uno bilingüe puede alternar entre el canal principal L el canal bilingüe R o una mezcla de ambos principal bilingüe presionando AUDIO Botones Operaciones Discos DVD ALL DVD RWVR RWVideo RW R R MP3 WMA Menú Opciones disponibles SETUP Configuración Start Inicio Muestra el menú Setup Configuración TV Auto Ch Scan Muestra el menú Auto Channel Set Configuración automática de canales Consulte Ajustes g...

Страница 93: ...ive Scan Barrido Progresivo Puede activar el vídeo con barrido progresivo lo que le provee imágenes de la mejor calidad con menos parpadeo Si está usando los conectores Component Video Out Progressive Scan pero conecta la grabadora a un televisor estándar analógico configure el barrido progresivo con OFF Desactivado Si esta usando los conectores Component Video Out Progressive Scan para la conexió...

Страница 94: ...as de sonidos de la cámara de video digital utilizar Audio 1 para utilizar el sonido que se grabó cuando se realizó la grabación o Audio 2 para usar la grabación doblada Auto Chapter Puede configurar las marcas automáticas de capítulos hechas durante la grabación a intervalos de 5 minutos intervalos de 10 minutos o None ninguno Menú Ajustes disponibles Ajustes de discos Initialize Formatea un DVD ...

Страница 95: ...udio del TV Algunos programas de TV se emiten con un programa de audio principal y uno secundario SAP Secondary Audio Program El audio del TV puede cambiarse Para cambiar el audio del TV Presione AUDIO repetidamente para cambiar entre las opciones de audio de TV disponibles Señal de audio STEREO SAP Estéreo SAP Mono Estéreo Señal de audio STEREO Estéreo L R Mono Estéreo Señal de audio SAP Mono SAP...

Страница 96: ...u grabadora puede producir un efecto de sonido envolvente 3D que simula la reproducción de audio multicanal de dos altavoces estéreo convencionales en lugar de los cinco o más altavoces que se necesitan normalmente para escuchar el audio multicanal desde un sistema de Home Theater Para activar el sonido envolvente 3D 1 Presione DISPLAY Mostrar dos veces y luego presione para seleccionar el icono d...

Страница 97: ...o Su grabadora puede reproducir CD de audio y archivos MP3 WMA de audio Antes de reproducir archivos MP3 WMA lea el siguiente requisito para archivos MP3 WMA de audio Requisito para archivos MP3 WMA de audio Extensiones de archivo MP3 WMA Frecuencia de muestreo en el rango 8 48 kHz MP3 en el rango 32 48 kHz WMA Velocidad de bits en el rango 8 320 kbps MP3 32 192 kbps WMA Formato CD R ISO 9660 y JO...

Страница 98: ...epita este paso para seleccionar un archivo 4 Presione para seleccionar una opción como girar anterior o siguiente y luego presione ENTER 5 Presione para seleccionar Full Screen Pantalla completa y luego presione ENTER La imagen seleccionada se muestra en la pantalla completa 6 Para detener la visualización en cualquier momento presione STOP Consejo Presione DISPLAY para ver la información de iden...

Страница 99: ...en un reproductor de DVD normal El formato para discos DVD RW es el formato VR grabación de video o formato Video El formato de grabación puede cambiarse si es necesario la reinicialización de un disco borrará su contenido El modo de grabación está estrechamente relacionado con el formato del disco Si el formato del disco es VR el modo de grabación es también VR Si el formato de disco es Video ent...

Страница 100: ...lla Los videos que sólo pueden copiarse una vez sólo pueden grabarse usando un disco DVD RW en modo VR con CPRM ver más abajo Protección contra copia CPRM CPRM es un sistema de protección contra copia con sistema de aleatorización que sólo permite la grabación de programas retransmitidos que únicamente pueden copiarse una vez CPRM son las siglas en inglés de Content Protection for Recordable Media...

Страница 101: ...a la grabación Ampliación del tiempo de grabación Para ampliar el tiempo de grabación El tiempo de grabación puede ampliarse en cualquier momento presionando REC Cada pulsación subsiguiente aumenta el tiempo de grabación en 10 minutos Cómo detener momentáneamente la grabación Para detener momentáneamente la grabación 1 Presione PAUSE STEP para detener momentáneamente la grabación 2 Cuando quiera c...

Страница 102: ...ama que desea borrar en la lista de grabaciones con temporizador luego presione CLEAR y seleccione OK y luego presione ENTER Solución de problemas de las grabaciones con temporizador Aún cuando el temporizador esté programado la grabadora no grabará en los siguientes casos No hay un disco adentro No es un disco grabable La protección del disco está configurada en ON en el menú Disc consulte Ajuste...

Страница 103: ...ada a través del conector DV IN Las cámaras de video digitales pueden normalmente grabar audio como pistas en estéreo de 16 bits 48 kHz o pistas dobles en estéreo de 12 bits 32 kHz Su grabadora sólo puede grabar una pista audio en estéreo Configure la opción DV Record Audio en Audio 1 o Audio 2 según se requiera consulte Grabación desde una entrada DV página 101 La entrada de audio al conector DV ...

Страница 104: ...de lista de títulos y lista de capítulos Con el menú Title List Lista de títulos puede editar el contenido de video Las características de edición disponibles en el menú de lista de títulos dependen de si está editando video en DVD y de si está editando contenido original o una lista de reproducción Hay dos formas de editar discos DVD RW en modo VR Puede editar directamente el contenido original d...

Страница 105: ... la reproducción del título o capítulo seleccionado Los títulos o capítulos ocultos en un DVD R RW no pueden reproducirse Search Chapter Muestra la lista de capítulos del título Time Buscar la hora de inicio del título Delete Elimina el título o capítulo Move Cambia la posición del capítulo en el menú Chapter List Playlist Protect Impide la grabación edición o eliminación accidental del título Edi...

Страница 106: ...e reproducción 1 Elija un título o capítulo en el menú TITLE LIST Original Lista de títulos Original o Chapter List Original Lista de capítulos original para ponerlo en la lista de reproducción y luego presione ENTER Las opciones del menú aparecen en el lado izquierdo del menú 2 Presione para seleccionar Playlist Add Agregar lista de reproducción y luego presione ENTER 3 Seleccione New Playlist Li...

Страница 107: ...cción que desea eliminar Para cancelar el punto seleccionado presione para seleccionar el icono Cancelar y luego presione ENTER 7 Cuando termine de editar seleccione el icono Terminado y luego presione ENTER Aparece un mensaje de confirmación 8 Presione para seleccionar OK y luego presione ENTER La parte seleccionada se elimina del título y el menú Title List se abre Cómo poner nombre a un título ...

Страница 108: ...que no desea reproducir sin eliminarlos del disco Para ocultar un capítulo o título 1 Presione para elegir el capítulo o título que desea ocultar en el menú TITLE LIST o Chapter List y luego presione ENTER Las opciones aparecen en el lado izquierdo de la pantalla 2 Seleccione Edit Editar y luego Hide Ocultar 3 Presione ENTER para confirmar La imagen en miniatura del capítulo o título se atenuará P...

Страница 109: ...abar una grabación 1 Seleccione la fuente de entrada que desea grabar canal de TV AV1 2 DV 2 Presione DISC MENU LIST para abrir el menú TITLE LIST 3 Presione para seleccionar el título que desea sobregrabar 4 Presione REC Grabar para empezar a grabar sobre la grabación existente La sobregrabación empieza en el punto inicial del título 5 Presione STOP para detener la sobregrabación El nuevo título ...

Страница 110: ... fabricante para su TV consulte la tabla 2 Suelte el botón TV POWER El control remoto está configurado para controlar el TV Números de código de TV controlables Si se indica más de un número de código pruebe a introducirlos uno por uno hasta que encuentre el que funciona con su TV Nota Los discos DVD RW no finalizados pueden reproducirse en reproductores de DVD normales El contenido editado de un ...

Страница 111: ...Corso 6779 Rumano 8279 Croata 7282 Ruso 8285 Checo 6783 Samoano 8377 Danés 6865 Sánscrito 8365 Holandés 7876 Gaélico escocés 7168 Inglés 6978 Serbio 8382 Esperanto 6979 Serbo Croata 8372 Estonio 6984 Shona 8378 Feroés 7079 Sindhi 8368 Fidji 7074 Singalés 8373 Finlandés 7073 Eslovaco 8375 Francés 7082 Esloveno 8376 Frisón 7089 Somalí 8379 Gallego 7176 Español 6983 Georgiano 7565 Sudanés 8385 Alemán...

Страница 112: ...nectado Enchufe bien el cable de alimentación en el tomacorriente de la pared Imagen anormal o no hay imagen El TV no está configurado para recibir la señal de salida de la grabadora Seleccione el modo de entrada de video adecuado en el TV para que la imagen de la grabadora aparezca en la pantalla del televisor El cable de video no está bien conectado Conecte bien el cable de video a los conectore...

Страница 113: ...s Apriete las conexiones o reemplace el cable Se ha seleccionado la banda de sintonización incorrecta en el menú Recorder Setup Configuración de la grabadora Pruebe otras opciones de selección de la banda de sintonización Consulte Uso del menú de configuración página 91 No puede reproducir un disco grabado en su grabadora en otro reproductor de DVD El disco se grabó en modo Video Finalice el disco...

Страница 114: ...nuevo para volver a encender la grabadora O Desenchufe el cable de alimentación y pasados más de cinco segundos vuélvalo a enchufar Especificaciones Generales Requisitos de alimentación CA 120 V 60 Hz Consumo de potencia 25 W Dimensiones aprox 16 9 2 1 13 9 ancho alto profundidad pulgadas 430 54 275 mm Masa aprox 9 03 lbs 4 1 kg Temp de funcionamiento 41 F a 95 F 5 C a 35 C Humedad de funcionamien...

Страница 115: ... el mismo grado de protección al centro de ventas más cercano de la tienda o sitio de web dónde usted compró el Producto Esta garantía no cubre daño cosmético ni daños causados por fuerzas de la naturaleza rayos accidente uso incorrecto abuso negligencia uso comercial o modificaciones del Producto o de cualquier parte del mismo incluyendo la antena Esta garantía no cubre daños debidos a una operac...

Страница 116: ...ficación no autorizada Si el equipo causa interferencias perjudiciales en la recepción de la señal de radio o televisión lo cual puede comprobarse encendiéndolo y apagándolo alternativamente se recomienda al usuario corregir la interferencia mediante uno de los siguientes procedimientos Cambie la orientación o la ubicación de la antena receptora Aumente la distancia entre el equipo y el receptor C...

Страница 117: ......

Страница 118: ...All rights reserved All other products and brand names aretrademarks of their respective owners 2006 produits Insignia Tous droits réservés Tous les autres produits ou noms de marques sont des marques de commerce qui appartiennent à leurs propriétaires respectifs 2006 productos Insignia Todos los derechos reservados Todos los demás productos y marcas son marcas comerciales de sus respectivos dueño...

Отзывы: