www.insigniaproducts.com
7
NS-DH50WH9 / NS-DH70WH9 / NS-DH50WH9-C
2
Make sure that there is at least 8 inches (20.3 centimeters) of space on all sides of the unit, with 16 inches (40.6
centimeters) of space on the side with the air outlet.
3
Make sure that your dehumidifier is in an area where temperatures will not fall below 41º F (5º C).
4
Make sure that your dehumidifier is placed away from any heat sources.
5
Place your dehumidifier on a smooth, level floor.
Using your dehumidifier
1
Plug your dehumidifier’s power plug into a power outlet.
2
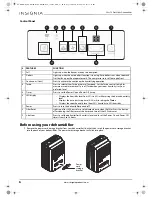
Press the
Power
button, then set your dehumidifier to the desired humidity level.
Setting the humidity level
1
For drier air, press the
-
button to set a lower humidity level.
2
For damper air, press the
+
button to set a higher humidity level.
Setting the Power On and Power Off timers
Your dehumidifier has the option to set a timer to turn it on and to turn it off. When you set the Power On or Power Off
timers, the On or Off LED indicators light to remind you which timers have been set.
Setting the Power On timer
1
Press
Timer
until the On LED indicator is lit.
2
Use the ± buttons to select the number of hours before your dehumidifier will automatically turn on, then wait for the
LED display to return to its previous state. The setting is saved.
Setting the Power Off timer
1
Press
Timer
until the Off LED indicator is lit.
2
Use the ± buttons to select the number of hours before your dehumidifier will automatically turn off, then wait for the
LED display to return to its previous state. The setting is saved.
Removing collected water with the bucket
1
When the bucket full indicator lights, remove the bucket from your dehumidifier.
2
Pour the water out, then reinsert the bucket into your dehumidifier.
Removing collected water with continuous draining
1
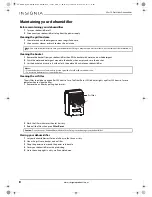
Remove the plastic cover from the continuous back drain outlet, then screw the drain hose (not included) onto the
drain outlet.
2
Direct the hose towards a floor drain.
Note:
Your dehumidifier is more efficient when in a closed room, but it can be used in a room with the doors open to dehumidify a
larger area.
Note:
The humidity level can be set to 35–85% humidity, and it increases or decreases in increments of 5%.
Notes:
• The timer settings are one-time use and will need to be set each time you want your dehumidifier to turn on and off by itself.
• You do not have to use the Power On and Power Off timers together. You can set one or the other.
• Turning your dehumidifier on or off at any time or adjusting the timer setting to 0.0 will cancel the timer function.
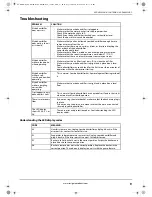
• If the LED display shows P2, the timer function will cancel. The P2 error code displays when the water bucket is full or is not in the
right position.
Note:
The ± buttons increment by 0.5 hours up to 10 hours. After you reach 10, the ± buttons increment by 1 hour up to 24 hours.
Note:
The ± buttons increment by 0.5 hours up to 10 hours. After you reach 10, the ± buttons increment by 1 hour up to 24 hours.
Notes:
• When the bucket is full, your dehumidifier automatically turns off and the bucket full indicator lights.
• Your dehumidifier will automatically restart when the bucket is back in place.
• If you remove the bucket while your dehumidifier is running, the LED display shows P2 and your dehumidifier stops running.
Note:
Make sure there are no kinks in the hose, as they may stop collected water from draining.
NS-DH50WH9_NS-DH70WH9_NS-DH50WH9-C_17-0857_MAN_V1_EN.fm Page 7 Monday, December 18, 2017 3:01 PM

