background image

2

Insignia NS-CADVD DVD Player

www.insignia-products.com

10

Protect the power cord from being walked on 
or pinched particularly at plugs and 
convenience receptacles and the point where 
they exit from your DVD player.

11

Only use attachments/accessories specified 
by the manufacturer.

12

Use only with the cart, stand, 
tripod, bracket, or table specified 
by the manufacturer or sold with 
your DVD player. When a cart is 
used, use caution when moving 
the cart and DVD player 
combination to avoid injury from tip-over.

13

Unplug your DVD player during lightning 
storms or when unused for long periods of 
time.

14

Refer all servicing to qualified service 
personnel. Servicing is required when your 
DVD player has been damaged in any way, 
such as when the power-supply cord or plug 
is damaged, when liquid has been spilled or 
objects have fallen into your DVD player, 
when your DVD player has been exposed to 
rain or moisture, or when your DVD player 
does not operate normally or has been 
dropped.

15

The main plug is the disconnect device and 
should remain readily accessible.

16

These servicing instructions are for use by 
qualified service personnel only. To reduce 
the risk of electric shock do not perform any 
servicing other than that contained in the 
operating instructions unless you are 
qualified to do so.

17

Your DVD player shall not be exposed to 
dripping or splashing and no objects filled 
with liquids, such as vases, shall be placed 
on your DVD player.

Features

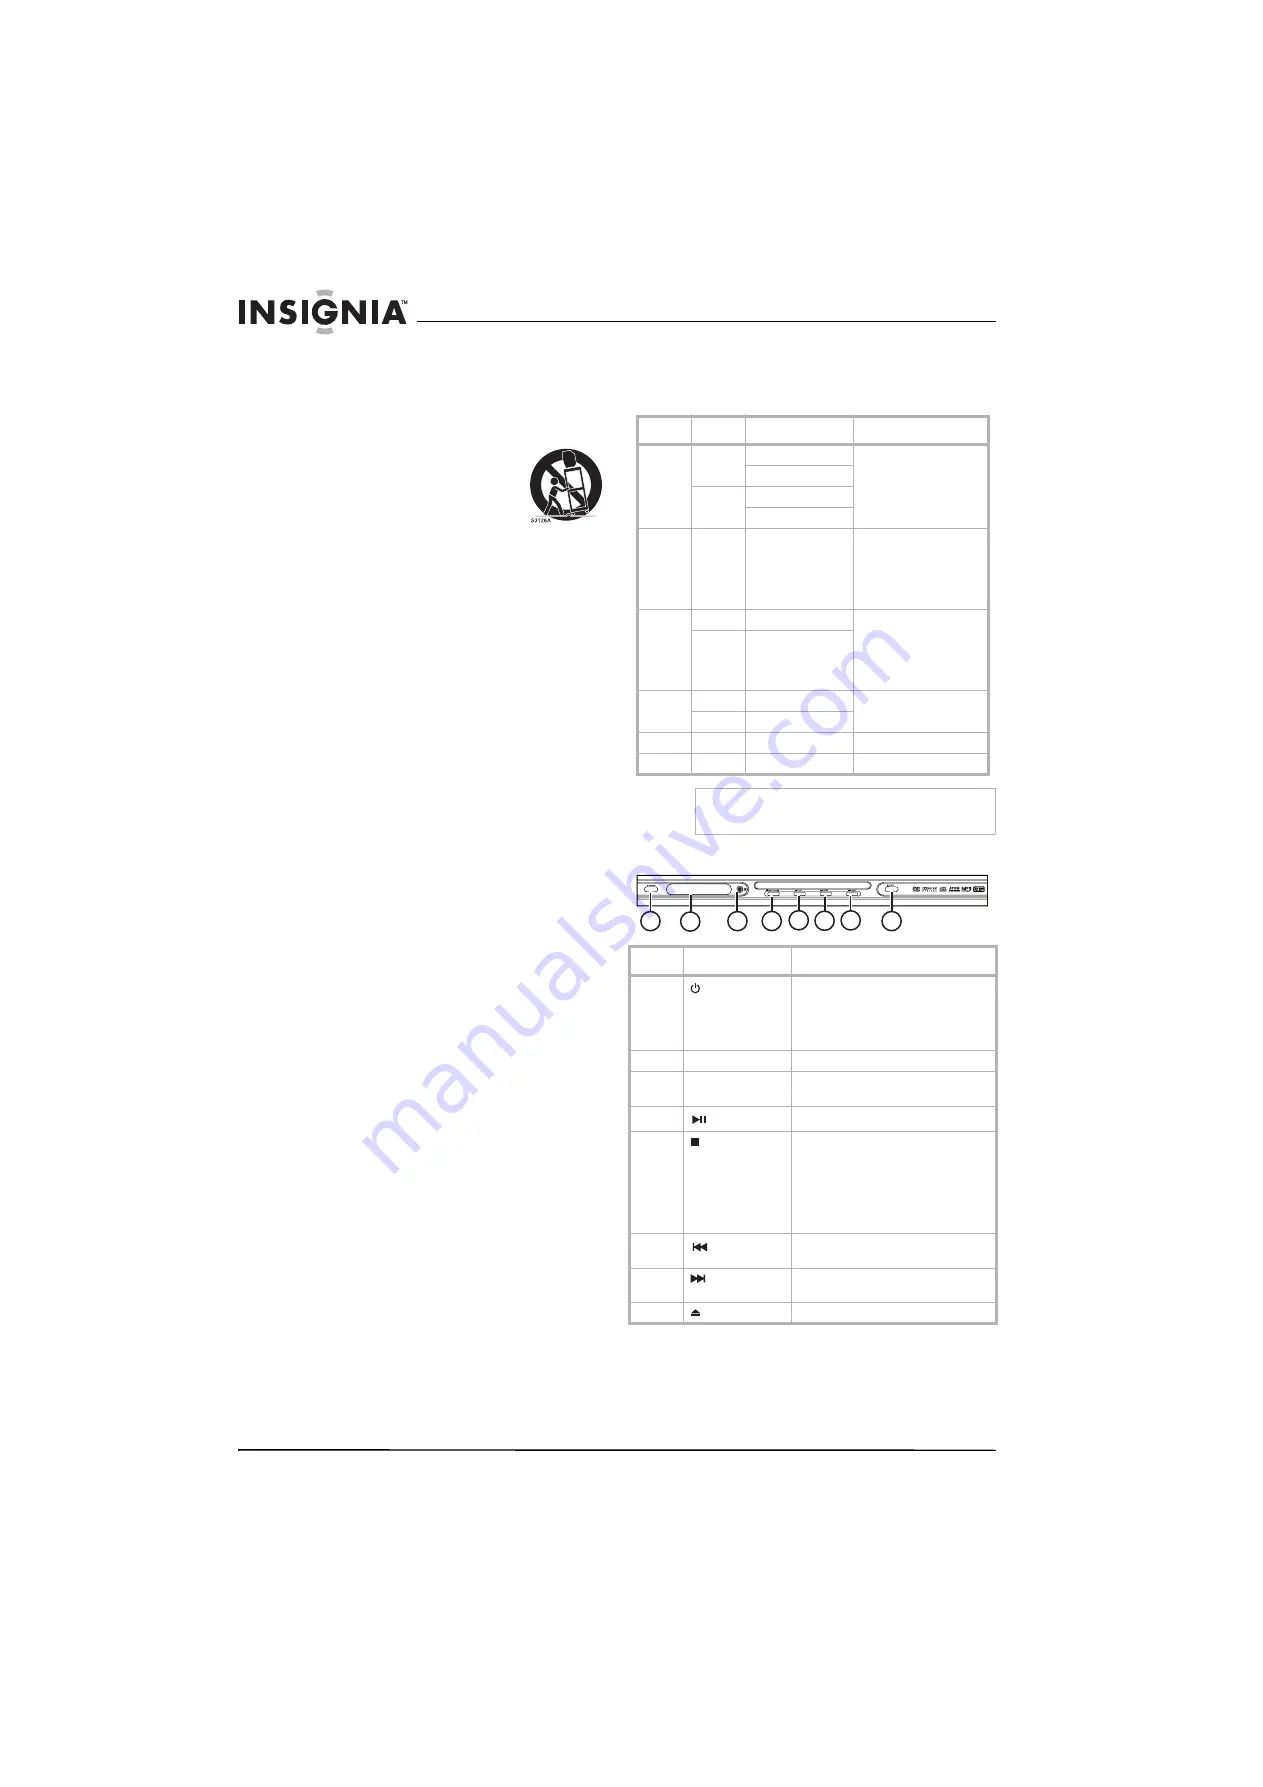
Playable discs

Front

Type

Size

Playback time

Data format

DVD

12 cm

1 layer: 120 min.

Compressed digital 
audio
Compressed digital 
video

2 layers: 240 min.

8 cm

1 layer: 80 min.

2 layers: 180 min.

SVCD
CVD

12 cm

45 min.

MPEG2
Compressed digital 
audio
Compressed digital 
video

VCD
VCD1.1
VCD1.0
DVCD

12 cm

74 min.

MPEG1
Compressed digital 
audio
Compressed digital 
video

8 cm

20 min.

CD

12 cm

74 min.

CD-DA: Digital audio

8 cm

20 min.

CD

12 cm

74 min.

Digital audio

JPEG

12 cm

60 min.

Digital photo

Note

Your player can also play DVD±RWs, CD-Rs, and 
CD-RWs.

#

Component

Description

1

POWER

Press to turn your player on or off 
(standby mode). When your player is 
in standby mode, it is still receiving 
power. To disconnect all power, 
unplug the power cord.

2

Display

Displays status information.

3

Remote control 
sensor

Receives signals from the remote 
control. Do not block.

4

PLAY/PAUSE

Press to start or pause playback.

5

STOP

Press to stop playback. If you press 
this button once then press 

PLAY/PAUSE

, playback resume from 

where you stopped. If you press this 
button twice then press 

PLAY/PAUSE

, playback starts at the 

beginning of the disc.

6

PREV

Press to go to the previous DVD 
chapter, CD track, or picture.

7

NEXT

Press to go to the next DVD chapter, 
CD track, or picture.

8

EJECT

Press to open or close the disc tray.

1

2

3

8

7

6

5

4

Содержание NS-CADVD

Страница 1: ...DVD Player Lecteur DVD NS CADVD User Guide Guide de l utilisateur ...

Страница 2: ......

Страница 3: ...D player near water 6 Clean only with a dry cloth 7 Do not block any ventilation openings Install in accordance with the manufacturer s instructions 8 Do not install near any heat sources such as radiators heat registers stoves or other heat generating devices including amplifiers that produce heat 9 Do not defeat the safety purpose of the polarized or grounding type plug A polarized plug has two ...

Страница 4: ... qualified to do so 17 Your DVD player shall not be exposed to dripping or splashing and no objects filled with liquids such as vases shall be placed on your DVD player Features Playable discs Front Type Size Playback time Data format DVD 12 cm 1 layer 120 min Compressed digital audio Compressed digital video 2 layers 240 min 8 cm 1 layer 80 min 2 layers 180 min SVCD CVD 12 cm 45 min MPEG2 Compres...

Страница 5: ... In on screen menus press to select and adjust options 8 TITLE When playing a DVD press open the DVD title menu if available Not all DVDs support this feature 9 ENTER In on screen menus press to confirm selections 10 PBC Press to turn the PBC feature for VCDs 2 0 on or off 11 PSCAN NORMAL Press to select the type of TV you have connected You can select Interlace S Video or P SCAN 12 VOL Press to i...

Страница 6: ...pport this feature 27 SLOW Press to play a DVD in slow motion Each time you press this button the slow motion speed changes Press PLAY to resume normal playback 28 STEP Press once to pause playback Press repeatedly to advance one frame at a time Press PLAY to resume normal playback 29 NEXT Press to go to the next DVD chapter CD track or picture 30 PREV Press to go to the previous DVD chapter CD tr...

Страница 7: ...ayer turns on 2 Press Power again to turn off your player Using the remote control Point the remote control toward the remote control sensor on the front of your player Make sure that no objects are between the remote control and the remote control sensor Do not expose the remote control to shock Do not expose the remote control to liquids or high humidity Do not place your player in a location wh...

Страница 8: ...player is connected to a digital sound system and you want to listen to the audio in its original format S PDIF PCM Select if your player is connected to a digital sound system and you want the audio converted to PCM format 4 Press SETUP to close the menu Playing a disc To play a disc 1 Press EJECT on the front of your player or OPEN CLOSE on the remote control to open the disc tray 2 Insert a dis...

Страница 9: ...aylist of DVD chapters or titles CD tracks or JPEG pictures You can add as many as 16 chapters titles tracks or pictures to the playlist To create a playlist 1 Press PROGRAM The program screen opens DVD or JPEG disc CD SVCD VCD or HD CD 2 Press the number buttons to enter a chapter title track or picture number then press or to move to the next entry field If you need to delete an entry press CLEA...

Страница 10: ...anguage 1 Press SETUP The on screen menu opens 2 Press or to select then press ENTER The LANGUAGE SETUP menu opens 3 Press or to select OSD LANGUAGE then press ENTER 4 Press or to select the language you want then press ENTER 5 Press SETUP to close the menu Selecting a DVD subtitle language To select a DVD subtitle language 1 Press SETUP The on screen menu opens 2 Press or to select then press ENT...

Страница 11: ...close the menu Turning the screen saver on or off Your player has a screen saver that will turn on when your player is in stop mode for several minutes To turn the screen saver on or off 1 Press SETUP The on screen menu opens 2 Press or to select SCREEN SAVER then press ENTER 3 Press or to select ON or OFF then press ENTER 4 Press SETUP to close the menu Setting the parental password The parental ...

Страница 12: ... to select an option then press ENTER You can select OP MODE Selects the sound level Select LINE OUT for most sound systems or select RF REMOD if the sound level is too low when your player is connected directly to the TV DYNAMIC RANGE Selects the range between the loudest and softest sounds This option is only available when OP MODE is set to LINE OUT DUAL MONO Selects the audio output mode Selec...

Страница 13: ...n see Playable discs on page 2 The disc may be damaged or dirty Clean the disc or try another disc For more information see Cleaning discs on page 11 Moisture may have condensed inside your player Remove the disc then leave your player turned on for one or two hours to let the moisture evaporate No picture Make sure that the TV is turned on Make sure that the TV is set to the correct video input s...

Страница 14: ...rements and compliance with safety performance of the U S Department of Health and Human Services and also with FDA Radiation Performance Standards 21 CFR Subchapter J Canada ICES 003 statement This Class B digital apparatus complies with Canadian ICES 003 Dolby Laboratories This product incorporates copyright protection technology that is protected by method claims of certain US patents and other...

Страница 15: ... a screen 25 inches or larger call 1 888 BESTBUY Call agents will diagnose and correct the issue over the phone or will have an Insignia approved repair person dispatched to your home Where is the warranty valid This warranty is valid only to the original purchaser of the product in the United States and Canada What does the warranty not cover This warranty does not cover Customer instruction Inst...

Страница 16: ...14 Insignia NS CADVD DVD Player www insignia products com ...

Страница 17: ...conception de lecteur DVD et a été conçu pour des performances et une fiabilité exceptionnelles Informations sur la sécurité 1 Lire ces instructions 2 Conserver ces instructions 3 Respecter tous les avertissements 4 Observer toutes les instructions 5 Ne pas utiliser le lecteur DVD près de l eau 6 Nettoyer uniquement avec un chiffon sec 7 Ne pas obstruer les ouvertures d aération Installer l appare...

Страница 18: ...doit rester facilement accessible 16 Ces instructions d entretien sont uniquement réservées à des techniciens qualifiés Pour réduire les risques de choc électrique n effectuer que les opérations d entretien contenues dans ce manuel à moins d avoir la qualification nécessaire 17 Le lecteur DVD ne doit pas être exposé à des gouttes d eau ou des éclaboussures et aucun objet rempli de liquide tel qu u...

Страница 19: ...ription 1 Marche Arrêt Permet d allumer ou d éteindre le lecteur mode Attente Quand le lecteur est en mode Attente il est toujours alimenté Pour déconnecter l alimentation débrancher le cordon secteur 2 PROGRAMMATION Permet de créer une liste de lecture Pour plus d informations voir Création d une liste de lecture à la page 22 3 RÉPÉTITION Permet de répéter le chapitre ou le titre en cours d un DV...

Страница 20: ...isque permet de sélectionner le titre les chapitres les pistes ou des images JPEG 22 OSD Permet d afficher l information sur la lecture Appuyer de nouveau sur cette touche pour désactiver l information sur la lecture 23 ANNULER Permet de supprimer le dernier chiffre qui a été entré dans la liste de lecture 24 RECHERCHE Permet d ouvrir le menu de recherche pour sélectionner un titre un chapitre une...

Страница 21: ...ype de vidéo pour le téléviseur est réglé par défaut sur S Vidéo Si le type de vidéo pour le téléviseur a été modifié appuyer sur PSCAN NORMAL Balayage progressif Normal pour sélectionner S VIDEO S Vidéo 4 Mettre en marche le téléviseur et sélectionner la source d entrée appropriée Pour plus d informations voir la documentation livrée avec le téléviseur Connexion d un téléviseur avec vidéo à compo...

Страница 22: ...dard vidéo du téléviseur Pour connecter un téléviseur en utilisant une prise S Vidéo sélectionner S VIDEO Pour connecter un téléviseur en utilisant les prises pour vidéo à composantes sélectionner P SCAN Balayage progressif pour un téléviseur à haute définition ou à balayage progressif ou sélectionner Interlace Entrelacé pour un téléviseur plus ancien à diffusion analogique Pour sélectionner le mo...

Страница 23: ...eproduire un disque 1 Appuyer sur EJECT Éjecter à l avant du lecteur ou OPEN CLOSE Ouvrir Fermer sur la télécommande pour ouvrir le plateau à disque 2 Insérer un disque l étiquette tournée vers le haut dans le plateau à disque puis appuyer sur EJECT Éjecter ou sur OPEN CLOSE Ouvrir Fermer pour fermer le plateau 3 Si la lecture ne commence pas automatiquement appuyer sur PLAY Lecture 4 Pour arrêter...

Страница 24: ...istrées sous divers angles de prises de vues Pour sélectionner un angle de prise de vues Appuyer sur ANGLE Angles Une icône Angle s affiche sur l écran quand plusieurs options d angles existent Création d une liste de lecture Il est possible de créer une liste de lecture de chapitres ou titres de DVD de pistes de CD ou d images JPEG La liste de lecture peut contenir jusqu à 16 chapitres titres pis...

Страница 25: ...disque Il est possible de faire une recherche d un chapitre titre piste ou position Pour effectuer une recherche sur un disque 1 Appuyer sur SEARCH Recherche Le menu de recherche s affiche 2 Appuyer sur ou pour sélectionner Chapter Chapitre Title Titre ou Time Durée 3 Appuyer sur les touches numériques pour saisir le chapitre le titre le numéro de piste ou la position puis appuyer sur ENTER Entrée...

Страница 26: ...Langue du menu puis appuyer sur ENTER Entrée 4 Appuyer sur ou pour sélectionner la langue souhaitée puis appuyer sur ENTER Entrée 5 Appuyer sur SETUP Configuration pour fermer le menu Activer et désactiver la dernière position mémorisée Si l option de la dernière position mémorisée LAST MEMORY est activée en appuyant sur Arrêt puis sur Lecture la lecture reprend à l endroit où elle avait été inter...

Страница 27: ... certaines émissions et films selon les classifications Pour regarder un programme ou un film à classification interdite l utilisateur doit saisir le mot de passe parental Pour configurer les contrôles parentaux 1 Appuyer sur SETUP Configuration Le menu d écran s affiche 2 Appuyer sur ou pour sélectionner PASSWORD Mot de passe puis appuyer sur ENTER Entrée 3 Appuyer sur les touches numériques pour...

Страница 28: ...sation des paramètres d usine Pour réinitialiser les paramètres d usine 1 Appuyer sur SETUP Configuration Le menu d écran s affiche 2 Appuyer sur ou pour sélectionner DEFAULT Par défaut puis appuyer sur ENTER Entrée 3 Appuyer sur SETUP Configuration pour fermer le menu Entretien Nettoyage du boîtier Il est nécessaire d utiliser un chiffon doux légèrement humecté d un détergent Ne pas utiliser un p...

Страница 29: ...à la documentation livrée avec le téléviseur Vérifier que le lecteur est connecté directement au téléviseur Problème Solution L image ne remplit pas entièrement l écran Vérifier que le format d écran est correctement sélectionné pour ce lecteur Pour plus d informations voir Sélection du type de téléviseur à la page 20 Vérifier que le format d écran est correctement sélectionné à partir du menu du ...

Страница 30: ... la distance entre l équipement et le récepteur Brancher l équipement sur la prise électrique d un circuit différent de celui auquel le récepteur est relié Contacter le revendeur ou un technicien qualifié pour toute assistance Avertissement de la FCC Tous changements ou toutes modifications qui ne seraient pas expressément approuvés par les responsables de l application des règles FCC pourraient r...

Страница 31: ...ignia pour la réparation à domicile Où cette garantie s applique t elle Cette garantie ne s applique qu à l acheteur original du produit aux États Unis et au Canada Ce qui n est pas couvert par cette garantie limitée La présente garantie ne couvre pas la formation du client l installation les réglages de configuration les dommages esthétiques les dommages résultants de catastrophes naturelles tell...

Страница 32: ...stered in some countries All other products and brand names are trademarks of their respective owners Distribué par Best Buy Purchasing LLC 7601 Penn Avenue South Richfield MN USA 55423 3645 2008 Best Buy Enterprise Services Inc Tous droits réservés INSIGNIA est une marque de Best Buy Enterprise Services Inc Déposée dans certains pays Tous les autres produits ou noms de marques sont des marques de...

Отзывы: