background image

12

 NS-39D310NA15 Insignia 39" LED TV

www.insigniaproducts.com

What connection should I 
use?

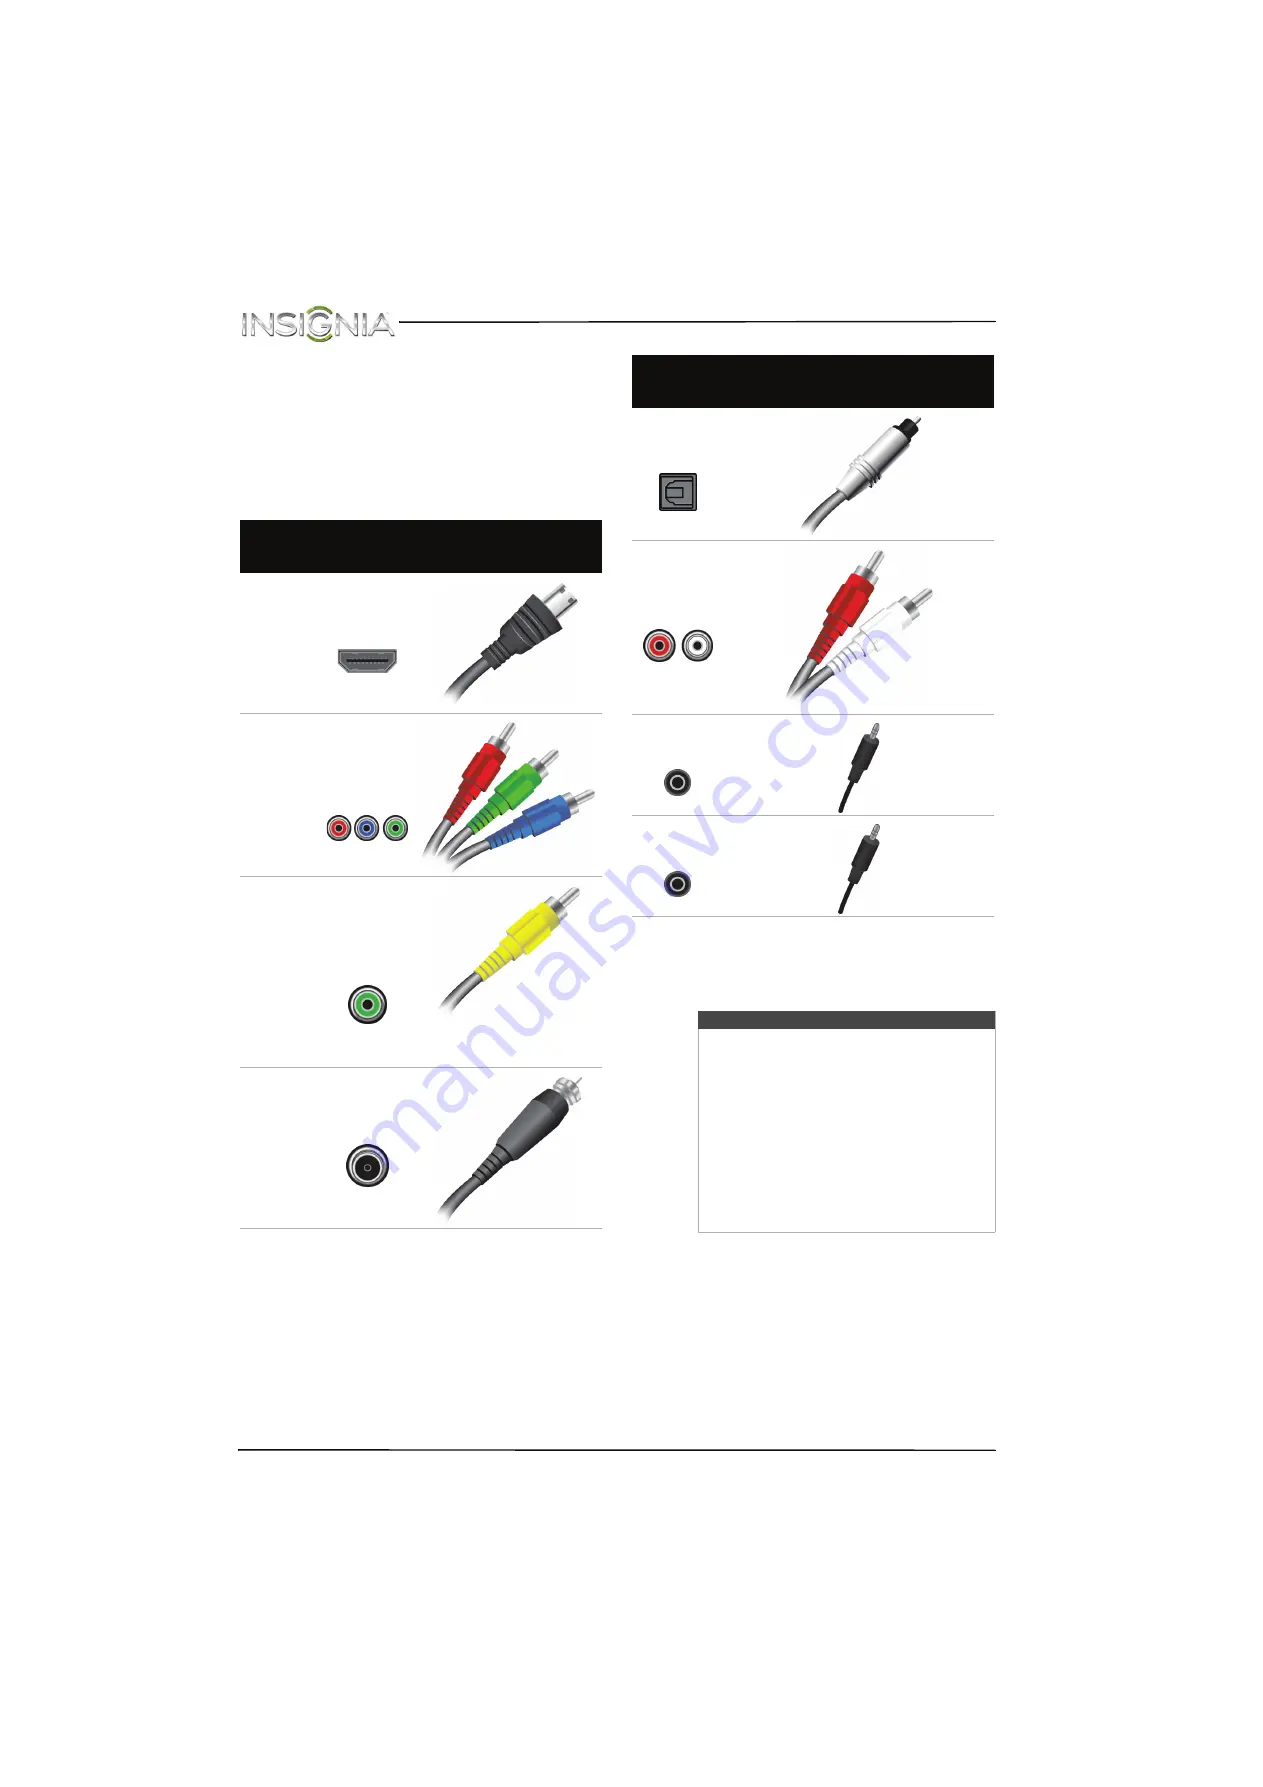
Your TV has several connection types for 
connecting devices to your TV.
For the best video quality, you should connect a 
device to the best available connection.
Use the following tables to identify cables:

You can use either 

HDMI

 jack on your TV to connect 

a DVI device to your TV. For more information, see 

Using DVI (same as HDMI but requires an audio 

connection)

” on page 

14

20

, or 

28

.

Video 
quality

Connection 
type and 
jack

Cable connector

Best (use this 

if your devices 

have HDMI)

HDMI 

video/audio

Better than 

composite or 

coaxial

Component 

video (requires 

an audio 

connection)

Better than 

coaxial

AV (composite 

video) (requires 

an audio 

connection)

Good

Coaxial 

video/audio

Connection 
type and 
jack

Cable connectors

Optical digital 

audio output

Analog audio 

input

3.5mm DVI 

audio input

3.5 analog audio 

output

Cautions

• Check the jacks for position and type 

before making any connections.

• Loose connections can result in image or 

color problems. Make sure that all 
connections are tight and secure.

• The external audio/video equipment 

shown may be different from your 
equipment. If you have questions, refer to 
the documentation that came with your 
equipment.

• Always unplug the power cord when 

connecting external equipment.

Содержание NS-39D310NA15

Страница 1: ...NS 39D310NA15 UserGuide 39 LED TV Before using your new product please read these instructions to prevent any damage...

Страница 2: ...e 12 Connecting a cable or satellite box 13 Using HDMI best 13 Using DVI same as HDMI but requires an audio connection 14 Using component video better 15 Using AV composite video good 16 Using coaxial...

Страница 3: ...9 Navigating the menus 39 Selecting a channel 40 Adjusting the volume 40 Viewing channel information 40 Using an MHL enabled device or Roku Streaming Stick 41 Using an MHL enabled device 41 Using a Ro...

Страница 4: ...ioning on or off 61 Selecting the analog closed captioning mode 62 Selecting the digital closed captioning mode 62 Customizing digital closed captioning settings 63 Adjusting time settings 64 Setting...

Страница 5: ...ome excited while watching a program especially on a larger than life TV Make sure that you place or install the TV where it cannot be pushed pulled over or knocked down Make sure that you route all c...

Страница 6: ...ipping or splashing and no objects filled with liquids such as vases should be placed on the apparatus WARNING Electric shock hazard To reduce the risk of fire or electric shock do not remove any cove...

Страница 7: ...in wire to an antenna discharge unit size of grounding conductors location of the antenna discharge unit connection to grounding electrodes and requirements for the grounding electrode Note to CATV s...

Страница 8: ...ing Stick and view your device s screen on your TV Supports 1080p HD video and 5 1 digital surround sound playback from your mobile device Requires an MHL enabled phone or tablet and an MHL cable See...

Страница 9: ...ce to protect the screen from damages and scratches 2 Find the front of the stand then secure the stand to the stand column using the four provided 20 mm screws Notes If you plan to wall mount your TV...

Страница 10: ...TV face down on a cushioned clean surface to protect the screen from damages and scratches 2 Remove the four screws that secure the stand column to the TV 3 Remove the stand column Warning This TV is...

Страница 11: ...that came with the wall mount bracket for information about how to correctly hang your TV Notes The length of the wall mount screws vary depending on the wall mount bracket you purchased See the inst...

Страница 12: ...menu For more information see Navigating the menus on page 39 2 INPUT Press one or more times to select the video input source your want then wait a few seconds Your TV switches to the source you sele...

Страница 13: ...HDMI but requires an audio connection on pages 14 20 or 28 3 HDMI 2 MHL Connect an HDMI device to this jack For more information see Using HDMI best on pages 13 19 24 or 27 OR Connect an MHL enabled d...

Страница 14: ...R OR Y VIDEO The component video and AV composite video jacks are shared You can connect only one component video or AV device at a time Connect the video for a component video device to the Y VIDEO P...

Страница 15: ...put source then press ENTER For more information see Selecting the videoinput source on page 38 13 return In TV mode press to return totheprevious channel 14 S T W X Press to navigate in on screen men...

Страница 16: ...evices have HDMI HDMI video audio Better than composite or coaxial Component video requires an audio connection Better than coaxial AV composite video requires an audio connection Good Coaxial video a...

Страница 17: ...ncoming cable from the cable wall jack to the cable in jack on the cable or satellite box 3 Connect an HDMI cable not provided to one of the HDMI jacks on the side of your TV and to the HDMI OUT jack...

Страница 18: ...f the cable to one of the HDMI jacks on the side of your TV 5 Connect a 3 5mm RCA stereo audio cable not provided to the PC AUDIO IN jack on the back of your TV and to the AUDIO OUT jacks on the cable...

Страница 19: ...o out jacks on the cable or satellite TV box 5 Plug your TV s power cord into a power outlet turn on your TV then turn on the cable or satellite box 6 Press INPUT to open the INPUT SOURCE list 7 Press...

Страница 20: ...urn on your TV then turn on the cable or satellite box 5 Press INPUT to open the INPUT SOURCE list 6 Press S or T to highlight Component AV then press ENTER Notes Cables are often color coded to match...

Страница 21: ...cable or satellite box 4 Plug your TV s power cord into a power outlet turn on your TV then turn on the cable or satellite box 5 Press INPUT to open the INPUT SOURCE list 6 Press S or T to highlight...

Страница 22: ...waves Do not bundle the coaxial cable with the power cord or other cables If the antenna is not installed correctly contact qualified service personnel to correct the problem If the signal level for a...

Страница 23: ...the DVD or Blu ray player is turned off 2 Connect an HDMI cable not provided to one of the HDMI jacks on the side of your TV and to the HDMI OUT jack on the DVD or Blu ray player 3 Plug your TV s pow...

Страница 24: ...your TV 4 Connect a 3 5mm RCA stereo audio cable not provided to the PC AUDIO IN jack on the back of your TV and to the AUDIO OUT jacks on the DVD or Blu ray player 5 Plug your TV s power cord into a...

Страница 25: ...4 Plug your TV s power cord into a power outlet then turn on your TV and DVD or Blu ray player 5 Press INPUT to open the INPUT SOURCE list 6 Press S or T to select Component AV then press ENTER Note C...

Страница 26: ...to open the INPUT SOURCE list 5 Press S or T to select Component AV then press ENTER Notes Cables are often color coded to match color coded jacks The yellow video connector on the AV cable connects...

Страница 27: ...your TV 3 Turn on the MHL enabled device 4 If your TV is turned on press ENTER when a message appears Your MHL enabled device s menu opens OR If your TV is turned off turn on your TV Press home Your...

Страница 28: ...ck on the game console 3 Plug your TV s power cord into a power outlet then turn on your TV 4 Turn on the game console then set it to the correct output mode For more information see the documentation...

Страница 29: ...th the console 5 Press INPUT to open the INPUT SOURCE list 6 Press S or T to select Component AV then press ENTER Note Cables are often color coded to match color coded jacks Note Your game console ma...

Страница 30: ...the INPUT SOURCE list 6 Press S or T to select Component AV then press ENTER Notes Cables are often color coded to match color coded jacks The yellow video connector on the AV cable connects to the g...

Страница 31: ...to one of the HDMI jacks on the side of your TV and to the HDMI OUT jack on the computer 3 Plug your TV s power cord into a power outlet then turn on your TV and the computer 4 Press INPUT to open the...

Страница 32: ...nnect a 3 5mm audio cable not provided to the PC AUDIO IN jack on the back of your TV and to the AUDIO OUT headphone jack on the computer 5 Plug your TV s power cord into a power outlet then turn on y...

Страница 33: ...u plug in the USB flash drive and want to switch back to the drive press INPUT to open the INPUT SOURCE list press S or T to select USB Photos then press ENTER The PHOTOS menu opens Caution Do not rem...

Страница 34: ...hen press ENTER For more information see Selecting the audio out mode on page 53 Warning Loud noise can damage your hearing When using headphones use the lowest volume setting on your headphones that...

Страница 35: ...he optical AUDIO IN jack on the digital home theater system or sound bar 3 Plug your TV s power cord into a power outlet then turn on your TV 4 Turn on the home theater system or sound bar then set it...

Страница 36: ...acks on the analog home theater system or sound bar 3 Plug your TV s power cord into a power outlet then turn on your TV 4 Turn on the home theater system or sound bar then set it to the correct sourc...

Страница 37: ...o the documentation that came with your devices for connection information Just remember to use the best connection types available for the best picture and sound For information about connection type...

Страница 38: ...r outlet Caution Your TV should only be operated from the power source indicated on the label Always unplug the AC power cord from the power outlet when you will not be using your TV for an extended p...

Страница 39: ...he remote control towards the remote sensor on the front of your TV For the location of the remote sensor see Front on page 8 Cautions Batteries should not be exposed to excessive heat such as sunshin...

Страница 40: ...untain Pacific Alaska Hawaii Atlantic or Newfoundland then press ENTER MENU or W 8 Press S or T to highlight Daylight Saving then press X to access the setting 9 Press S or T to select On if your view...

Страница 41: ...message asks how you connected the cable box to your TV Select HDMI Component or AV then press ENTER if you connected a cable box to your TV using one of these cables Read the message then press ENTER...

Страница 42: ...t the power cord is connected to a power outlet 2 Press power to turn on your TV The power indicator turns off 3 Press power again to turn off your TV Your TV enters standby mode and the power indicat...

Страница 43: ...selectable are grayed out Menus in this manual are described in TV mode unless otherwise indicated The screens shown in this manual are for explanation purposes and may vary from the actual screens on...

Страница 44: ...orite channel list see Setting up a favorite channel list on page 56 Adjusting the volume Press VOL or VOL to increase or decrease the volume Press MUTE to turn off the sound Press MUTE again to turn...

Страница 45: ...ens 3 Use S T W X and ENTER to navigate on your device To switch to an MHL device that is already connected 1 Press INPUT then press S or T to select HDMI 2 MHL ACC OR Press MENU then press W or X to...

Страница 46: ...X and ENTER to navigate on your Roku Streaming Stick To switch to a Roku Streaming Stick that is already connected 1 Press INPUT then press S or T to select HDMI 2 Roku OR Press MENU then press W or X...

Страница 47: ...ink is set to On Device Auto Power Off automatically turns off HDMI CEC devices when you turn off your TV 1 Press MENU The on screen menu opens 2 Press W or X to highlight SETTINGS then press T or ENT...

Страница 48: ...ess MENU to return to the previous menu or press EXIT to close the menu Turning Audio Receiver on or off When INlink is turned on and you have connected a HDMI CEC compatible audio receiver to your TV...

Страница 49: ...d INlink compatible device is turned on and you switch to a different video input source such as TV Connect switches to the device 1 Press MENU The on screen menu opens 2 Press W or X to highlight SET...

Страница 50: ...ous menu or press EXIT to close the menu Using a USB flash drive You can connect a USB flash drive to your TV to view compatible JPEG pictures Switching to USB mode 1 Make sure that you have connected...

Страница 51: ...st A heart appears on a photo that has been added to the favorite photo list Press EXIT to close the control bar When a photo is displayed full screen a control bar appears at the bottom of the photo...

Страница 52: ...s on page 47 Viewing photos in a slideshow You can view your photos in a slideshow 1 Switch to USB mode See Switching to USB mode on page 46 The PHOTOS menu opens 2 If the photos you want to view are...

Страница 53: ...t 1 Press MENU The on screen menu opens with the PICTURE menu displayed 2 Press T or ENTER to access the menu 3 Press S or T to highlight an option then press ENTER to access the option You can select...

Страница 54: ...lects the noise reduction mode to reduce picture noise snow You can select Off Low Middle or High Adaptive Contrast Automatically adjusts picture detail and brightness You can select On or Off Reset P...

Страница 55: ...ress MENU to return to the previous menu or press EXIT to close the menu Setting the power on picture mode You can set the picture mode your TV uses when you turn it on 1 Press MENU The on screen menu...

Страница 56: ...em You can select RAW to pass through the original digital audio sound PCM to output audio in 2 channel stereo Audio Delay Fine tunes the audio when it is not in sync with the video MTS SAP Analog cha...

Страница 57: ...IO OUT jack to control the audio Audio Out Variable Select this option to use the remote control that came with your TV to control the audio from the home theater system or sound bar you connected to...

Страница 58: ...Antenna your TV scans for available channels The scan may take several minutes B If you select Cable a message asks if you have a cable box Select No then press ENTER if no cable box is connected Your...

Страница 59: ...the number buttons for the channel 1 Press MENU The on screen menu opens 2 Press W or X to highlight CHANNELS then press T or ENTER The CHANNELS menu opens 3 Press S or T to highlight Add Skip Channel...

Страница 60: ...led you can label the channel to make it easier to identify You can also relabel a channel that is already labeled 1 Press MENU The on screen menu opens 2 Press W or X to highlight CHANNELS then press...

Страница 61: ...me exceptions such as news and sports and deny access to programs that exceed the ratings level you select To watch programs that exceed the selected rating you must enter a password Setting or changi...

Страница 62: ...7 Press MENU to return to the previous menu or press EXIT to close the menu Blocking unrated TV Some TV programs such as news and sports shows are not rated When Block Unrated TV is turned on TV progr...

Страница 63: ...Parental guidance suggested TV 14 Parental guidance strongly suggested TV MA Mature audiences only U S TV content ratings All All ratings are blocked FV Fantasy violence L Strong language S Sexual si...

Страница 64: ...revious menu or press EXIT to close the menu Downloading rating information If the program you are viewing has downloadable rating information you can download the information to use when setting pare...

Страница 65: ...the menu Using closed captioning Closed captioning displays a text version of the TV program audio or displays information provided by the broadcaster Turning closed captioning on or off 1 Press MENU...

Страница 66: ...he broadcaster 6 Press MENU to return to the previous menu or press EXIT to close the menu Selecting the digital closed captioning mode Digital channels usually have one or more closed captioning mode...

Страница 67: ...AL CC SETTINGS menu opens with Style highlighted 5 Press ENTER then press S or T to select Custom 6 Press S or T to highlight an option then press ENTER You can select Size Selects the font size Font...

Страница 68: ...omatically set by the TV signal source 7 Press ENTER to close the menu 8 Press S or T to highlight Time Zone then press ENTER A menu opens 9 Press S or T to select your time zone then press ENTER You...

Страница 69: ...the sleep timer select Off 6 Press MENU to return to the previous menu or press EXIT to close the menu Adjusting menu settings Selecting the menu language Your TV can display the on screen menu in Eng...

Страница 70: ...connected to them and turned on Your TV uses this information to determine what options you can select on the INPUT SOURCE list when you press INPUT 1 Press MENU The on screen menu opens 2 Press W or...

Страница 71: ...lt settings 5 Press S or T to select Yes to reset or No to not reset then press ENTER If you select Yes your TV turns off then turns on again The TV SETUP wizard opens 6 Go through the TV SETUP wizard...

Страница 72: ...sure that the antenna or cable TV is connected correctly and securely See Connecting a cable or satellite box on page 13 or Connecting an antenna or cable TV no box on page 18 Adjust the brightness Se...

Страница 73: ...lem Solution Dotted lines or stripes appear on the screen Make sure that the antenna or cable TV is connected correctly and securely See Connecting a cable or satellite box on page 13 or Connecting an...

Страница 74: ...r TV Try turning off one device at a time to determine which device is causing interference After you have determined which device is causing interference move it further from the TV to eliminate the...

Страница 75: ...at the channels are not blocked See Setting parental control levels on page 59 Make sure that the channels are not hidden The channel may have been deleted from the channel list You can tune to the ch...

Страница 76: ...tify It may look like a micro USB to HDMI cable because the cable connectors are the same but the cable itself is thinner The cable also may not be labeled MHL Try adjusting the picture settings on yo...

Страница 77: ...gnia device it may not be compatible with your TV My TV s remote control does not control the device Make sure that there are no obstructions between the remote control and the remote control sensors...

Страница 78: ...receiver for example turn the volume knob or press a button Audio Receiver is automatically set to On To prevent this from happening turn off the INlink feature See Turning INlink on or off on page 43...

Страница 79: ...iant HDCPcompliant MHL enabled HDMI2 MHLjack Component video 1 back Composite video 1 back Sharedwith component Y Shared audio component and composite Yes PC VGA No 3 5mm DVI audio input 1 back DVI 2...

Страница 80: ...iversal remote control has a code search feature run a code search to identify a code that matches your TV See your universal remote control s instructions for details If your universal remote control...

Страница 81: ...nce with FCC Rules and Regulations Canadian Notice CAN ICES 3 B NMB 3 B Standard Television Receiving Apparatus Appareil de r ception t l vision ordinaire Canada BETS 7 NTMR 7 IC Statement This device...

Страница 82: ...nal purchase was made What does the warranty not cover This warranty does not cover Customer instruction education Installation Set up adjustments Cosmetic damage Damage due to acts of God such as pow...

Страница 83: ...asing LLC 7601 Penn Avenue South Richfield MN55423 3645USA 2014BBY Solutions Inc All rights reserved INSIGNIA is a trademark ofBBY Solutions Inc Registeredin some countries All other products andbrand...

Отзывы: