background image

23

 NS-28D220NA16 28" 720p 60Hz, LED TV

www.insigniaproducts.com

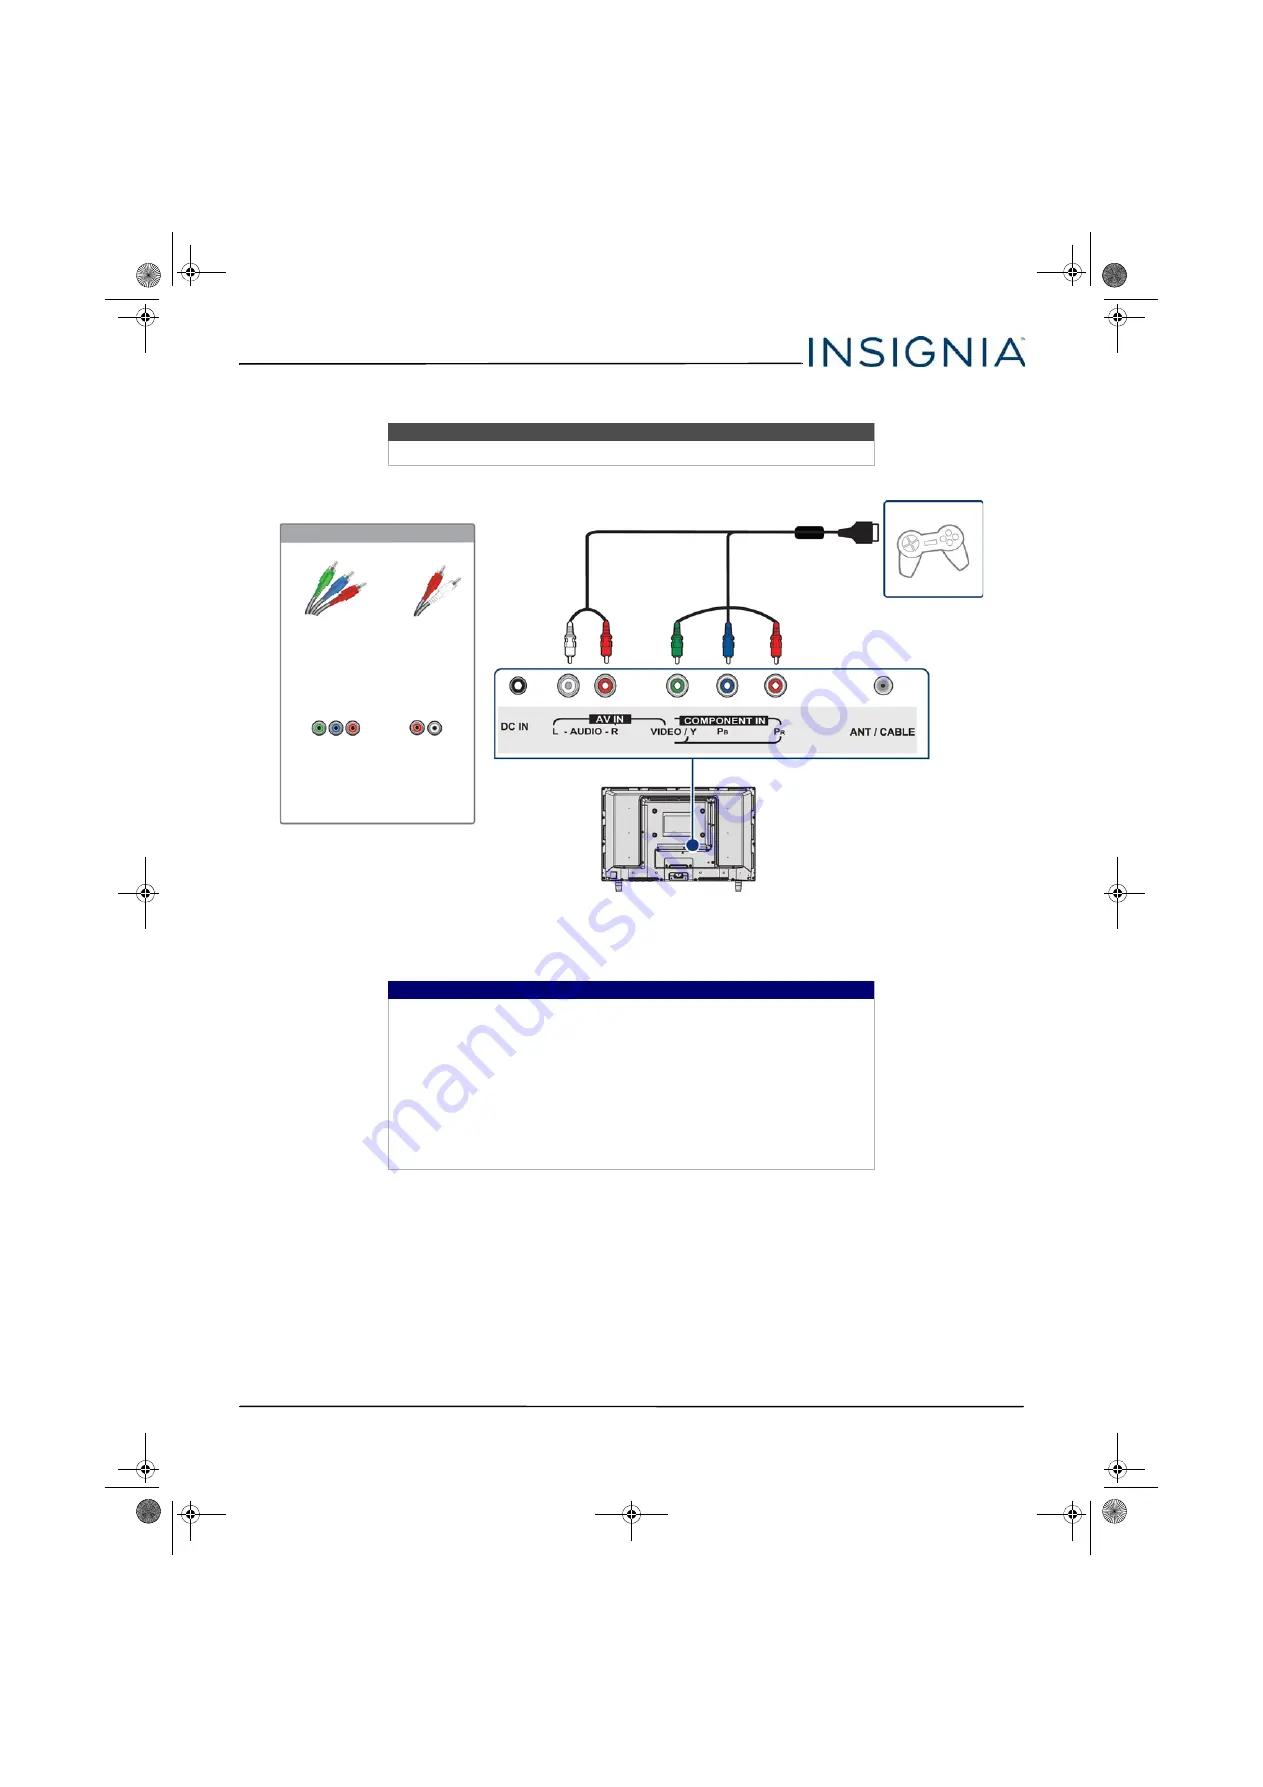
Component video (better)

1

Make sure that your TV’s power adapter is unplugged and the game console is turned off.

2

Connect the game console’s component video cable (not provided) to the 

VIDEO / Y

P

B

, and 

P

R

 video jacks and 

L

and 

R AUDIO

 jacks on the back of your TV and to the component jack(s) on the game console.

3

Plug your TV’s power adapter into a power outlet, then turn on your TV and the game console.

4

Press 

INPUT

 to open the 

INPUT SOURCE 

list.

5

Press 

 or 

 to select 

Component/AV

, then press 

ENTER

.

Note

Cables are often color-coded to match color-coded jacks.

Important

• Your game console may require a special component video cable. See 

the documentation that came with your game console or check the 
manufacturer’s website.

• The 

VIDEO / Y

P

B

, and 

P

R

 video jacks (used to connect a component 

device) share the 

L

 and 

R


AUDIO

 jacks with the 

VIDEO / Y

 jack (used to 

connect an AV device). You can only connect one component video or 
AV device at a time. We suggest upgrading to HDMI if your game 
console supports it.

• When you connect the audio using the 

L

and

R


AUDIO

 jacks, the audio 

output is analog.

Game console

Back of TV

Console-specific component video 

and audio cable

On your TV

Component 

video cable 

connectors

Audio cable 

connectors

Component 

video jacks

Analog 

audio jacks

NS-28D220NA16_14-1311_MAN_V1_ENG.book  Page 23  Friday, April 24, 2015  9:15 AM

Содержание NS-28D220NA16

Страница 1: ...USERGUIDE Before using your new product please read these instructions to prevent any damage 28 720p 60Hz LED TV NS 28D220NA16 NS 28D220NA16_14 1311_MAN_V1_ENG book Page 0 Friday April 24 2015 9 15 AM ...

Страница 2: ...2 What connection should I use 13 Connecting a cable or satellite box 14 HDMI best 14 Component video better 15 AV composite video good 16 Coaxial good 17 Connecting an antenna or cable TV no box 18 Connecting a DVD or Blu ray player 19 HDMI best 19 Component video better 20 AV composite video good 21 Connecting a game console 22 HDMI best 22 Component video better 23 AV composite video good 24 Co...

Страница 3: ...mation 38 Using INlink 39 Turning INlink on or off 39 Turning Device Auto Power Off on or off 39 Turning TV Auto Power On on or off 40 Turning Audio Receiver on or off 40 Displaying a list of INlink compatible devices 41 Selecting an INlink compatible device 41 Opening an INlink compatible device s root menu 42 Using a USB flash drive 42 Switching to USB mode 42 Browsing photos 43 Viewing favorite...

Страница 4: ...ning mode 58 Customizing digital closed captioning settings 59 Adjusting time settings 60 Setting the clock 60 Setting the sleep timer 61 Adjusting menu settings 61 Selecting the menu language 61 Turning Input Sensor on or off 62 Labeling an input source 62 Maintaining 63 Cleaning the TV cabinet 63 Cleaning the TV screen 63 Troubleshooting 63 Viewing system information 63 Learning more about your ...

Страница 5: ...TELEVISION ALWAYS contact your retailer about professional installation if you have any doubts about your ability to safely mount your television ALWAYS use a mount that has been recommended by the television manufacturer and has a safety certification by an independent laboratory such as UL CSA ETL ALWAYS follow all instructions supplied by the television and mount manufacturers ALWAYS make sure ...

Страница 6: ...apparatus 18 Your TV has four VESA mounting holes on the back If you attach a wall mount bracket or TV stand to the back of your TV the bracket or stand must be securely attached using all four holes If you do not use all four mounting holes your TV may fall and cause property damage or personal injury See the documentation that came with your wall mount or TV stand for complete mounting instructi...

Страница 7: ...No 70 provides information with respect to correct grounding of the mast and supporting structure grounding of the lead in wire to an antenna discharge unit size of grounding conductors location of the antenna discharge unit connection to grounding electrodes and requirements for the grounding electrode Note to CATV system installer Article 820 of the National Electrical Code ANSI NFPA No 40 provi...

Страница 8: ...having HDMI CEC compatible products plug and play No setup is needed CEC technology lets different devices discover and communicate with each other See page 39 for instructions on how to use INlink Game mode Video games generally require adjustments to the TV picture settings to get the maximum experience See the Game option in Adjusting the TV picture on page 45 for instruction on how to select G...

Страница 9: ...ll mount bracket Installing the stands 1 Carefully place your TV face down on a cushioned clean surface to protect the screen 2 Secure the TV stands to the TV with the four provided screws Notes If you plan to wall mount your TV do not install the stands Store the stands and stand screws in case you decide to use the stands in the future Screw type Screw length of screws M4 14 mm 4 Front NS 28D220...

Страница 10: ...ack If you attach a wall mount bracket to the back of your TV the bracket must be securely attached using all four holes If you do not use all four mounting holes your TV may fall and cause property damage or personal injury See the documentation that came with your wall mount for complete mounting instructions This TV is intended to be supported by a UL Listed wall mount bracket with suitable wei...

Страница 11: ...nt bracket for information about how to correctly hang your TV Notes The length of the wall mount screws vary depending on the wall mount bracket you purchased See the instructions that came with the wall mount bracket for screw lengths The mounting holes on the back of your TV take type M6 screws 3 94 in 100 mm 7 87 in 200 mm NS 28D220NA16_14 1311_MAN_V1_ENG book Page 7 Friday April 24 2015 9 15 ...

Страница 12: ...ED TV Remote control and batteries 2 AAA AC power adapter TV stand 2 and screws 4 Quick Setup Guide Important Information Safety sheet Front features Item Description 1 Remote control sensor Receives signals from the remote control Do not block 2 Power indicator Turns off when your TV is on Lights red when your TV is off standby mode NS 28D220NA16_14 1311_MAN_V1_ENG book Page 8 Friday April 24 201...

Страница 13: ...input source on page 36 In menu mode press to confirm selections 3 VOL VOL Press to increase or decrease the volume OR Press to go to the next or previous menu in the on screen menus 4 CH CH Press to go to the next or previous channel in the channel list For more information see Selecting a channel on page 38 OR Press to select an option in an on screen menu 5 power Press to turn your TV on or off...

Страница 14: ...ing a USB flash drive on page 26 and Using a USB flash drive on page 42 4 HDMI1 ARC Connect an HDMI device to this jack For more information see HDMI best on pages 14 19 or 22 or Connecting a computer on page 25 OR Connect an ARC enabled home theater receiver to this jack 5 HDMI2 Connect an HDMI device to this jack For more information see HDMI best on pages 14 19 or 22 or Connecting a computer on...

Страница 15: ...VIDEO Y Connect the video for a component video device to the VIDEO Y PB and PR jacks For more information see Component video better on page 15 20 or 23 OR Connect the video for an AV device to the VIDEO Y jack For more information see AV composite video good on page 16 21 or 24 Important The component video and AV jacks are shared You can connect only one component video or AV device at a time 4...

Страница 16: ...39 USB Control a photo slideshow SeeViewing photos in a slideshow on page44 12 INPUT Open the INPUTSOURCE list Press or to select the videoinput source then press ENTER See Selecting the videoinput source on page 36 13 return Return tothe previous channel 14 TV Navigate in on screen TV menus and toadjust settings USB Control a photo slideshow 15 home Open the on screen menu 16 INFO DisplayTV statu...

Страница 17: ...o connection Better than coaxial AV composite video requires an audio connection Good Coaxial video audio Connection type and jack Cable connectors Coaxial digital audio output Analog audio input Cautions Check the jacks for position and type before making any connections Loose connections can cause poor audio or video quality Make sure that all connections are tight and secure The external audio ...

Страница 18: ...ff 2 Connect the incoming cable from the cable wall jack to the cable in jack on the cable or satellite box 3 Connect an HDMI cable not provided to an HDMI jack on the side of your TV and to the HDMI OUT jack on the cable or satellite box 4 Plug your TV s power adapter into a power outlet turn on your TV then turn on the cable or satellite box 5 Press INPUT to open the INPUT SOURCE list 6 Press or...

Страница 19: ...on your TV then turn on the cable or satellite box 6 Press INPUT to open the INPUT SOURCE list 7 Press or to highlight Component AV then press ENTER Note Cables are often color coded to match color coded jacks Important The VIDEO Y PB and PR video jacks used to connect a component device share the L and R AUDIO jacks with the VIDEO Y jack used to connect an AV device You can only connect one compo...

Страница 20: ...list 6 Press or to highlight Component AV then press ENTER Notes Cables are often color coded to match color coded jacks The yellow video connector on the AV cable connects to the green VIDEO Y jack Important The VIDEO Y PB and PR video jacks used to connect a component device share the L and R AUDIO jacks with the VIDEO Y jack used to connect an AV device You can only connect one component video ...

Страница 21: ... power adapter into a power outlet turn on your TV then turn on the cable or satellite box 5 Press INPUT to open the INPUT SOURCE list 6 Press or to highlight TV then press ENTER 7 If you cannot tune to channels you know exist scan for channels See Automatically scanning for channels on page 49 Notes Use a coaxial cable to eliminate interference and noise from radio waves Do not bundle the coaxial...

Страница 22: ...er adapter or other cables If the antenna is not installed correctly contact qualified service personnel to correct the problem If the signal level for a channel is weak the picture may be distorted Adjust the antenna or use a highly directional outdoor or set top antenna with a built in amplifier If the picture quality is good on some channels and poor on others the problem may be caused by a poo...

Страница 23: ... adapter is unplugged and the DVD or Blu ray player is turned off 2 Connect an HDMI cable not provided to an HDMI jack on the side of your TV and to the HDMI OUT jack on the DVD or Blu ray player 3 Plug your TV s power adapter into a power outlet then turn on your TV and DVD or Blu ray player 4 Press INPUT to open the INPUT SOURCE list 5 Press or to highlight HDMI 1 or HDMI 2 then press ENTER Note...

Страница 24: ... Press INPUT to open the INPUT SOURCE list 6 Press or to select Component AV then press ENTER Note Cables are often color coded to match color coded jacks Important The VIDEO Y PB and PR video jacks used to connect a component device share the L and R AUDIO jacks with the VIDEO Y jack used to connect an AV device You can only connect one component video or AV device at a time We suggest upgrading ...

Страница 25: ...press ENTER Notes Cables are often color coded to match color coded jacks The yellow video connector on the AV cable connects to the green VIDEO Y jack Important The VIDEO Y PB and PR video jacks used to connect a component device share the L and R AUDIO jacks with the VIDEO Y jack used to connect an AV device You can only connect one component video or AV device at a time We suggest upgrading to ...

Страница 26: ...ter is unplugged and the game console is turned off 2 Connect an HDMI cable not provided to an HDMI jack on the side of your TV and to the HDMI OUT jack on the game console 3 Plug your TV s power adapter into a power outlet then turn on your TV and the game console 4 Press INPUT to open the INPUT SOURCE list 5 Press or to highlight HDMI 1 or HDMI 2 then press ENTER Note An HDMI cable carries both ...

Страница 27: ...ch color coded jacks Important Your game console may require a special component video cable See the documentation that came with your game console or check the manufacturer s website The VIDEO Y PB and PR video jacks used to connect a component device share the L and R AUDIO jacks with the VIDEO Y jack used to connect an AV device You can only connect one component video or AV device at a time We...

Страница 28: ...yellow video connector on the AV cable connects to the green VIDEO Y jack Important Most game consoles come with a special AV cable See the documentation that came with your game console or check the manufacturer s Web site The VIDEO Y PB and PR video jacks used to connect a component device share the L and R AUDIO jacks with the VIDEO Y jack used to connect an AV device You can only connect one c...

Страница 29: ...your TV and to the HDMI OUT jack on the computer 3 Plug your TV s power adapter into a power outlet then turn on your TV and the computer 4 Press INPUT to open the INPUT SOURCE list 5 Press or to highlight HDMI 1 or HDMI 2 then press ENTER 6 Adjust the display properties on the computer if necessary HDMI cable Side of TV HDMI cable connector HDMI jack On your TV NS 28D220NA16_14 1311_MAN_V1_ENG bo...

Страница 30: ...nd want to switch back to the drive press INPUT to open the INPUT SOURCE list press or to select USB Photos then press ENTER The PHOTOS menu opens Caution Do not remove the USB flash drive or turn off the TV while using the USB flash drive You may lose data or damage the USB flash drive Note The Photos viewer only supports JPEG format images with jpg file extensions and not all JPEG files are comp...

Страница 31: ...e audio out mode on page 48 Warning Loud noise can damage your hearing When using headphones use the lowest volume setting on your headphones that still lets you hear the sound Notes If you connect headphones when your TV is turned off then you turn on your TV the TV speakers are muted and the audio plays through the headphones You can also connect a home theater system sound bar or external speak...

Страница 32: ... Plug your TV s power adapter into a power outlet then turn on your TV 4 Turn on the digital speaker system or sound bar then set it to the correct source For more information see the documentation that came with the digital speaker system or sound bar 5 On your TV s Audio menu highlight Digital Audio Format Audio Delay then press ENTER or Set the Audio Format option to PCM See the Digital Audio F...

Страница 33: ...und bar 3 Plug your TV s power adapter into a power outlet then turn on your TV 4 Turn on the analog speaker system or sound bar then set it to the correct source For more information see the documentation that came with the analog speaker system or sound bar 5 On your TV s Audio menu set the Headphones Audio Out option to Headphones Audio Out Variable or Audio Out Fixed See the Headphones Audio O...

Страница 34: ...our devices Refer to the documentation that came with your devices for connection information Just remember to use the best connection types available for the best picture and sound For information about connection types see What connection should I use on page 13 DVD or Blu ray player Cable or satellite box AV receiver Antenna or cable TV connected directly to the wall jack NS 28D220NA16_14 1311_...

Страница 35: ...he power outlet 1 Connect the power adapter to the DC IN connector on the back of your TV 2 Connect the other end of the adapter to a power outlet Caution Your TV should only be operated from the power source indicated on the label Always unplug the power adapter from the power outlet when you will not be using your TV for an extended period of time NS 28D220NA16_14 1311_MAN_V1_ENG book Page 31 Fr...

Страница 36: ...he battery compartment cover Aiming the remote control Point the remote control towards the remote sensor on the front of your TV Cautions Batteries should not be exposed to excessive heat such as sunshine heat registers or fire Battery chemicals can cause a rash If the batteries leak clean the battery compartment with a cloth If chemicals touch your skin wash immediately Make sure that batteries ...

Страница 37: ...about the universal remote codes 5 Press ENTER Your TV displays a list of remote control codes for various brands of universal remote controls 6 Press MENU to return to the previous menu or press EXIT to close the menu Tips If your universal remote control has a code search feature run a code search to identify a code that matches your TV See your universal remote control s instructions for detail...

Страница 38: ...en press ENTER 4 Press or to highlight Home Use Mode or Store Display Mode then press ENTER If you selected Store Display Mode a message asks if you are sure you want this mode Select OK to continue using Store Display Mode or select Cancel to automatically change to Home Use Mode Store Display Mode is not an energy savings mode and will display a retail banner 5 Press or to highlight an option th...

Страница 39: ...t label press to select Next then press ENTER OR If you select Custom press ENTER then press or to enter the first character in your custom label Press or to move to the previous or next character position Use the arrow buttons to enter additional characters You can enter 12 characters letters or numbers When you have finished creating your label press ENTER then press twice to highlight Next then...

Страница 40: ... TV The power indicator turns off 3 Press power again to turn off your TV Your TV enters standby mode and the power indicator turns red Selecting the video input source 1 Turn on your TV 2 If you want to use a device connected to a video input such as a DVD or Blu ray player turn on the device 3 Press INPUT 4 Press or to select a video input source then press ENTER Note You can press EXIT to stop ...

Страница 41: ...Audio menu TV mode Channels menu TV mode Settings menu TV mode Help menu PHOTOS menu USB mode Notes Depending on the signal source selected you may see different options on your screen Menu items that are not selectable are grayed out NS 28D220NA16_14 1311_MAN_V1_ENG book Page 37 Friday April 24 2015 9 15 AM ...

Страница 42: ...MUTE again to turn the sound back on Viewing channel information Press INFO to view an information banner The information banner shows the current program information such as channel number video input source and resolution Digital channel information Displays the channel number station name channel label broadcast program name TV rating signal type audio information resolution current time signal...

Страница 43: ...o return to the previous menu or press EXIT to close the menu Turning Device Auto Power Off on or off When INlink is set to On Device Auto Power Off automatically turns off HDMI CEC devices when you turn off your TV 1 Press MENU 2 Press or to highlight SETTINGS then press or ENTER 3 Press or to highlight INlink then press ENTER or 4 Press or to highlight Device Auto Power Off then press ENTER or 5...

Страница 44: ...ress EXIT to close the menu Turning Audio Receiver on or off When INlink is turned on and you have connected an HDMI CEC compatible audio receiver to your TV turning on Audio Receiver lets you use your TV s remote control to control the volume on the audio receiver 1 Press MENU 2 Press or to highlight SETTINGS then press or ENTER 3 Press or to highlight INlink then press ENTER or 4 Press or to hig...

Страница 45: ...d appears 5 Press MENU to return to the previous menu or press EXIT to close the menu Selecting an INlink compatible device When you have more than one INlink compatible device connected you can select the device you want to use 1 Press MENU 2 Press or to highlight SETTINGS then press or ENTER 3 Press or to highlight INlink then press ENTER or 4 Press or to highlight Connect then press ENTER or 5 ...

Страница 46: ... view compatible JPEG pictures This section covers Switching to USB mode Browsing photos Viewing favorite photos Viewing photos in a slideshow Switching to USB mode 1 Make sure that you have connected the USB flash drive to the USB port on your TV 2 Press or to highlight Yes in the message that appears then press ENTER The PHOTOS menu opens OR If you connected the USB flash drive then changed to a...

Страница 47: ...rs on a photo that has been added to the favorite photo list When a photo is displayed full screen a control bar appears at the bottom of the photo The file name picture resolution size and date are displayed on the bottom of the control bar If you do not press a button within 10 seconds the control bar closes Press INFO to open the control bar again 4 To navigate on the photo screen press to go t...

Страница 48: ...USB mode on page 42 2 If the photos you want to view are in a folder on the USB flash drive select the folder For information about selecting a folder see Browsing photos on page 43 or Viewing favorite photos on page 44 3 Press MENU 4 Press or to highlight Start Slideshow then press ENTER or A slideshow starts with the first photo in the current folder 5 To control the slideshow Note Photos are sh...

Страница 49: ...ghtness and sharpness This selection is good for standard TV broadcasts Energy Savings the backlight brightness is decreased Your TV has a backlight that provides light for displaying a picture By reducing the amount of light your TV uses less energy Movie a finely detailed picture Adjusts the brightness and contrast and lowers the sharpness for a more realistic picture This selection is good for ...

Страница 50: ...ettings Resets all picture settings to factory mode 4 Press or to adjust the option or press or to select a setting 5 Press MENU to return to the previous menu or press EXIT to close the menu Automatically adjusting the aspect ratio Auto Aspect Ratio automatically changes how the picture looks on the screen aspect ratio based on the TV program you are viewing 1 Press MENU 2 Press or to highlight C...

Страница 51: ...ettings to improve the sound quality You also can reset all sound settings to the factory default 1 Press MENU 2 Press or to highlight AUDIO then press or ENTER 3 Press or to highlight an option then press ENTER or to access the option You can select Audio Mode Selects the sound mode You can select Standard Balances treble and bass This setting is good for watching standard TV broadcasts Theater E...

Страница 52: ... the side of your TV to connect headphones a home theater system sound bar or external speaker system When a device is connected to the AUDIO OUT jack the TV speakers are muted You can select Headphones Audio Out Variable Select this option to use the remote control that came with your TV to control the audio from headphones a home theater system a sound bar or an external speaker system you conne...

Страница 53: ...nels your TV searches for channels with signals and stores the channel information in the channel list When you press CH or CH your TV goes to the next or previous channel in the channel list If the TV signal source changes for example you change from an outdoor antenna to cable TV no box you need to scan for channels 1 Press MENU 2 Press or to highlight CHANNELS then press or ENTER 3 Press or to ...

Страница 54: ...els The scan may take several minutes When the scan is complete the on screen menu closes and your TV tunes to the first channel it found when scanning C If you select Antenna your TV scans for available channels The scan may take several minutes When the scan is complete the on screen menu closes and your TV tunes to the first channel it found when scanning Note You can press EXIT to stop the aut...

Страница 55: ...en press or ENTER 3 Press or to highlight Favorites then press ENTER or 4 Press or to highlight the channel you want to add to the favorites list then press ENTER Each channel has a circle to the left When you add a channel to the Favorite List the circle is filled 5 Press MENU to return to the previous menu or press EXIT to close the menu Notes If you highlight a channel in the list for two to fo...

Страница 56: ...to move to the previous or next character position Repeat this step to enter additional characters You can enter as many as 11 characters letters numbers or symbols 6 When you have completed the label press ENTER or MENU to save your label and return to the Channels menu 7 Press EXIT to close the menu Checking the digital signal strength You can check the digital signal strength to determine if yo...

Страница 57: ...loading rating information Locking control buttons Setting or changing the password 1 Press MENU 2 Press or to highlight SETTINGS then press or ENTER 3 Press or to highlight Parental Controls then press ENTER or 4 Press the number buttons to enter the four digit password The default password is 0000 You should change the password to a number you can remember 5 Press or to highlight Change Password...

Страница 58: ... S rating levels Some of the age based TV Parental Guidelines ratings also have content based ratings Canadian rating levels U S TV ratings NONE Not rated TV Y All children TV Y7 Suitable forchildren 7 and older TV G General audiences TV PG Parental guidance suggested TV 14 Parental guidance strongly suggested TV MA Mature audiences only U S TV content ratings All All ratings are blocked FV Fantas...

Страница 59: ...A ratings Canadian English or Canadian French for Canadian ratings 7 Press or to select the rating If a rating has sub ratings press or to highlight a sub rating 8 Press ENTER to confirm A lock symbol appears next to a blocked rating 9 Press MENU to return to the previous menu or press EXIT to close the menu Canadian French ratings E Exempt programming G General audiences 8 ans Suitable for childr...

Страница 60: ...ending on the broadcaster 6 Press or to select the program and content types you want to block then press ENTER 7 To reset the RRT5 information to the factory default press or to highlight Reset RRT5 8 Press ENTER 9 Press or to highlight ENTER or Cancel then press ENTER If you select ENTER the ratings are reset and all menus close 10 If you select Cancel press ENTER MENU or to return to the previo...

Страница 61: ...e broadcaster Closed caption controls include Turning closed captioning on or off Selecting the analog closed captioning mode Selecting the digital closed captioning mode Customizing digital closed captioning settings Turning closed captioning on or off 1 Press MENU 2 Press or to highlight SETTINGS then press or ENTER 3 Press or to highlight Closed Caption then press ENTER or 4 Press or to highlig...

Страница 62: ... the menu Selecting the digital closed captioning mode Digital channels usually have one or more closed captioning modes The CC1 mode usually displays a text version of the TV program audio in a small banner The other CC modes display information provided by the broadcaster CS1 mode displays a text version of the audio in the same language as the audio 1 Press MENU 2 Press or to highlight SETTINGS...

Страница 63: ...ghlight an option then press ENTER or You can select Size Selects the font size Font Selects the font style Text Color Selects the color for the words Text Opacity Selects the opacity level for the words Background Color Selects the color for the background Background Opacity Selects the opacity level for the background Edge Effect Selects the style of the letter edge Edge Color Selects the color ...

Страница 64: ...ENTER 7 Press or to highlight Time Zone then press ENTER or 8 Press or to select your time zone then press ENTER You can select Eastern Central Mountain Pacific Alaska Hawaii Atlantic or Newfoundland 9 If your viewing area observes Daylight Saving Time press or to highlight Daylight Saving then press ENTER 10 Press or to select On or Off then press ENTER to close the menu 11 If you selected Manual...

Страница 65: ...e menu Adjusting menu settings You can adjust how the TV menus look by Selecting the menu language Turning Input Sensor on or off Labeling an input source Selecting the menu language Your TV can display the on screen menu in English French or Spanish When you set up your TV for the first time you selected the language You can change the menu language to a different language 1 Press MENU 2 Press or...

Страница 66: ...close the menu Labeling an input source You can add a label to an input source to make it easier to identify 1 Press MENU 2 Press or to highlight SETTINGS then press or ENTER 3 Press or to highlight Input Labels then press ENTER or 4 Press or to select the input source you want to label then press to move to the label field 5 Press or to select a preset label or select Custom to create your own la...

Страница 67: ...ur TV Updating the TV firmware Customizing TV settings Restoring settings to the defaults Video and audio problems Remote control problems General problems INlink CEC compatible device problems Viewing system information You may need to view system information during troubleshooting 1 Press MENU 2 Press or to highlight HELP then press or ENTER 3 Press or to highlight System Info then press ENTER o...

Страница 68: ... part of the Easy Setup wizard the first time you turned on your TV you can run the wizard again to customize settings When you run the Easy Setup wizard your TV will not reset any changes you made on the Picture Audio Channels or Settings menu The wizard scans for channels and replaces the channel information stored on your TV 1 Press MENU 2 Press or to highlight HELP then press or ENTER 3 Press ...

Страница 69: ...e aspect ratio See the Aspect Ratio option in Adjusting the TV picture on page 45 No picture screen is not lit and no sound Press on the TV or the remote control Make sure that the Audio Only option is set to Off See Playing TV audio only on page 49 Make sure that the video cables are connected correctly and securely to your TV Adjust the contrast and brightness See Adjusting the TV picture on pag...

Страница 70: ...or cable TV is connected correctly and securely See Connecting a cable or satellite box on page 14 or Connecting an antenna or cable TV no box on page 18 If you are using an antenna the digital channel signal may be low To check the digital channel signal strength see Checking the digital signal strength on page 52 If you are using an antenna and the signal strength is low adjust the antenna or us...

Страница 71: ...ee If an S VHS camera or a camcorder is connected while another connected device is turned on the picture may be poor Turn off one or more devices Good sound but poor color Adjust the contrast color and brightness settings See Adjusting the TV picture on page 45 Problem Solution Audio noise Other devices for example a surround sound receiver external speakers fans or hair dryers may be interfering...

Страница 72: ... turned on Turn off Auto Input Sensing See Turning Input Sensor on or off on page 62 Problem Solution One or more channels do not display Make sure that the channels are not blocked See Blocking unrated TV on page 54 Make sure that the channels are not hidden The channel may have been deleted from the channel list You can tune to the channel by pressing the number buttons or you can add the channe...

Страница 73: ...e with the device Make sure that the TV volume is turned up and not muted Try adjusting the TV sound See Adjusting sound settings on page 47 Make sure that the TV speakers are turned on and not muted See Adjusting sound settings on page 47 Make sure that the INlink feature is turned on See Turning INlink on or off on page 39 If you have connected an HDMI CEC audio receiver adjust the volume on the...

Страница 74: ...link on or off on page 39 Make sure that Device Auto Power Off is set to On on the INlink menu See Turning Device Auto Power Off on or off on page 39 The device may not support this feature See the documentation that came with the device for more information Problem Solution My TV does not turn on when I turn on my device Make sure that the INlink feature is turned on See Turning INlink on or off ...

Страница 75: ...nalog NTSC Digital ATSC 8 VSB Clear QAM HDMI 2 side EDID compliant HDCP compliant Component video 1 back Composite video 1 back Shared with componentY Shared audio component and composite Yes USB 1 side Supports JPEG and firmware upgrade Antenna Cable 1 back Video No Analog audio Headphone 1 side Digital audio 1 coaxial side WiFi No Ethernet No DTS Tuning Package DTS Sound Speakers Number 2 Watts ...

Страница 76: ...evice may not cause interference and 2 this device must accept any interference including interference that may cause undesired operation of the device This equipment complies with IC radiation exposure limits set forth for an uncontrolled environment Dolby License Notice and Trademark Acknowledgement Manufactured under license from Dolby Laboratories Dolby and the double D symbol are trademarks o...

Страница 77: ...se was made What does the warranty not cover This warranty does not cover Customer instruction education Installation Set up adjustments Cosmetic damage Damage due to acts of God such as power surges Accident s Misuse unintentional or intentional Abuse unintentional or intentional Negligence Commercial purposes use including but not limited to use in a place of business or in communal areas of a m...

Страница 78: ...dits affiliated companies Registered in some countries Distributed by Best Buy Purchasing LLC 7601 Penn Ave South Richfield MN 55423 U S A 2015 Best Buy All rights reserved Made inChina V1 ENGLISH 14 1311 NS 28D220NA16_14 1311_MAN_V1_ENG book Page 1 Friday April 24 2015 9 15 AM ...

Отзывы: