background image

28

Time Search 

To start playing at any chosen time on the disc:

1. Press DISPLAY twice during playback. The time

search box shows the elapsed playing time.

2. Press 

v

/

V

to select the time clock icon and

[-:--:--] appears.

3. Input the required start time in hours, minutes,

and seconds from left to right. If you enter the
wrong numbers, press 

b

/

B

to move the under

bar (_) to the wrong number. Then enter the cor-
rect numbers.

4. Press ENTER to confirm. Playback starts from the

selected time.

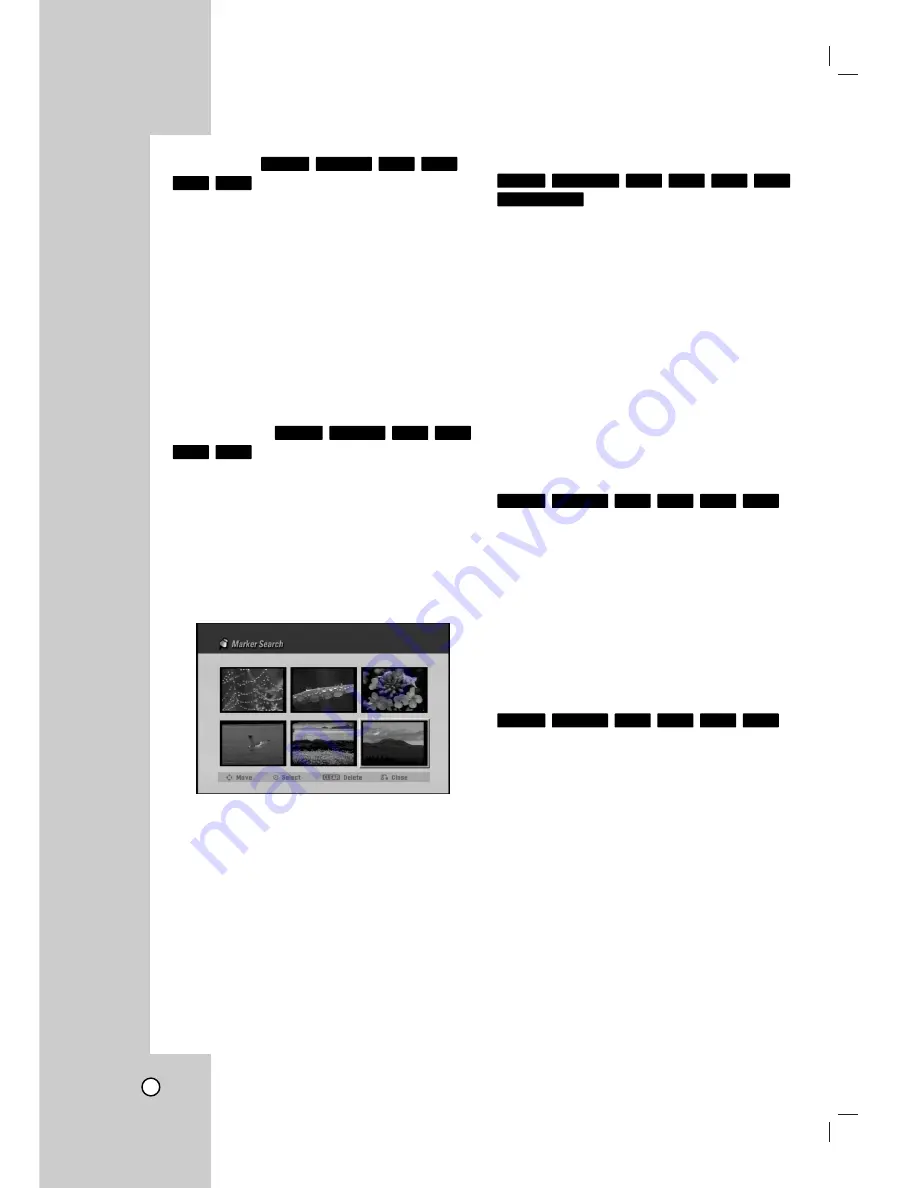
Marker Search 

To enter a Marker 

You can start playback from up to six memorized
points. To enter a marker, press MARKER at the
desired point on the disc. The Marker icon appears
on the TV screen briefly. Repeat to enter up to six
markers.

To Recall or Clear a Marked Scene 

1. During disc playback, press SEARCH.

The marker search menu appears on the screen.

2. Use

b

/

B/v/V

to select a marker scene that you

want to recall or clear.

3. Press ENTER and playback starts from the

marked scene. Or, Press CLEAR and use 

b

B

to select [OK] then press ENTER to delete
marked scene from the list.

4. To remove the Marker Search menu,

press RETURN 

(

O

)

.

Play mode select 

Press PLAY MODE to select a desired play mode
while playback.

[CHAPTER] repeats the current chapter.

[TITLE] repeats the current title.

[ALL] repeats the all titles/tracks. (VR mode 
DVD-RW only).

[OFF] does not play repeatedly.

[RANDOM] random playback. (Karaoke DVD only)

[NORMAL] normal playback. (Karaoke DVD only)

Tip:

By pressing SKIP (

>

) during Random playback, the

Recorder selects another title and resumes Random
playback.

Still Picture and Frame-by-Frame Playback 

1. Press PAUSE/STEP (

X

) during playback.

Advance the picture frame-by-frame by pressing
PAUSE/STEP (

X

) repeatedly.

2. To exit still motion mode, press PLAY (

N

).

Tip:

You can advance or back up the picture frame-by-
frame by pressing 

b

B

repeatedly during PAUSE

mode. 

Zoom 

Use zoom to enlarge the video image.

1. Press ZOOM during playback or still playback to

activate the Zoom function. 

2. Each press of the ZOOM button changes the TV

screen in the sequence: X1 (normal size) 

X2

size 

X4 size 

X1 (normal size)

3. Use the 

b B v V

buttons to move through the

zoomed picture.

4. To resume normal playback, press ZOOM repeat-

edly or CLEAR button.

N o t e :

The Zoom function may not work on some DVDs.

DVD

+R

-R

+RW

-RW

Video

-RW

VR

DVD

+R

-R

+RW

-RW

Video

-RW

VR

karaoke DVD

DVD

+R

-R

+RW

-RWvideo

-RW

VR

DVD

+R

-R

+RW

-RW

Video

-RW

VR

DVD

+R

-R

+RW

-RW

Video

-RW

VR

Содержание IS-DVD100121

Страница 1: ...RC7310ML NA1ULI_ENG_11Y Installation and Operating Guide Warranty Model Number IS DVD100121 VCR DVD Recorder Call us and we will guide you through your first recording for free 1 877 467 4289 ...

Страница 2: ...if not installed and used in accordance with the instruction manual may cause harmful interference to radio communications However there is no guarantee that interference will not occur in a particular installation If this product does cause harmful interference to radio or televi sion reception which can be determined by turning the product off and on the user is encouraged to try to correct the ...

Страница 3: ...type plug has two blades and a third grounding prong The wide blade or the third prong are provided for your safety If the provided plug does not fit into your outlet consult an electrician for replacement of the obsolete outlet 10 Protect the power cord from being walked on or pinched particularly at plugs convenience recepta cles and the point where they exit from the product 11 Only use attachm...

Страница 4: ...ord 22 Area Code 22 Recording Settings 23 Disc Record Mode 23 VCR Record Mode 23 Auto Chapter 23 Disc Settings 23 24 Initialize 23 Finalize 24 Disc Label 24 Disc Protect 24 Auto Play 24 General Explanation of On Screen Display 25 Displaying Information While Watching TV 25 Displaying Disc Information On screen 25 PLAYBACK VCR Tape Playback 26 27 Basic Instructions 26 Auto Tracking 26 Manual Tracki...

Страница 5: ...t Menu Overview 40 VR Mode Original and Playlist Editing 41 Titles Chapters and Parts 41 Is editing a DVD like editing a video tape 41 About word Original and Playlist 41 Adding Chapter Markers 41 Changing Title Thumbnails 41 Making a New Playlist 42 Adding Additional Title Chapters to the Playlist 42 Deleting an Original or Playlist Title Chapter 43 Deleting a Part 43 Naming a Title 44 Moving a P...

Страница 6: ...cs Do not touch the playback side of the disc Hold the disc by the edges so that fingerprints do not get on the surface Never stick paper or tape on the disc Storing Discs After playing store the disc in its case Do not expose the disc to direct sunlight or sources of heat and never leave it in a parked car exposed to direct sunlight Cleaning Discs Fingerprints and dust on the disc can cause poor ...

Страница 7: ...be recorded on repeatedly Recordings can be erased then you can record again on the same Disc Playable on DVD RW compatible players automatically finalization The edited contents are playable on DVD RW compatible players only after finalization Recordings can be edited the title chapter DVD R DVD Recordable These Discs can be recorded only once After you finalize a DVD R you cannot record on it or...

Страница 8: ...sc using a personal computer even if it is recorded in a compatible format there are cases in which it may not play because of the settings of the application software used to create the disc Check with the software publisher for more detailed information Region code of the recorder and DVDs This recorder is designed and manufactured for playback of Region 1 encoded DVD soft ware The region code o...

Страница 9: ...d you are advised to check carefully what is lawful copying in the area in which you are making a copy Copying of copyright material such as films or music is unlawful unless permit ted by a legal exception or consented to by the rights owner This product incorporates copyright protection technology that is protected by method claims of certain U S patents and other intellectual property rights ow...

Страница 10: ... title is assigned a reference number enabling you to locate it easily Chapter DVD video discs only A chapter is a segment of a title such as a scene in a film or one interview in a series Each chapter is assigned a chapter number enabling you to locate the chapter you want Depending on the disc chap ters may not be recorded Track A distinct element of audiovisual information such as the picture o...

Страница 11: ...f the Recorder k Remote Sensor Point the Recorder Remote Control here l VCR indicator Indicates the active VCR deck m DVD VCR Toggles control between the DVD deck and the VCR deck n z REC Starts recording Press repeatedly to set the recording time o X X C C PAUSE STEP Pause playback or recording temporarily Press repeatedly for frame by frame playback p x STOP Stops playback q m m DVD Skip to begi...

Страница 12: ...tes that TV mode is active Indicates current chapter or track number Indicates that a DVD to VCR or VCR to DVD dubbing is in progress Indicates when the Recorder is Locked Indicates when the Recorder is playing a tape in Hi Fi Indicates a stereo broadcast is being received Indicates when a SAP BILINGUAL broadcast is being received Indicates clock total playing time elapsed time remaining time titl...

Страница 13: ...arts playback PLAY MODE Selects play mode z REC Starts recording Press repeatedly to set the recording time REC MODE Selects the recording mode DVD SP LP EP or XP VCR SP or SLP RETURN O Removes the menu Displays the menu of a video CD with PBC STOP x Stops playback or recording SEARCH Displays Marker Search menu SETUP Accesses or removes the Setup menu SKIP Go to next chapter or track Returns to b...

Страница 14: ...xial audio equipment a b c d e f g h i j k Rear Panel Caution Do not touch the inner pins of the jacks on the rear panel Electrostatic discharge may cause permanent damage to the unit Hookup and Settings Depending on your TV and other equipment there are various ways you can connect the recorder Please refer to the manuals of your TV VCR Stereo System or other devices as necessary for additional c...

Страница 15: ...er is required connect a coaxial cable from the wall jack to the IN connector on the converter and a coaxial cable from the OUT connector on the convert er to the ANT IN on your Recorder This cable hookup permits both TV and Recorder operation To view or record a CATV channel 1 Tune the TV to the Recorder output channel CH 3 or 4 2 Set the Recorder channel selector to the cable output channel Exam...

Страница 16: ...est video resolu tion possible Connect the COMPONENT PROGRESSIVE SCAN VIDEO OUT jacks on the Recorder to the correspon ding in jacks on the TV using an optional Y Pb Pr cable C Notes Set Progressive Scan option to ON in the setup menu see page 20 Progressive Scan does not work with the RF Audio Video or S Video connections If your TV does not accept the Progressive Scan format the picture will app...

Страница 17: ...audio stream is selected Notes If the audio format of the digital output does not match the capabilities of your receiver the receiver will produce a strong distorted sound or no sound at all Six Channel Digital Surround Sound via digital connec tion can only be obtained if your receiver is equipped with a Digital Multi channel decoder To see the audio format of the current DVD in the on screen di...

Страница 18: ... press B 2 Use v V to select the tuning band TV or CATV option then press ENTER TV If you are using a standard antenna to receive channels CATV If you are using basic cable to receive channels Auto Channel Set Connect the Recorder to the desired type of antenna or cable TV system as shown on page 15 This Recorder is equipped with a frequency synthe sized tuner capable of receiving up to 181 channe...

Страница 19: ...on to determine the proper setting 2 Use B to choose the Daylight Savings option Use v V to choose Auto On or Off When it is set to Auto the Recorder will use XDS information to determine the proper setting 3 Press ENTER to confirm your setting Note The Auto Clock Feature enables the Recorder to set up the clock when the Recorder is turned off Manual If your local TV station does not send date and...

Страница 20: ...d to the standard setting and a picture will once again be visible on a conventional analog TV or monitor Power Save Mode Set Power Save Mode to ON to place your Recorder into an economic power save mode Factory Set You can reset the Recorder to its original factory settings Some options cannot be reset Rating Password and Area Code 1 Select the Factory Set option 2 Press B to select SET then pres...

Страница 21: ...s made this unit automatically converts any 96 kHz signals to 48 kHz so your system can decode them If your receiver or amplifier is capable of handling 96 kHz signals select 96 kHz When this choice is made this unit passes each type of signal through without any further processing Check the documentation for your amplifier to verify its capabilities DRC Dynamic Range Control With the DVD format y...

Страница 22: ...g selection then press SETUP to exit the menu 5 Press OPEN CLOSE Z to activate parental control Note If you set a rating for the recorder all disc scenes with the same rating or lower are played Higher rated scenes are not played unless an alternate scene is available on the disc The alternative must have the same rating or a lower one If no suitable alternative is found playback stops You must en...

Страница 23: ...lect None Disc Settings Initialize If you load a completely blank disc the recorder will initialize the disc DVD R The recorder initialize the disc to Video mode The recording mode will always be Video mode DVD RW The Initialize menu will appear Select VR Mode or Video Mode then press ENTER DVD R DVD RW The Initialize menu will appears Select OK then press ENTER Also you can reformat the DVD RW DV...

Страница 24: ...and DVD R disc If Disc Protect option is set to ON the finalize is not available To finalize set Disc Protect option to OFF Disc Label Use the Disc Label feature to enter a name for the disc This name appears when you load the disc and when you display disc information on screen The Disc label can be up to 32 characters long For discs formatted on a different Recorder you will see only a limited c...

Страница 25: ... is selected the audio channel can be switched only to Stereo Displaying Disc Information on screen You can display various information about the disc or tape loaded on screen Some items can be changed using the menu 1 Press DISPLAY once to show current status Example DVD RW in VR mode 2 Press DISPLAY once again to show various play back information The items displayed differ depending on the disc...

Страница 26: ... you visually search for a tape sec tion in either direction forward and reverse During the high speed picture search modes the audio is muted and horizontal lines noise bars appear Also a short time is needed to stabilize the tape speed when re entering the PLAY mode so slight interfer ence may be observed during this time To search 1 Press BACKWARD m or FORWARD M during playback 2 To return to p...

Страница 27: ...ress OPEN CLOSE Z to remove the disc Press OPEN CLOSE Z to close disc tray or press POWER 1 the disc tray closes automati cally and unit turns off Notes If parental control is set and the disc is not within the rating settings you must input the password See Rating on page 22 DVDs may have a region code Your Recorder will not play discs that have a region code different from your Recorder The regi...

Страница 28: ...enu press RETURN O Play mode select Press PLAY MODE to select a desired play mode while playback CHAPTER repeats the current chapter TITLE repeats the current title ALL repeats the all titles tracks VR mode DVD RW only OFF does not play repeatedly RANDOM random playback Karaoke DVD only NORMAL normal playback Karaoke DVD only Tip By pressing SKIP during Random playback the Recorder selects another...

Страница 29: ... is no analog audio output when DTS is selected To listen to the DTS soundtrack connect this recorder to a DTS decoder via one of the digital outputs See page 16 for connection details Changing the Audio Channel Press AUDIO then press b B repeatedly during playback to hear a different audio channel With DVD RW discs recorded in VR mode that have both a main and a Bilingual audio channel you can sw...

Страница 30: ...isplay the folders on the disc Use v V b B to select the Folder icon on the Music menu then press ENTER twice On CDs or DVDs with mixed content Audio tracks MP3 WMA files JPEG files you can select between the Music menu and Photo menu by pressing TITLE repeatedly If you are in a file list and want to return to the Folder list use the v V to highlight and press ENTER to return to the previous menu ...

Страница 31: ...frequency within 8 48 kHz MP3 within 32 48 kHz WMA Bit rate within 8 320 kbps MP3 32 192 kbps WMA This unit cannot read an MP3 WMA file that has a file extension other than mp3 wma CD R physical format should be ISO 9660 and JOLIET DVD R RW physical format should be ISO 9660 UDF Bridge format If you record MP3 WMA files using software that cannot create a file system eg Direct CD it is impossible ...

Страница 32: ...l track file folders If you select folder for Programmed Playback all tracks in the folder are added to the program list You can access or remove the Program List screen bypressing DISC MENU LIST Program List menu options 1 Press v V to select a track file on the Program List then press ENTER The menu options appear 2 Use v V to select an option then press ENTER to confirm your selection Play Play...

Страница 33: ...t to return to the Folder list use the v V to highlight and press ENTER to return to the previous menu screen On CDs or DVDs with mixed content Audio tracks MP3 WMA files or JPEG files you can select between the Music menu and Photo menu by pressing TITLE repeatedly Photo menu options 1 Use v V b B to select a file then press ENTER The menu options appear 2 Use v V to select an option then press E...

Страница 34: ...m ited as follows Depending upon the size and number of JPEG files it could take a long time for the recorder to read the files If you don t see an on screen dis play after several minutes some of the files may be too large reduce the resolution of the JPEG files to less than 4M pixels The total number of files and folders on the disc are free but the total number of files and folders on the folde...

Страница 35: ...e quality and how much space the recording will take up on the disc Notes for recording Notes for recording The recording times shown are not exact because the recorder uses variable bit rate video compression This means that the exact record ing time will depend on the material being record ed When recording a TV broadcast if the reception is poor or the picture contains interference the recordin...

Страница 36: ...REC repeatedly to select the recording time length Recording starts after the first press DVD Each subsequent press increases the recording time by 10 minutes VCR Each subsequent press increases the recording time by 30 minutes maximum 540 minutes Please confirm the VHS tape has enough remaining time to be recorded before recording Instant Timer Record Menu Checking the Recording Time Press z REC ...

Страница 37: ...r left right v V up down Change the setting at the current cursor position Press RETURN O to exit the Timer Record menu Press TIMER REC to display Timer Record List 3 Press ENTER to save the program The Timer Record List will appear 4 Press RETURN O to exit the Timer Record List Notes The Timer indicator lights on the front panel display If the Disc and Tape indicator are blinking either no disc o...

Страница 38: ...not change VCR mode during the DVD recording mode Dubbing from DVD to VCR Dubbing from DVD to VCR You can copy the contents of a DVD to a VHS tape using the DUBBING or DUB button 1 Insert a blank VHS videotape into the VCR deck 2 Insert the disc you wish to copy in the DVD deck and close the disc tray 3 Find the place on the DVD or Disc from which you want to start dubbing using the PLAY FF REW an...

Страница 39: ... VCR decks go into Pause mode and the DUB indicator blinks on the front panel display While in Pause mode you can adjust the VCR play back position using PLAY REW FF PAUSE STEP etc The DVD deck will remain in Pause mode To resume Dubbing press the DUBBING button twice Recording from External Recording from External Components Components You can record from an external component such as a camcorder...

Страница 40: ...R The menu options on the left side of the menu Use v V to select a option then press ENTER to confirm your selection 2 To exit the Title List menu press RETURN O repeatedly 1 Menu options To display menu option select a title or chapter then press ENTER The options displayed differ depending on the disc type Play Start playback of the selected title or chapter The hidden titles and chapters on th...

Страница 41: ...ut word Original and Playlist Throughout this manual you will often see the words Original and Playlist to refer to the actual content and the edited version Original content refers to what s actually recorded on the disc Playlist content refers to the edited version of the disc how the Original content is to be played Adding Chapter Markers Adding Chapter Markers You can create chapters within a ...

Страница 42: ...s ENTER 3 Select New Playlist then press ENTER The new title appears in the updated Playlist All chapters of the title are added to the Playlist Adding Adding Additional T Additional Title itle Chapters to the Playlist Chapters to the Playlist You can add an Original title or chapter to add to a Playlist title even if it is already registered 1 Choose a title or chapter on the Title List Original ...

Страница 43: ...ed Title If more than two titles are repeatedly deleted the titles are combined into one When you are deleting a title or chapter only the last one on DVD R RW increases remaining recording time Deleting a Part Deleting a Part You can delete a part which you do not want in the title 1 Use b B v V to choose a title you want to delete on the Title List menu then press ENTER The options appears on th...

Страница 44: ...letes the character to the left of the cursor position 0 9 Enters the character corresponding to the selected column DISC MENU LIST DISPLAY Switches the keyboard type 4 Choose OK then press ENTER to fix the name and return to the previous menu screen 5 Press RETURN O repeatedly to exit the menu Notes Names can be up to 32 characters long For discs formatted on a different recorder you will see onl...

Страница 45: ...select dividing point less than 3 seconds Combining T Combining Two Chapters wo Chapters Into One Into One Use this function to combine two adjacent chapters into one 1 On the Chapter List menu select the second chapter of the two chapters you want to combine then press ENTER The menu options appears on the left side of the screen 2 Use v V to select Combine option The combine indicator appears be...

Страница 46: ...e menu After doing that you are able to see the chapter or title Protect a T Protect a Title itle Use this function to protect against accidental record ing editing or deleting of the title 1 Press DISC MENU LIST to display the Title List menu 2 Use v V b B to choose a title you want to protect then press ENTER Options appear on the left side of the screen 3 Select Protect from the options Example...

Страница 47: ... discs 1 Insert DVD R or DVD RW disc recorded already 2 Press TITLE in Play mode or DVD tuner mode Title List menu will appear as shown below 3 To play back a title select the title you want then press ENTER or PLAY N Tip You can remove the Title List menu by pressing STOP x Playing Playing Y Your Recordings our Recordings on Other DVD Players on Other DVD Players Finalizing a Disc Finalizing a Di...

Страница 48: ...ssian 6669 Cambodian 7577 Catalan 6765 Chinese 9072 Corsican 6779 Croatian 7282 Czech 6783 Danish 6865 Dutch 7876 English 6978 Esperanto 6979 Estonian 6984 Faroese 7079 Language Code Fiji 7074 Finnish 7073 French 7082 Frisian 7089 Galician 7176 Georgian 7565 German 6869 Greek 6976 Greenlandic 7576 Guarani 7178 Gujarati 7185 Hausa 7265 Hebrew 7387 Hindi 7273 Hungarian 7285 Icelandic 7383 Indonesian...

Страница 49: ... from the external com ponent is copy protected The skipped channels were deleted with the CH Add Del feature Correction Plug the power cord into the wall out let securely Select the appropriate video input mode on the TV so the picture from the Recorder appears on the TV screen Connect the video cable into the jacks securely Set Progressive Scan to OFF see page 20 Check the connection Select the ...

Страница 50: ... ex PLAY Camcorder is off The recorder s source is incorrect Clock in Record is not set to correct time Timer has been programmed incorrectly TIMER indicator light does not appear after programming timer aCorrection Insert a disc or tape Check that the disc or tape indicator in the display window is lit Insert a playable disc Check the disc type and Regional code Place the disc with the playback s...

Страница 51: ... Out is not selected for viewing at the TV Recorder s TV audio channel is set to SAP or MONO Correction Tighten connections or replace cable Try Tuning Band Select options see page 18 for details Finalize the disc see page 24 No solution The other player must be RW compatible in order to play it No solution Use another disc You cannot record the source Select the channel on the Recorder s built in...

Страница 52: ...OURS T 120 SLP 6 HOURS T 120 8 HOURS T 160 Video recording format Sampling frequency 27MHz Compression format MPEG 2 Audio recording format Sampling frequency 48kHz 96kHz Compression format Dolby Digital VCR Specifications Head system Four head helical scan azimuth system Timer 12 hour display type with AM PM Tape speed SP 33 35 mm sec LP 16 67 mm sec SLP 11 12 mm sec Tape width 12 7 mm Rewind tim...

Страница 53: ... sync Mini DIN 4 pin x 1 C 0 286 V p p 75 Ω Outputs VIDEO OUT 1 Vp p 75 Ω sync negative RCA jack x 1 S VIDEO OUT Y 1 0 V p p 75 Ω negative sync Mini DIN 4 pin x 1 C 0 286 V p p 75 Ω COMPONENT VIDEO OUT Y 1 0 V p p 75 Ω negative sync RCA jack x 1 PROGRESSIVE SCAN Pb Pr 0 7 V p p 75 Ω RCA jack x 2 Audio output digital audio 0 5 V p p 75 Ω RCA jack x 1 Audio output optical audio Optical connector x 1...

Страница 54: ... ranty does not cover damage due to improper operation or maintenance connection to improper voltage supply or attempted repair by anyone other than a facility authorized by Insignia to service the Product This warranty does not cover Products sold AS IS or WITH ALL FAULTS or consumables such as fuses or batteries This warranty is valid only in the United States and Canada This warranty is invalid...

Отзывы: