background image

25

Operation 

Copying from DVD to VCR

You can copy the contents of a DVD to a VHS tape.

1. Insert the disc you wish to copy into the DVD

deck and close the disc tray.

2. Insert a blank VHS video tape into the VCR deck.

3. Find the place on the DVD from which you want

to start dubbing using the PLAY, FF, REW and
PAUSE functions. 
For best results, pause playback at the point from
which you want to record.

4. Press the 

REC/ITR. The DVD goes into PLAY

mode and the VCR goes into RECORD mode. If
the DVD disc menu appears, you may need to
press PLAY (

H

) manually to begin copying.

5.  When the DVD is finished playing, press STOP (

x

)

to end copying.

Notes: 

If the DVD you are attempting to copy is copy protected,
you will not be able to copy the disc. It is not permitted
to copy Macrovision encoded DVDs (or Discs). “Lock” is
displayed in the display window. 

You must stop the copy process manually when the
DVD movie ends, or the unit may replay and record over
and over again.

When you stop the DVD playback during copying, the
recording on VCR is stopped automatically.

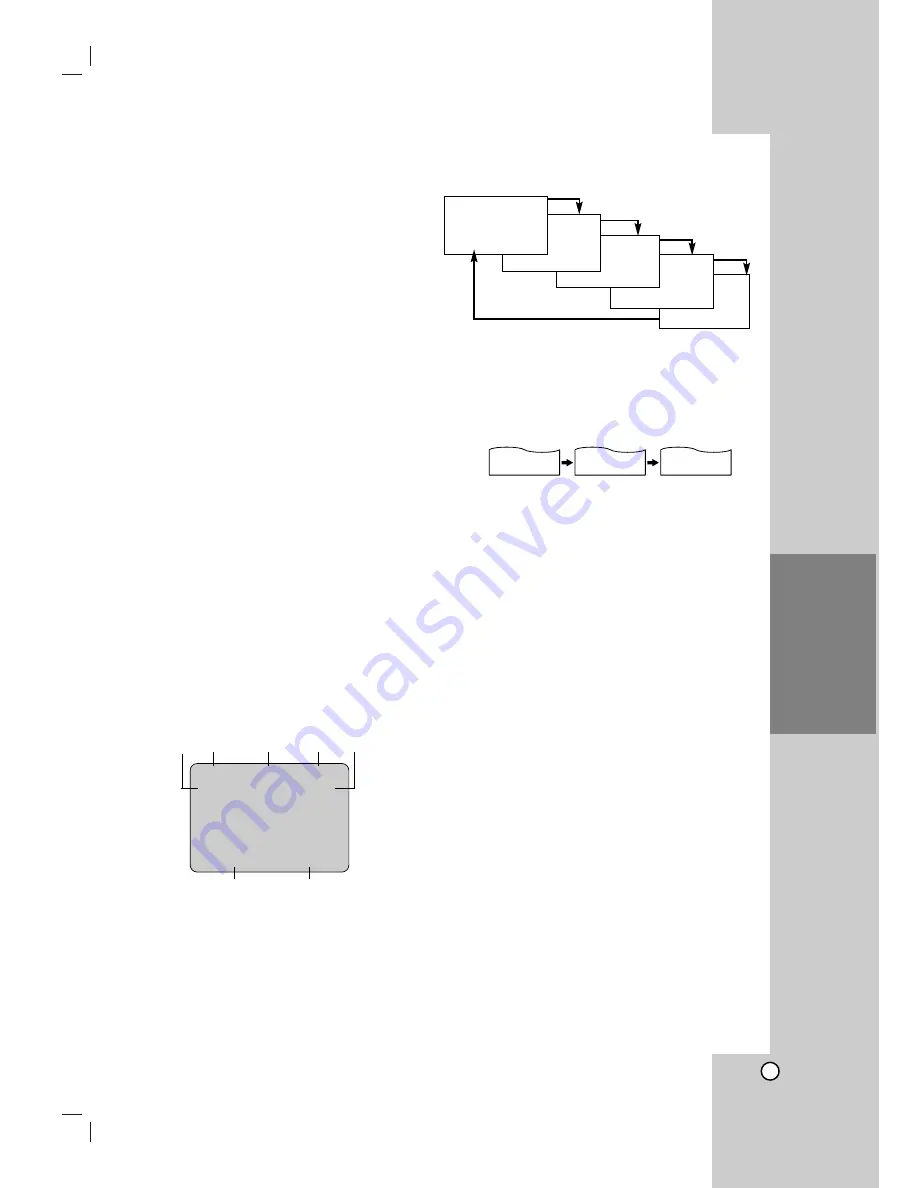
On-Screen Display - VCR

On-Screen Display - VCR

Some of these functions will be displayed every time
the DVD+VCR is operated.

Each press of the ENTER/OK changes the TV screen
in the following sequence.

Real-Time Counter

If a tape with contents recorded on it is inserted into
the VCR, the real-time counter shows length of the
tape running in hours, minutes, and seconds. Press
CLK/CNT to select the real-time counter display.
Every press of CLK/CNT changes the TV screen as
illustrated below.

Counter Memory 

This feature is useful if there is a section of tape you
want to view immediately after recording or if you
want to return to the same point several times.

1.

Begin recording or playing a tape.

2.

Press CLK/CNT until the real-time counter is dis-
played on the TV screen.

3.

At the point that you want to locate later, reset the
real-time counter to “0:00:00” by pressing CLEAR.

4.

Continue to play or record.

5.

Press STOP

(

x

when recording or playback fin-

ishes.

6.

Press BACKWARD

(

m

)

. The tape automatically

stops when the tape counter returns to about
“0:00:00”.

Tape Remaining

This function displays the amount of time remaining
on the tape during recording or playback. Press
CLK/CNT repeatedly until the REM indicator displays
on the TV screen during recording or playback.
The remaining tape length may not be displayed cor-
rectly depending on the condition of the tape and the
kind of the tape (T-140, T-160, or T-210 etc.).

Notes:

The function displays can be seen displayed on the TV
screen for 5 seconds.  

The clock (or tape counter, tape remaining) mode will be
displayed until you press ENTER/OK.

The tape counter and the remaining tape length indica-
tor appear only when a cassette is inserted. Also, the
remaining tape length indicator appears after any tape
operation.

PLAY

HI-FI 

CH  4

SP

STEREO

OCT  8 ,  SAT

2:15 PM

2:15 AM

0:05:25

REM 1:07

CLOCK

COUNTER

REMAINING TIME

TAPE SPEED DISPLAY

FUNCTION DISPLAY

HI-FI DISPLAY

CHANNEL DISPLAY

STEREO/SAP DISPLAY

(MONO is not displayed)

DATE DISPLAY

CLOCK/ COUNT/
REMAIN DISPLAY

REM 1:58

0:35:40

2:15 PM

STOP

CH  4

SP

STEREO

APR  30 , SAT

2:15 PM

Содержание IS-DVD040924

Страница 1: ...V9510MZ NA1ULI_RV0016Q_ENG Installation and Operating Guide Warranty Model Number IS DVD040924 DVD Player Video Cassette Recorder ...

Страница 2: ... with the instruction manual may cause harmful interference to radio communications However there is no guarantee that interference will not occur in a particular installation If this product does cause harmful interference to radio or televi sion reception which can be determined by turning the product off and on the user is encouraged to try to correct the interference by one or more of the foll...

Страница 3: ...plug has two blades and a third grounding prong The wide blade or the third prong are provided for your safety If the provided plug does not fit into your outlet consult an electrician for replacement of the obsolete outlet 10 Protect the power cord from being walked on or pinched particularly at plugs convenience recepta cles and the point where they exit from the product 11 Only use attachments ...

Страница 4: ... Hi Fi Stereo MTS Broadcast 21 Hi Fi Stereo Audio Sound 21 MTS Multi Channel TV Sound 21 VCR Tape Recording 22 25 Basic Instructions 22 Timer Recording 22 23 Instant Timer Recording 24 Recording from External Components 24 Copying from DVD to VCR 25 On Screen Display VCR 25 Additional VCR Information 26 VCR Auto Play System 26 S VHS Quasi Playback SQPB 26 Easy Information 26 Playing a DVD 27 29 Pl...

Страница 5: ...wing sym bols is applicable only to the disc represented by the symbol DVD Audio CDs MP3 Discs WMA Discs JPEG Discs About the Symbol Display may appear on your TV display during opera tion and indicates that the function is not permitted by this unit or the disc Notes on Discs Handling Discs Do not touch the playback side of the disc Hold the disc by the edges so that fingerprints do not get on th...

Страница 6: ...opular compression format used for digital audio files that yields very high near CD quality WMA Windows media audio file A type of coding decoding developed by Microsoft Corp JPEG Joint Pictures Expert Group JPEG is a compressed file format that allows you to save images with no limit on the number of colors Title DVD only A title is generally a distinct section of a DVD disc For example the main...

Страница 7: ... DISPLAYED IN THE PICTURE IN CASE OF 525 PROGRESSIVE SCAN PICTURE PROBLEMS IT IS RECOMMENDED THAT THE USER SWITCH THE CONNECTION TO THE STANDARD DEFINITION OUTPUT IF THERE ARE QUESTIONS REGARDING OUR TV SET COM PATIBILITY WITH THIS MODEL 525p DVD VCR PLEASE CONTACT OUR CUSTOMER SERVICE CENTER About the Remote Control Operation Range Point the remote control at the remote sensor and press the butto...

Страница 8: ...current deck status Playback Pause etc g Remote Sensor Point the DVD VCR remote control here h Z Z EJECT Ejects the tape in the VCR deck i m m DVD Skip to beginning of current chapter or track press twice in quick successions to go to previous chapter or track Press and hold button for about two seconds to search backward VCR Rewinds the tape during the stop mode or for fast reverse picture search...

Страница 9: ...eatedly for frame by frame playback SKIP Go to next chapter or track Returns to beginning of current chapter or track or go to previous chapter or track STOP x x Stops playback or recording BACKWARD FORWARD m M DVD Search backward or forward VCR Rewinds Advances the tape during the STOP mode for fast backward forward picture search PLAY H H Starts playback PROGRAM Places a track on the program lis...

Страница 10: ...ation Depending on your TV and other equipment there are various ways you can connect the player Please refer to the manuals of your TV VCR stereo system or other devices as nec essary for additional connection information Notes The picture and sound of a nearby TV VCR or radio may be distorted during playback Position the units away from each other or turn off the unit after removing the disc Mak...

Страница 11: ...to the IN connector on the converter and a coaxial cable from the OUT connector on the convert er to the ANT IN on your DVD VCR This cable hookup permits both TV and DVD VCR operation To view or record a CATV channel 1 Tune the TV to the DVD VCR output channel CH 3 or 4 2 Set the DVD VCR channel selector to the cable output channel Example CH3 3 Select a channel using the cable converter Notes Wit...

Страница 12: ... high definition or digital ready television you may take advantage of the DVD VCR s progressive scan output for the highest video resolution possible 1 Connect the COMPONENT PROGRESSIVE SCAN VIDEO OUT jacks on the DVD VCR to the corresponding in jacks on the TV using an optional Y Pb Pr cable C 2 Connect the Left and Right AUDIO OUT jacks of the DVD VCR to the audio left right in jacks on the TV ...

Страница 13: ... and the logos on the front of the receiver Caution Due to the DTS Licensing agreement the digital output will be in DTS digital out when DTS audio stream is selected Notes If the audio format of the digital output does not match the capabilities of your receiver the receiver will produce a strong distorted sound or no sound at all Six Channel Digital Surround Sound via digital connec tion can onl...

Страница 14: ...ion broadcast in the signal channel Use b B to choose AUTO ON or OFF TIME ZONE You can set your local Time Zone manually If you choose AUTO the DVD VCR sets the clock using the first Coordinated Universal Time informa tion it finds in a broadcast signal Use b B to choose the correct time zone AUTO EASTERN CENTRAL MOUNTAIN PACIFIC ALASKA or HAWAII Notes The Auto Clock feature enables the DVD VCR to...

Страница 15: ...i Fi system and standard NORMAL mono system The same audio is generally recorded on both systems The VHS Hi Fi system plays on separate left and right channels and the NORMAL system plays monaural sound The normal track is always played so the cassette can be played on a DVD VCR that does not have VHS Hi Fi BROADCAST TYPE STEREO SAP MONO Multichannel Television Sound MTS carries stereo and or Seco...

Страница 16: ...reen shows the current setting for the selected item as well as alternate setting s 4 Use v V to select the second desired option then press B to move to the third level 5 Use v V to select the desired setting then press ENTER OK to confirm your selection Some items require additional steps 6 Press SETUP or PLAY H to exit the Setup menu LANGUAGE Menu Language Select a language for the VCR and DVD ...

Страница 17: ... Connect component progressive out of this unit to the input of your monitor television set your television or monitor to component progressive Input 1 Select Progressive Scan on the DISPLAY menu then press B 2 Select On using the v V buttons 3 Press ENTER OK to confirm your selection The confirm menu will appear 4 When the confirm menu appears on your screen Cancel is highlighted as default Use t...

Страница 18: ... without any further processing Check the documentation for your amplifier to verify its capabilities DRC Dynamic Range Control With the DVD format you can hear a program s soundtrack in the most accurate and realistic presen tation possible thanks to digital audio technology However you may wish to compress the dynamic range of the audio output the difference between the loudest sounds and the qu...

Страница 19: ... full Note If you set a rating for the player all disc scenes with the same rating or lower are played Higher rated scenes are not played unless an alternate scene is available on the disc The alternative must have the same rating or a lower one If no suitable alternative is found playback stops You must enter the 4 digit password or change the rating level in order to play the disc 4 Press ENTER ...

Страница 20: ... due to scratches on the tape Manual Tracking To manually adjust the tracking use the CH TRK v V buttons on the remote control or CH v V on the front panel during playback Notes Vertical jitter requires a very fine adjustment Tracking is automatically reset to normal when the tape is ejected or the power cord is unplugged for more than 3 seconds Search This function lets you visually search for a ...

Страница 21: ...red for true stereo play back To experience the full and rich stereo sound available with Hi Fi recorded tapes we recommend the connection of this unit to a home stereo audio system 1 Set the AUDIO MODE option to HI FI on the VCR SETUP menu 2 Set the AUDIO OUTPUT option to STEREO so that the left channel sound L is heard from the left speaker and the right channel sound R is heard from the right s...

Страница 22: ...During the VCR recording mode you cannot change to the DVD mode To pause the recording 1 Press PAUSE STEP X to pause the tape during recording The REC indicator flashes in the display window 2 When you want to continue recording press PAUSE STEP X or press REC ITR z After 5 minutes in PAUSE mode the DVD VCR stops automatically to protect the tape and the video heads To record one TV program while ...

Страница 23: ...u make a mistake or want to change a setting use v to select the option and correct it using b B If the program preset time is past the PAST TIME PROGRAMMED message appears on the TV screen Return to the incorrect program and program it with the correct time If you enter a past date the timer recording will be performed on that date of the next year If the power fails or the DVD VCR is unplugged t...

Страница 24: ... REC ITR z once to check the recording time The recalled setting automatically returns to the TV screen after 6 seconds Extending the Recording Time The recording time can be extended anytime by pressing REC ITR z Subsequent presses result in advancing the recording time by 30 minute increments Note If you press PAUSE STEP X during instant timer record ing the instant timer recording is cancelled ...

Страница 25: ...er display Every press of CLK CNT changes the TV screen as illustrated below Counter Memory This feature is useful if there is a section of tape you want to view immediately after recording or if you want to return to the same point several times 1 Begin recording or playing a tape 2 Press CLK CNT until the real time counter is dis played on the TV screen 3 At the point that you want to locate lat...

Страница 26: ...d after rewinding and the turns itself off automatically Note Auto power off does not function during regular DVD play mode DVD VCR power stays on S VHS Quasi Playback SQPB This DVD VCR can play back S VHS recorded tapes however it cannot make recordings using S VHS format tapes SQPB is an abbreviation for S VHS Quasi Playback Easy Information If the Extended Data Service XDS signals are pro vided...

Страница 27: ...menu screen Notes If parental control is set and the disc is not within the rating settings you must input the password See LOCK on page 19 DVDs may have a region code Your player will not play discs that have a region code different from your player The region code for this player is 1 one General Features Notes Unless stated otherwise all operations described use the remote control Some features...

Страница 28: ...u appears on the screen 2 Within 10 seconds press b B to select a marker number that you want to recall or clear 3 Press ENTER OK and playback starts from the marked scene Or Press CLEAR and the marker number is erased from the list 4 You can play any marker by inputting its number on the marker search menu Repeat You can repeat a title chapter on a disc Press REPEAT during playback to select a de...

Страница 29: ... OK Title Menu 1 Press TITLE If the current title has a menu the menu appears on the screen Otherwise the disc menu may appear 2 The menu offers features such as camera angles spoken language and subtitle options and chap ters for the title 3 Press TITLE to exit Disc Menu Press DISC MENU and the disc menu is displayed Press DISC MENU again to exit Camera Angle If the disc contains scenes recorded ...

Страница 30: ...m protection re pack the unit as it was originally packed at the factory Keeping the exterior surfaces clean Do not use volatile liquids such as insecticide spray near the unit Do not leave rubber or plastic products in contact with the unit for a long period of time since they leave marks on the surface Cleaning the unit To clean the player use a soft dry cloth If the sur faces are extremely dirt...

Страница 31: ...ws Sampling frequency within 8 48 kHz MP3 within 32 48kHz WMA Bit rate within 32 320kbps MP3 48 384kbps WMA The player cannot read an MP3 WMA file that has a file extension other than mp3 wma CD R physical format should be ISO 9660 If you record MP3 WMA files using software that cannot create a file system eg Direct CD it is impossible to playback MP3 WMA files We recommend that you use Easy CD Cr...

Страница 32: ...layback will be cancelled Search 1 Press BACKWARD m or FORWARD M during playback 2 Press BACKWARD m or FORWARD M repeatedly to select the required speed X2 X4 and X8 backward or forward 3 To exit SEARCH mode press PLAY H Random 1 Press RANDOM during playback Random Playback begins immediately and Random appears on the menu screen 2 To return to normal playback press RANDOM repeatedly until Random ...

Страница 33: ...Program list have played once 6 To resume normal playback from programmed playback select a track of AUDIO CD or MUSIC list and then press PLAY H Repeat Programmed Tracks 1 Press REPEAT when playing a disc The repeat icon appears 2 Press REPEAT to select a desired repeat mode Track repeats the current track All repeats all the tracks on programmed list Off No display does not play repeatedly Note ...

Страница 34: ...ill Picture 1 Press PAUSE STEP X during slide show The player will now go into PAUSE mode 2 To return to the slide show press PLAY H or press PAUSE STEP X a gain Moving to another File Press SKIP or or cursor b or B once while viewing a picture to advance to the next or previous file Zoom Use zoom to enlarge the photo image see page 28 To rotate picture Press v V during showing a picture to rotate...

Страница 35: ...elorussian 6669 Cambodian 7577 Catalan 6765 Chinese 9072 Corsican 6779 Croatian 7282 Czech 6783 Danish 6865 Dutch 7876 English 6978 Esperanto 6979 Estonian 6984 Faroese 7079 Language Code Fiji 7074 Finnish 7073 French 7082 Frisian 7089 Galician 7176 Georgian 7565 German 6869 Greek 6976 Greenlandic 7576 Guarani 7178 Gujarati 7185 Hausa 7265 Hebrew 7387 Hindi 7273 Hungarian 7285 Icelandic 7383 Indon...

Страница 36: ...gressive scan mode The Progressive Scan is set to On on the setup menu but is connected to a standard analog television with compo nent video input Correction Plug the power cord into the wall out let securely Refer to page 7 Insert a disc or tape Check that the disc or tape indicator in the display window is lit Select the appropriate video input mode on the TV so the picture from the DVD VCR pla...

Страница 37: ...ctions ex PLAY Camcorder is off DVD VCR SOURCE SELECT is not set to LINE1 or LINE2 Clock in DVD VCR is not set to correct time Timer has been programmed incorrectly indicator light does not appear after programming timer Correction Insert a playable disc Check the disc type and Regional code Place the disc with the playback side down Place the disc on the disc tray correctly inside the guide Clean...

Страница 38: ... Four head helical scan azimuth system Timer 12 hour display type with AM PM Tape speed SP 33 35 mm sec LP 16 67 mm sec SLP 11 12 mm sec Tape width 12 7 mm Maximum recording time SP 2 HOURS T 120 SLP 6 HOURS T 120 8 HOURS T 160 Rewind time About 3 minutes T 120 Channel coverage VHF 2 13 UHF 14 69 CATV 1 125 4A A W W 1 W 84 A 5 A 1 Frequency range 20 Hz to 20 kHz Signal to noise ratio More than 43 ...

Страница 39: ...39 Note Note ...

Страница 40: ... ranty does not cover damage due to improper operation or maintenance connection to improper voltage supply or attempted repair by anyone other than a facility authorized by Insignia to service the Product This warranty does not cover Products sold AS IS or WITH ALL FAULTS or consumables such as fuses or batteries This warranty is valid only in the United States and Canada This warranty is invalid...

Отзывы: