background image


www.insigniarange.com


Last Modified 08/10/2020


 26 

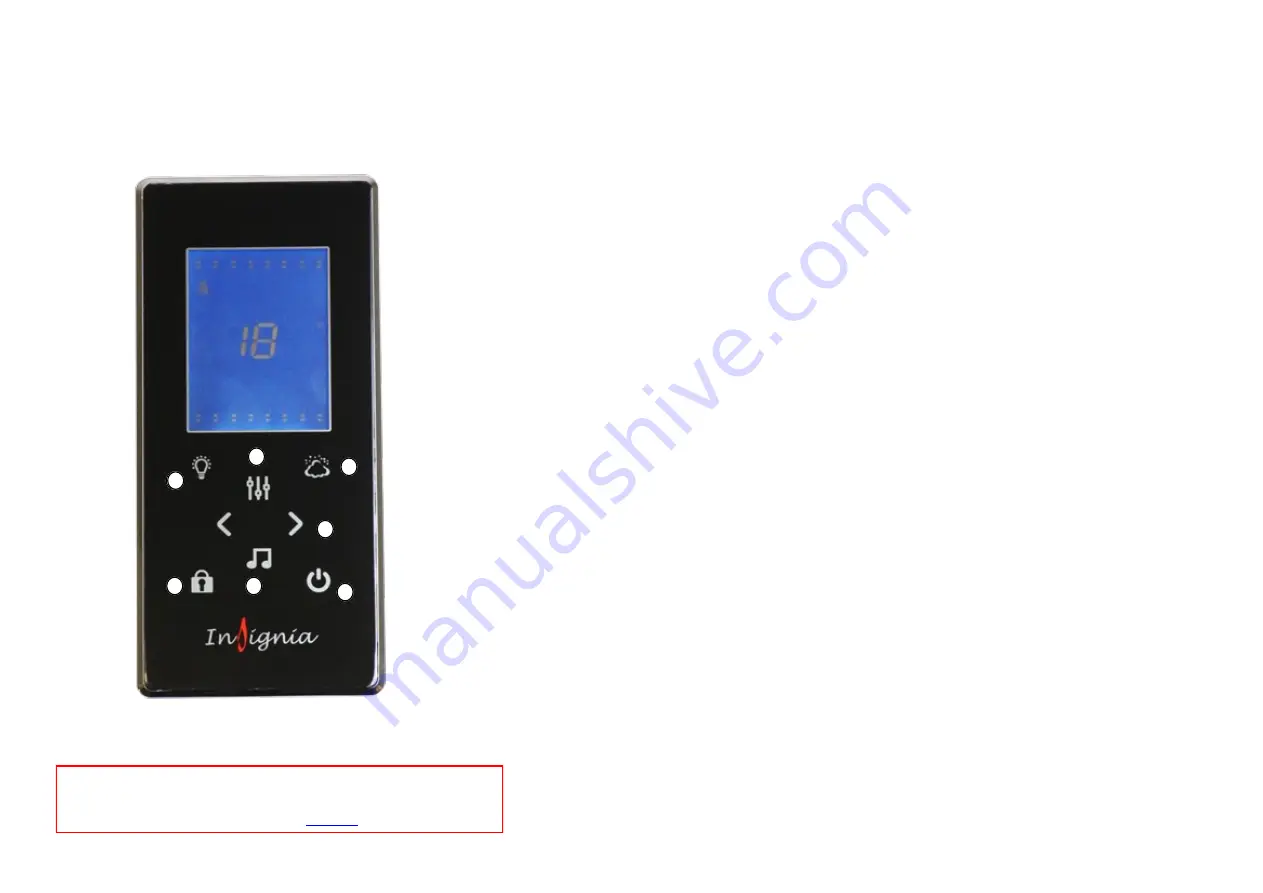
Control Panel Instructions


Button 1 (Lights) 


Once the control panel is switched on, the lights will come on automatically. Press the Light button once and the 

lights will start to scroll through the multiple colour options. Then to stop the lights on a specific colour simply press 

the light button again on the desired colour. To turn the lights off press the light button again.


Button 2 (Steam) 


To start the steam function, simply press the steam button (which looks like a cloud). To set the time and 

temperature of the steam session, simply press the mode button (button 3) and then use the arrows to scroll up 

and down (button 6)


Button 3 (Mode) 


This will do nothing on start

-

up, however it will be your go to button when using steam, radio and Bluetooth options


Button 4 (Padlock) 


This is your unlock button. After twenty seconds of inactivity the steam function will lock on the panel. This is done 

as a safety feature, so it can

t be accidentally activated. Other buttons will remain functional whilst in this state of 

lock mode


Button 5 (Music) 


Press once for FM Radio and press twice for Bluetooth. For tuning radio stations or connecting Bluetooth, please 
see the next page. For volume control, once on the radio or Bluetooth setting press Mode (button 3) then use the 

left and right arrows to change the volume. The volume is denoted by a number followed by the letters 

db


Button 6 (Left and Right Arrows) 


This will do nothing on start

-

up, however they are multi

-

functional depending on what setting you are using. When 

in the radio setting you can use them to change the station. When using the Bluetooth setting you can skip forward 

or back tracks in your playlist. You can also control the volume with these arrows as directed above.


Button 7 (Power) 


Press once to turn on the panel. Simply press again to turn it off. When powering down the 03 will automatically 

start and last for approximately 10 minutes. After this the screen will power off. 


1


 3


 2


5


7


4


5


To see our tutorial videos for operating Insignia control panel

s, please search 

for 

Insignia Showers

” 

on YouTube and find our 

Insignia Control Panel

” 

Playlist, or you can 

click here


Содержание 2825951

Страница 1: ...ments Parts inside of your warranty contact www insigniarange co uk support Spares Replacements Parts outside of your warranty visit www insigniaoutlet co uk www insigniarange co uk WARRANTY REG NO __...

Страница 2: ...ny years to come Like everything in order to obtain a first class product that will serve you well for many years the effort and correctness put into the assembly will reflect in the quality of your f...

Страница 3: ...cian This product comes with 13 amp plug s fitted with an RCD unit We leave it this way for you to connect this your own way due to continued additions to current regulations 1 Connect within current...

Страница 4: ...D ELECTRICAN COMPANY TO COMPLETE THE CONNECTION FROM SHOWER TO THE HOUSE SUPPLY LAWS DEMAND IN MANY CASES YOU DO THIS AND YOUR WARRANTY IS VOID IN REGARDS TO THE ELECTRICAL ITEMS IF THIS IS NOT UNDERT...

Страница 5: ...Plumbing Requirements Schematics Starting The Installation Steam Generator Connections Sealing and Water Testing Control Panel Instructions Spare Parts List Steam Room Shower Safety Guide Steam Room U...

Страница 6: ...Fixed glass 2 x Aluminium curved end posts Whilst the next steps show you how to assemble your shower we want to make sure you have a correct build to ensure you get a trouble free shower Therefore ou...

Страница 7: ...Requirements Bacteria Resistant Sanitary Silicone for vertical joints RubberGum Plumbers Mait for waste joints Not Supplied Supplied Not Supplied Hardware Requirements A Steam Shower requires 3 x 1 M...

Страница 8: ...as arrived been checked and is present No replacement missing parts can be obtained free of charge during or after the build Any claims can only be within the timescale permitted 48 hours after delive...

Страница 9: ...r plumber The end delivery however must fall within the scope above Important Note Do not exceed 3 4 BAR pressure under any circumstances Warranty is void if so as damage will occur If you have a comb...

Страница 10: ...www insigniarange com Last Modified 08 10 2020 10...

Страница 11: ...this out as this item is for the steam generator drainage and will be connected in the instructions later Now please level the tray by firstly placing the tray in its final location and then using a s...

Страница 12: ...l at the bottom take the rubber off and apply silicone inside the rubber and replace back onto the column Step 2 Place the mirrored back panel marked Right to the side glass ensuring that the side gla...

Страница 13: ...ow attach the front fixed panels using ST35 screws wider rail with the Insignia logo at the top Step 5 Then screw the inner uprights into the top and bottom rails using the ST25 screws To do this you...

Страница 14: ...www insigniarange com Last Modified 08 10 2020 14 Step 6 Insert the corner uprights onto the outer front fixed glass pan els as shown in the image Step 7 Now use the ST14 screws to secure into place...

Страница 15: ...ete front frame to the side panels once you are happy with the alignment run a bead of silicone up the edges on the inside of the corner post and Rubber gum along the bottom of the frame Then screw to...

Страница 16: ...and the bath tub and using the ST14 screws and SW9 washers fix the back walls to the roof by screwing upwards from the rear of the shower NOTE If a small gap exists silicone seal later Step 11 Screw d...

Страница 17: ...ur shelf brackets and secure by tightening the grub screw situated on the bottom of the bracket Accessory Installation Please Note Ensure all grey backing film on the rear of the glass panels are pier...

Страница 18: ...liding up and down Thermostatic Probe Insert the probe into the hole situated below the control panel roughly 6mm into the cabin and run clear silicone around the rear side of the probe Ozone o3 Unscr...

Страница 19: ...wheels towards the track ensuring a secure a tight fit Now grease the track to ensure a smooth and long lasting operation not supplied Handles Ensuring that the inner thread is protruding out from th...

Страница 20: ...Guard Version Place in middle hole first Turn Tri Jet to tighten Use Allen key to tighten left chrome outlet Use Allen key to tighten right chrome outlet Note Connect the 1 metre insulated hose to the...

Страница 21: ...e water exits from then turn off the water and swap over the relevant hose Alternatively remove the outer chrome knob by removing the chrome cap and loosening the grub screw please ensure not to unscr...

Страница 22: ...www insigniarange com Last Modified 08 10 2020 22 Electric Box Steam Generator Connections Thermostatic Probe Roof Light Antenna Speaker Speaker Power Supply...

Страница 23: ...ur shower Make sure these are fitted in the correct position as they are only attached for transportation reasons only Water Inlet Connect a braided hose from the shower valve s centre feed to this op...

Страница 24: ...as shown below Follow the lights around in the order shown as this allows a consistent path around the entire roof and will leave you placing the last light next to the first light This is important...

Страница 25: ...ther side finishing at the front If you have a small leak normally caused through insufficient sealer or air bubble on assembly dry the area thoroughly and reseal Please remember the location of the w...

Страница 26: ...activated Other buttons will remain functional whilst in this state of lock mode Button 5 Music Press once for FM Radio and press twice for Bluetooth For tuning radio stations or connecting Bluetooth...

Страница 27: ...tep 1 To tune your radio channels firstly press the music function button which looks like a musical note Tuning your radio channels Step 1 To connect a device via Bluetooth press the music function b...

Страница 28: ...contains many useful items such as is your parts warranty registered advice on cleaning servicing your shower cabin fault finding and many more items This is a MUST to read and not just HELP It saves...

Страница 29: ...Part Code Part Description SP300 Waste hose SP301 White insulated thermo pipe SP187 Drain Hose SP305 Magnetic door seals SP309 Rear door seals SP153 4 Port 3 Feed Thermostatic Valve SP126 4 Port Sele...

Страница 30: ...e use 8 If you have any underlying health conditions which you feel could be aggravated by using a steam room consult your GP before use 9 If you begin to have any issues with your health after using...

Страница 31: ...ee a small C to the right of the display The large number in the middle of the display can be changed by pressing the arrows 4 The maximum temperature you can reach is 60 C The average temperature in...

Страница 32: ...in water until it is fully hydrated Pour at least 5ml half a bottle of the AMI essential oil onto the pad The more oil you use the more intense the aroma 3 Fully insert the diffuser pad into the allot...

Страница 33: ...www insigniarange com Last Modified 08 10 2020 33 Bathroom Electrical Zones...

Страница 34: ...oom goes past zones 0 1 and 2 portable electrical appliances can be utilised if their cord length doesn t allow them to be used in zone 2 For example a hairdryer can be used in the outside zones provi...

Страница 35: ...mmon crossed out wheelie bin label We accept returns of all products carrying the Insignia brand All other products are either considered outside the scope of WEEE or Insignia is not technically the p...

Страница 36: ...www insigniarange com Last Modified 08 10 2020 36...

Отзывы: