background image

14

Advanced Operation

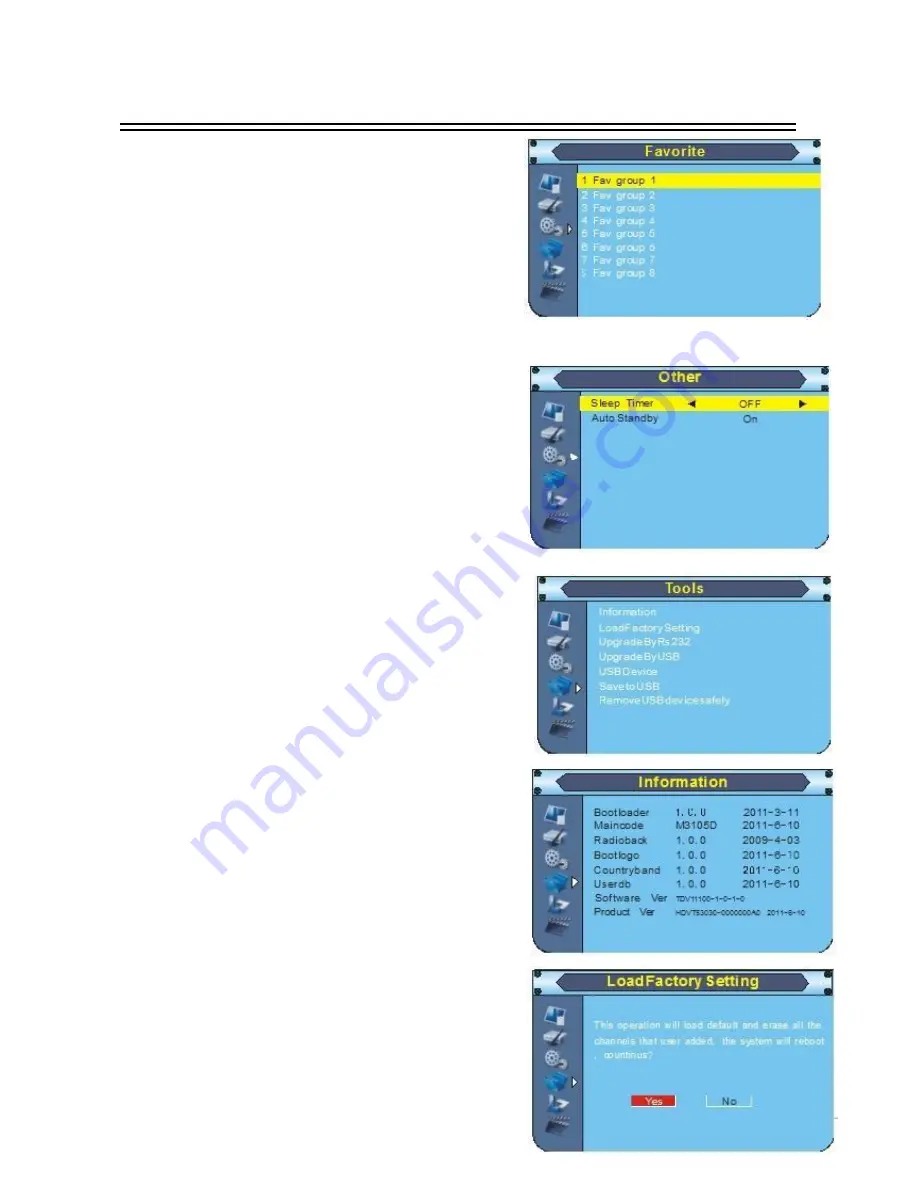
3.7 Favorite

Totally 8 groups for optional.
Choose “1 Fav group 1” and press [OK] button to

rename it. Use navigations button to input according to
screen.

3.8 Other

Move cursor to “Other” and press [OK] button to enter in

its setup interface.

Sleep Timer: OFF/10 Min/30 Min/60 Min/90 Min/120
Min.

Auto Standby: On/OFF

4. Tools

Move cursor to “Tools” and press [OK] button to enter in

its submenu. There are 5 options which are listed below.

Information

Load Factory Setting

Upgrade By USB

USB Device

Remove USB device safely

4.1 Information

Move cursor to “Information” and press [OK] button to

display information of the device.

4.2 Load Factory Default

Move cursor to “Load Factory Default” and press [OK]

button to load factory default. The default password is
“0000”.This step must be done at first time use or after
upgrade. Please operate according to screen.

Содержание X-2004

Страница 1: ...X 2004 DVB T SD MPEG 4 Receiver USER MANUAL Please read this user manual before using or connecting this product And keep it handy for future reference...

Страница 2: ...stallation 7 Service Life of Batteries 7 Operation Range of Remote Control 7 Basic connections 8 Preparation 8 Connecting TV Set 8 Fast Installation 9 Advanced Operation 10 18 Main Menu 10 Channel Lis...

Страница 3: ...ks This product has been manufactured to conform to the International Safety Standards Please peruse the following safety precautions before use it OVERLOADING Do not overload a wall outlet extension...

Страница 4: ...oduct to standby status or turn off the power when the product will not be used Unplug the power cord from the AC outlet when the product will be idle for a long period of time Do not insert fingers o...

Страница 5: ...y Indicator The LED indicator goes red in standby mode goes green in working mode 3 IR Receiver Window 4 USB Port Rear Panel 1 RF IN 2 Digital Coaxial Output 3 TV SCART 4 AC IN NOTE In order to avoid...

Страница 6: ...information bar of current service 9 AUDIO Shift sound track 10 TEXT Display text information of current channel 11 PREV Back to previous 12 NEXT Skip to next 13 SLOW 14 PAUSE PLAY Make a pause Start...

Страница 7: ...ot use the new and old batteries together Please remove the batteries if the remote control is not going to be used for a long period of time Otherwise it may cause electrolyte leakage and lead malfun...

Страница 8: ...set only one kind of video output format will be accepted Please choose a corresponding video output mode for the product otherwise the image will be distorted NOTE Users can choose any proper video o...

Страница 9: ...on to back to channel list after auto search has been done Press OK button to display channel list use CH button to select channel and press OK button to enjoy watching If the Welcome window does not...

Страница 10: ...Use CH button and press OK button to confirm Use programmable buttons which with color to set up according to screen Favor button works only when the favorite channels have been set Default Password i...

Страница 11: ...and quit from current menu 2 2 Channel Scan Move cursor to Channel Scan and press OK button to enter in its submenu Scan Mode By Channel and By Frequency Scan Band VHF and UHF Ch No Channel 5 12 VHF...

Страница 12: ...OSD Setting Favorite Other 3 1 Language Choose Language and press OK button to enter in its setup submenu Use VOL button to change options Language English French Deutsch Italian Spanish Russian Turk...

Страница 13: ...OFF Once Daily Weekly Monthly Timer Service Channel Record It s deactivated when timer mode is off Wakeup Channel The system will start automatically once the Timer Mode is activated Wakeup Date Set...

Страница 14: ...4 Tools Move cursor to Tools and press OK button to enter in its submenu There are 5 options which are listed below Information Load Factory Setting Upgrade By USB USB Device Remove USB device safely...

Страница 15: ...Safely Choose Remove USB Device Safely and press OK button to carry out this action A window will displayed to ask you confirm to remove the USB device Press OK button to confirm remove EXIT button t...

Страница 16: ...le playing Press STOP button to stop playing There are 5 options 2 4 8 16 24 in Fast Backward and Fast Forward mode There are 3 options 1 2 1 4 1 8 in Slow Forward mode Press INFO button twice to open...

Страница 17: ...apacity is Recorded video will be stored in the disk 6 4 Jump Move cursor to Jump and press OK button to enter in its setup interface There are 5 options which are listed below 30sec 1min 5min 10min 3...

Страница 18: ...de Packed Identification is the identification number of audio and video signals in the digital data flow stream of DVB MPEG 2 signals It is used to transmit audio and video signals to a specific addr...

Страница 19: ...ut cord may damage The video output mode of the unit is different from the mode of monitor Reset the mode No Color The video output system of the unit is different from the mode of monitor Reset the c...

Страница 20: ...or 809 West Tower Coastal City Hai De 3 road Nanshan Area Shenzhen City Guangdong Province China 809 Tel 86 755 216 79069 Mob 86 159 893 964 29 Email inpax inpax com cn Inpax china inpax com cn Web ww...

Отзывы: