


- 9 -
3 Wiring
Terminal
No.
Terminal Name
Terminal Function
Description
Remarks
(6)
Ethernet port (RJ45)
Communication
port with PLC or
PC.
Only IT6***E HMIs support
this port.
(7)
Battery cover
(1)
One battery
is inside. It is
used as backup
power of the
HMI perpetual
calendar.
The battery is 3 V CR2032
lithium battery (lifespan:
around five years with
ambient temperature at
25
°
C).
Note
(1)
: The battery of IT6100E is built insde the HMI.
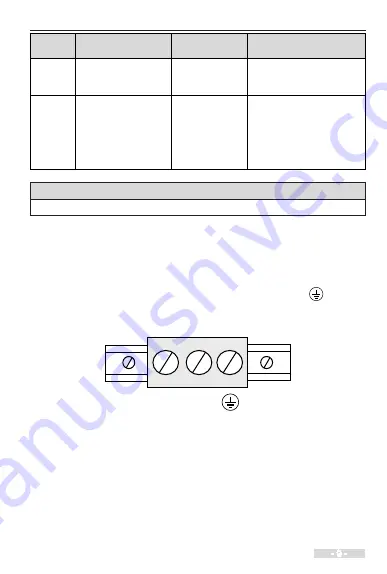
3.2 Wiring Description
3.2.1 Power Supply Connection
The power supply of the HMI is 24 VDC. Connect the power positive to the +24V
terminal and negative to the GND terminal. The terminal marked with
is used to
connect to the PE cable. The power port is as shown in the following figure:
+24V
GND
Содержание IT6000
Страница 18: ...17 4 Quick Setup 4 3 Installation of InoTouch Editor Step 1 Double click Step 2 Click Next...
Страница 19: ...4 Quick Setup 18 Step 3 Click Next Step 4 Click Next...
Страница 20: ...19 4 Quick Setup Step 5 Select as below Step 5 Wait until Installation Complete and then click Close...
Страница 22: ...21 4 Quick Setup Step 3 Follow steps as follows Step 4 Select Bit Switch...
Страница 24: ...23 4 Quick Setup Step 7 Follow below steps Step 8 Click OK...
Страница 26: ...25 4 Quick Setup Step 11 Follow below steps Step 12 Click OK...
Страница 27: ...4 Quick Setup 26 Step 13 Select Bit Lamp Step 14 Follow below steps...
Страница 29: ...4 Quick Setup 28 Step 16 Select Num Display Step 17 Follow below steps...
Страница 30: ...29 4 Quick Setup Step 18 Select Rectangle Step 19 Follow below steps...
Страница 32: ...31 4 Quick Setup Step 22 Select Text Step 23 Follow below steps...
Страница 33: ...4 Quick Setup 32 Step 24 Set other texts in the same way Step 25 Click Compile to check errors...
Страница 34: ...33 4 Quick Setup Step 26 Click Off line simulation to check the functions right click the screen to withdraw...
Страница 38: ...37 4 Quick Setup Step 7 Follow below steps Step 8 Follow below steps...
Страница 39: ...4 Quick Setup 38 Step 9 Follow below steps Step 10 Follow below steps Step 11...
Страница 40: ...39 4 Quick Setup Step 12 1 Switch to RUN 2 The RUN light is on...
Страница 42: ...41 4 Quick Setup Tip Set Display as below...
Страница 48: ...47 Revision History Date Version Change Description Jan 2017 A00 First issue Firmware version 10205 00252...


