background image


13/24 

13 

Password 

By default, this column is blank. You can click 

Enter Password 

to change it. The steps for setting the password of the 

device (required when creating a private network) are as follows: 


STEP 1: 

Click the device name to select the device in the lower panel. 


STEP 2:

 Click 

Enter Password

. A dialog box appears, showing the device name and password. 

Figure 11


Figure 11 Setting the device password 


STEP 3:

 Click

 OK

 to verify the password. The password field accepts the device password in any case formats, 

with or without dash. 

A confirmation box appears if the password is entered correctly. If a device is not found, a message appears, providing 
suggestions to solve the common problems. This process might take a few seconds to get completed. 


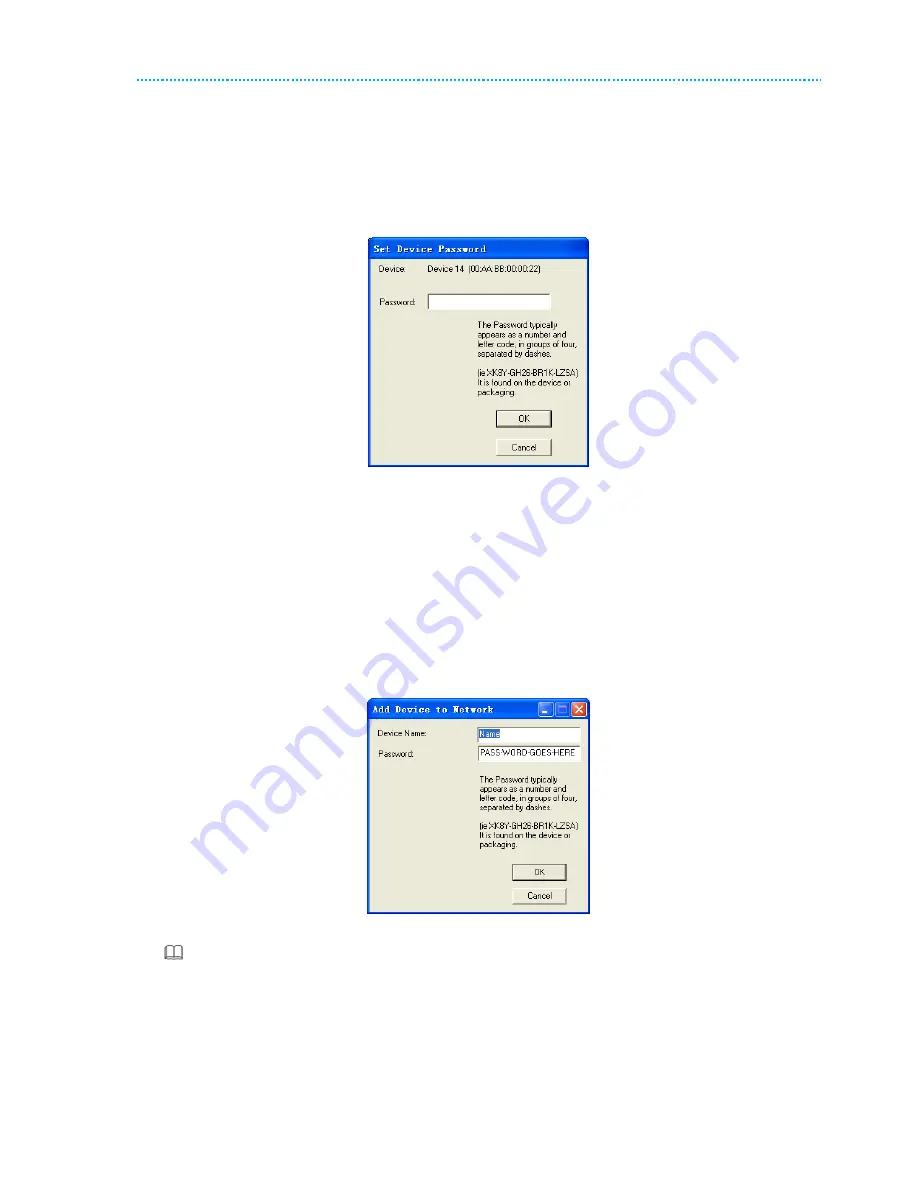
Add 

This button is used to add a remote device to the existing network by entering the device password of the device. A 
dialog box appears. 

Figure 12

. You can enter a device name and the password. 

If the device is found and the password is entered correctly, a confirmation box appears. If a device is not found, a 
message appears, providing suggestions to solve the common problems. 


Figure 12 Adding the remote device 

 Note: 

The  device  must  be  in  the  powerline  (plugged  in),  so  that  you  can  confirm  the  password  and  add  the  device  to  the 
network. If the device is not located, a warning message appears. 


Scan 

This button is used to perform an immediate search for HomePlugAV devices connected to the powerline network. By 
default, the utility automatically scans every a few seconds and updates the displayed information. 

Содержание PLC500M

Страница 1: ...INN 001 InnboxPLC500M UM 01 EN 020 Adapter INNBOX PLC 500M User Manual Type of document User Manual Prepared for RC1011BX PI699E2 8P45A 3 Date 13 3 2014 Author Grega Smolej Uroš Habič ...

Страница 2: ...nnboxPLC500M UM 01 EN 020 INN 001 The contents of this document are the property of Iskratel Kranj Slovenia and may not be copied reproduced or disclosed to a third party without written consent of the owner ...

Страница 3: ... ADAPTER 7 3 1 The Ethernet Interface 7 3 2 The Adapter s Buttons 7 3 3 The Adapter s LEDs 7 5 HOW TO INSTALL THE UTILITY 9 6 HOW TO USE THE UTILITY 12 6 1 Main Tab 12 6 2 Privacy Tab 14 6 3 Diagnostics Tab 15 6 4 About Tab 16 7 FORMING A HOMEPLUG AV LOGICAL NETWORK 17 7 1 Using the Security Reset Pushbutton 17 7 2 Using the Utility 17 8 JOINING A NETWORK 18 8 1 Using the Security Reset Pushbutton...

Страница 4: ......

Страница 5: ...y power socket in the household can become a communication node Provides data connectivity to your routers computers and other networking devices in Plug and Play manner Provides power save mode where the output consumption of the device is less than 0 5W Up to 500Mbps physical data rate 1 2 Application High Definition HD and Standard Definition SD video distribution Higher data rate broadband sha...

Страница 6: ...oduct should never be placed near or over a radiator or heat register Do not use an extension cord between the device and the AC power source Only a qualified technician should service this product Opening or removing covers may result in exposure to dangerous voltage points or other risks Do not plug the device into a power strip or surge protector because these devices may consist of filter and ...

Страница 7: ...y Reset Set the status of the device members or restore the factory default settings Pressing and holding the Security Reset button for less than 3 seconds makes the adapter a member of the existing AV Logical Network AVLN Pressing and holding the Button for between 10 seconds and 15 seconds makes the adapter restore the factory default settings 3 3 The Adapter s LEDs All adapters LEDs are located...

Страница 8: ...s normally Green Blink Device is resetting or device is in the process of password synchronization OFF The PLC adapter is powered off Ethernet Green ON Ethernet connection has established Green Blink Data is being transmitted OFF No Ethernet connection Data Green ON The PLC adapter has connected to the powerline network OFF The PLC adapter does not connect to the powerline network Note When data i...

Страница 9: ...ollow the steps below to install the utility No password or CD Key is needed R 1 Please insert the utility CD into the computer s CD ROM drive Select the PLC 500AV Utility Installation folder and then double click the setup exe The page for installing the utility software is displayed Figure 4 Open the setup wizard R 2 Click Next to display the following page Figure 5 License agreement R 3 Select ...

Страница 10: ...Kranj Slovenia and may not be copied reproduced or disclosed to a third party without written consent of the owner Figure 6 Selecting the folder R 4 Click Browse to select the installation folder and then click Next to continue Figure 7 Confirm installation R 5 Click Next to display the following page ...

Страница 11: ...11 24 11 Figure 8 Completing the installation R 6 Click Close to finish the installation ...

Страница 12: ...odically for other HomePlugAV devices connected to it If no local HomePlugAV device is discovered the status bar displays NO HOMEPLUG ADAPTERS DETECTED Figure 10 Main tab The lower panel displays all the HomePlugAV remote devices which are discovered in the current logical network The total number of remote devices connected in the same network is displayed above the remote device panel Network ty...

Страница 13: ...ommon problems This process might take a few seconds to get completed Add This button is used to add a remote device to the existing network by entering the device password of the device A dialog box appears Figure 12 You can enter a device name and the password If the device is found and the password is entered correctly a confirmation box appears If a device is not found a message appears provid...

Страница 14: ...the network name changes to anything other than HomePlugAV the network type in the main screen is displayed as Private Set Local Device Only This button is used to change the network name and password of the local device If a new network password is entered all the devices appeared in the main panel prior to this are no longer present in the new network effectively making the local devices not to ...

Страница 15: ...e Lower panel displays the history of all remote devices appeared on the computer over a certain period of time All the devices and the parameters of the devices on the powerline network are listed Devices that are active on the current logical network show a transfer rate in the rate column Devices on other networks or devices that no longer exist are shown with a in the rate column The following...

Страница 16: ...ed to a third party without written consent of the owner 5 4 About Tab The About screen shows the software version and provides an html link to a website such as http www qua qualcomm com Clicking the web address you can visit the web site Figure 15 About tab Preferences The lower part of the panel displays options for turning the autoscan function on or off ...

Страница 17: ...ess than 3 seconds The button on B must be pressed within 2 minutes STEP 3 Wait for connection to complete The Power indicator on both devices will flash evenly at 1 second interval until the operation succeeds or fails The Power indicator will illuminate steadily on successful completion If an error occurs the Power indicator on both devices will flash unevenly for 2 minutes 6 2 Using the Utility...

Страница 18: ... logical network AVLN using the Security Reset pushbutton and using the Utility Operation progress and outcome can be monitored by observing the behavior of the power LED 7 1 Using the Security Reset Pushbutton Scenario Devices A and B are located in network N Device C the joiner that is not located in any networks attempts to join Network N Any devices on Network N can become the adder Figure 20 ...

Страница 19: ...n on Device A or B for less than 3 seconds making it the adder Within 2 minutes press the pushbutton on Device C the joiner for less than 3 seconds Wait for connection to complete The Power indicator on Device A or Device B and Device C will flash at 1 second intervals until the process succeeds or fails It will illuminate steadily on success If an error occurs the Power indicator on Device A or D...

Страница 20: ...64bit PLC PHY Rate 500Mbps Max Modulation Band 2 68MHz Modulation Schemes Supports OFDM 4096 1024 256 64 16 8 QAM QPSK BPSK and ROBO Encryption 128 AES LED s Power Ethernet Data Push Button Reset Restore the factory default settings Security Set the network password automatically Consumption 3W Operating Temperature 0ºC to 40ºC Storage Temperature 20ºC to 70ºC Operating Humidity 10 to 90 non conde...

Страница 21: ... Avoidance DAK Device Access Key DM Device Manager IGMP Internet Group Management Protocol NEK Network Encryption Key NID Network ID Identification NMK Network Membership Key PLC Powerline Communication PIB Parameter Information Block STA Station a STA in the network with a connection to the powerline and being able to source or sink traffic TDMA Time Division Multiple Access TEI Terminal Equipmen...

Страница 22: ...ckets that do not have a VLAN TAG The settings are available for Unicast directed to a host IGMP default CAP 3 sets the channel access priority for IGMP frames these are the group management frames not the stream data Unicast default CAP 1 sets the default channel access priority for unicast frames not matching any other classification or mapping IGMP managed Multicast Stream Fixed to CAP 2 sets t...

Страница 23: ......

Страница 24: ...4 Iskratel d o o Kranj Innbox Business Unit Ljubljanska c 24a SI 4000 Kranj Slovenia phone 386 0 4 207 2000 fax 386 0 4 207 2712 e mail info innbox net web www innbox net INN 001 InnboxPLC500M UM 01 EN 020 ...

Отзывы: