www.inline-info.com
QUICK REFERENCE SHEET
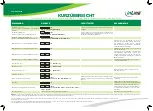
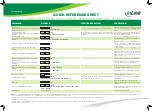
COMMAND
HOTKEYS
1
FRONT-PANEL BUTTON
DESCRIPTION
Select PC Port²
(Jointly select PC port/ hub port control/ audio&mic,
if binding is enabled)
ScrLk + ScrLk + X
X=1-2 / 1-4 (PC port number)
Press the corresponding button to select the active PC port.
Select the active PC port (jointly select PC port/
hub port control/ audio&mic, if binding is ena-
bled)
Select Hub Port Control
2
(Jointly select PC and hub port control, if binding is
enabled)
ScrLk + ScrLk + Fx
Fx=F1-F2/F1-F4, x=Hub port number
Press the button to toggle the specific PC+USB hub port
control. (It works only if PC port/ hub port control binding
is enabled.)
Select the PC port that control all USB hub ports
(jointly select PC & hub port control, if PC/ hub
port control binding is enabled)
Select Audio&Mic Port
3
(Jointly select PC port and audio&mic, if binding is
enabled)
ScrLk + ScrLk + Fy
Fy=F5-F6/F5-F8, y=audio/mic.-port number
Select the active audio&mic port (jointly select
PC & audio&mic port, if binding is enabled)
Bind PC and Hub Port Control Switching
2
[Default]
ScrLk + ScrLk + Z
Enable the binding of PC port and hub port con-
trol (once this feature is enabled, any PC and/
or hub port control switching is bound together)
(factory default)
Unbind PC and Hub Port Control Switching
2
[Default]
ScrLk + ScrLk + X
Disable the binding of PC port and hub port con-
trol
Bind PC and Audio&Mic Switching
3
[Default]
ScrLk + ScrLk + Q
Enable the binding of PC port and audio&mic
switching. (once this feature is enabled, any PC
and/or audio&mic switching is bound together)
(factory default)
Unbind PC and Audio&Mic Switching
3
[Default]
ScrLk + ScrLk + W
Disable the binding of PC port and audio&mic
Previous PC port
2
(Jointly select PC/ hub port control, if binding is
enabled)
ScrLk + ScrLk +
↑
(
Arrow Up)
Select the previous connected PC port (jointly
select PC/ hub port control, if binding is
Next PC port
2
(Jointly select PC/ hub port control, if binding
enabled)
ScrLk + ScrLk +
↓
(
Arrow Down)
Select the next connected PC port (jointly select
PC/ hub port control, if binding is
Previous PC port
ScrLk + ScrLk +
← (
Back Space)
Toggle between the previous port and current
Beep Sound On/Off
ScrLk + ScrLk + B
Toggle on/off the beep sound
Define Hotkey Preceding
ScrLk + ScrLk + H + y
y=Scroll Lock, Caps Lock, ESC, F12, Num Lock
Press and hold down last button ( Button 2 / Button 4 ) till two
beeps, release the button, then press (y)
Select the hotkey preceding sequence among 5
alternative keys
Auto Scan
ScrLk + ScrLk + S
Autoscan through every connected port for
quick screen browsing of each port (scan delay
= 5 sec.)
Autoscan with Programmable Delay
ScrLk + ScrLk + H + z
z=1>10s, 2>20s, 3>30s, 4>40S, 5>50s, 6>60s, 7>70s, 8>80s,
9>90s, 0>100s
Auto scan with a user-defined delay time within a
range of 10 ~ 100 seconds
Stop Auto Scan
Press any button
Terminate Autoscan activity
Notes:
1. The USB keyboard hotkeys allows you a faster and broader control for your KVM switching operation in addition to the front-panel button. If you have configured a hotkey preceding sequence other than two consecutive scroll locks, here you should change your hotkey se-
quence accordingly. (For preceding sequence key configuration, please refer to “Define Hotkey Preceding Sequence” in above table.)
2. When the binding of PC & USB hub port control switching is enabled by the hotkey sequence: ScrLk + ScrLk + Z, any PC and hub port control switching are bound together. To remove this binding, use the
hotkey sequence: ScrLk + ScrLk + X.
3. When the binding of PC and audio&mic switching is enabled by the hotkey sequence: ScrLk + ScrLk + Q, any PC and audio&mic switching are bound together. To remove this binding, use
the hotkey sequence: ScrLk + ScrLk + W.
Dual Monitors HDMI/DP USB KVM Switch w/ Audio & Mic -- Operation Commands for Hotkeys / Front-Panel Button


