background image

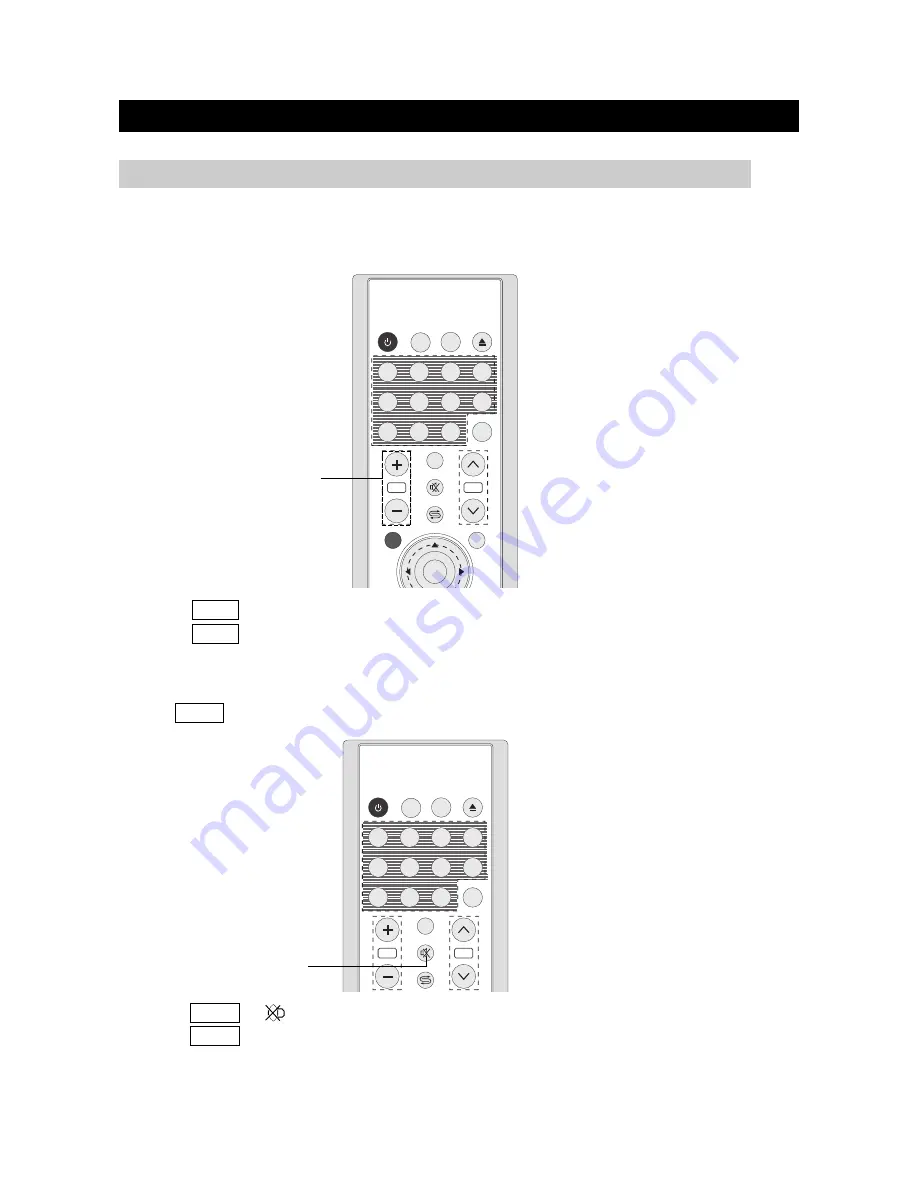
Changing the volume

You can change the volume on the front panel or on the remote control unit.

Using MUTE on the remote control

Press  MUTE  to mute the current sound output.

WATCHING TV

page15

1. Press  MUTE  . ''        '' will display on the screen.

2. Press  MUTE  again to cancel the mute.

1. Press  VOL+  to increase the volume.

2. Press  VOL-   to decrease the volume.

SIMPLE BUTTON OPERATION FOR CHANGING VOLUME/SOUND

/-

MUTE

OSD

TV MENU

OK

POWER

LAST

OPEN

CAPTION

5

6

7

8

1

2

3

4

9

10/0

+10

AUTO

VOL

CH

TV/DVD
/AUX/PC

MPX

MUTE

MUTE

OSD

POWER

LAST

OPEN

CAPTION

5

6

7

8

1

2

3

4

9

10/0

+10

AUTO

VOL

CH

MPX

Содержание DTV-172A

Страница 1: ...DTV 172A 17 LCD TV USER GUIDE http www initialdvd com ...

Страница 2: ...V MODE SELECTION WATCHING TV TURNING ON THE POWER TURNING OFF THE POWER SIMPLE BUTTON OPERATIONS FOR CHANGING CHANNELS USING LAST ON THE REMOTE UNIT SIMPLE BUTTON OPERATION FOR CHANGING VOLUME SOUND MENU ADJUSTMENT TV TUNER ADJUSTMENT CONTENT BLOCKING PICTURE ADJUSTMENT AUDIO ADJUSTMENT WINDOW ADJUSTMENT OPTIONS ADJUSTMENT TROUBLESHOOTING SPECIFICATIONS LCD VIEWING ANGLE ADJUSTMENT 1 2 3 4 5 5 5 5...

Страница 3: ... and if not installed and used in accordance with the instructions may cause harmful interference to radio communications However there is no guarantee that interference will not occur in a particular installation If this equipment does not cause harmful interference to radio or television reception which can be determined by turning the equipment off and on the user is encourage to try to correct...

Страница 4: ... them or objects from resting on them Check the cords at the plugs and product 8 Overloading Do not overload AC outlets or extension cords Overloading can cause fire or electric shock 9 Entering of objects and liquids Never insert an object into the product through vents or openings High voltage flows in the product and inserting an object can cause electric shock and or short internal parts For t...

Страница 5: ... cart stand tripod or table Unstable installation is likely to make the product fall resulting in serious injuries as well as material damage Use only the cart stand tripod bracket or table specified by the manufacturer or sold with the apparatus 19 When a cart is used use caution when moving the cart apparatus combination to void injury from tip over 20 Ventilation The vents and other openings in...

Страница 6: ...10 0 10 AUTO REPEAT P MODE A MODE SUBTITLE AUDIO ANGLE REMAIN SETUP ZOOM SLOW RETURN PLAY PAUSE STOP SKIP SEARCH WIDE VOL CH TV DVD AUX PC MPX DTV 172A 17 LCD TV USER GUIDE http www initialdvd com Power adapter AV cables User guide Remote control Component Video Cable or Y Pb Pr cable Audio cable for component input It also includes AAA batteries 2 Warranty card USB Extension Cable ...

Страница 7: ...lay or operate the remote control unit closer to the remote sensor window CAUTIONS REGARDING REMOTE CONTROL UNIT Use the remote control by pointing it towards the remote sensor on the TV Objects between the remote control and the sensor may disrupt operation Effective range is 20 feet but is dependant on what your viewing angle is Range can also be affected by direct sunlight on the TV s sensor US...

Страница 8: ...en TV DVD USB CARD AUX Video AUX S Video AUX Component PC 5 MUTE Mute the sound 6 PREV NEXT CH To skip to the previous next chapter previous next channel 7 VOLUME Use to adjust the volume 8 POWER BUTTON Use to turn the unit on and off FUNCTIONAL OVERVIEW page6 FRONT VIEW 1 2 3 4 5 6 7 8 VOL TV AUX PC CH CH VOL ...

Страница 9: ...mposite Video and Audio Out 3 AV2 IN Component Video and Audio In 4 VGA Audio PC Input 5 PHONES 6 DC IN FUNCTIONAL OVERVIEW page7 REAR VIEW PHONES AUDIO AUDIO S VIDEO VIDEO L R CB PB Y DC IN VGA AV1 IN AUDIO L R CR PR AUDIO VIDEO L R AV OUT AV2 IN 1 2 3 4 5 6 ...

Страница 10: ...reen and use the buttons to select between TV AUX Video AUX S Video AUX Component PC and press the OK button to confirm 7 Cursor Buttons Use to navigate in menus FUNCTIONAL OVERVIEW page8 REMOTE CONTROL DVD MENU DVDTITLE MUTE OSD TV MENU OK POWER LAST OPEN CAPTION RC 172DT 5 6 7 8 1 2 3 4 9 10 0 10 AUTO REPEAT P MODE A MODE SUBTITLE AUDIO ANGLE REMAIN SETUP ZOOM SLOW RETURN PLAY PAUSE STOP SKIP SE...

Страница 11: ...e language 20 ANGLE Use to shift DVD viewing angle 21 REPEAT Use to repeat the DVD playback 22 WIDE In DVD mode use to set TV display mode 23 SETUP Use to bring up DVD setup menu 24 RETURN Return to the previous menu screen 25 FF FR Use to play DVD fast forward backward 26 STOP Use to stop the DVD playback 27 DVD MENU Use to bring up the DVD root menu 28 TV MENU Use to bring up TV menu and exits T...

Страница 12: ...CONNECTIONS page10 2a 2e 1a 1b Computer or HDTV Receiver 2b 2c 2f PHONES AUDIO AUDIO S VIDEO VIDEO L R C B P B Y DC IN VGA AV1 IN AUDIO L R C R P R AUDIO VIDEO L R AV OUT AV2 IN 2d VGA Audio Cable ...

Страница 13: ...jacks use the TV DVD AUX PC button and the buttons to set the DTV 172A s signal source to AUX S Video d Using the AV2 Component input The AV2 input may be used for Progressive scan this connection is also known as Y Pb Pr or HDTV inputs use the TV DVD AUX PC button and the buttons to set the DTV 172A s signal source to AUX Component e Using the VGA connector Connect a PC computer to the DTV 172A t...

Страница 14: ...ounts of electric power is still consumed even when the power is turned off TURNING OFF THE POWER By pressing the TV AUX PC on the TV set and confirming by the OK button on the remote control you can change the mode as follows TV AV MODE SELECTION VOL TV AUX PC CH CH VOL POWER POWER DVD MENU DVDTITLE MUTE OSD TV MENU OK POWER LAST OPEN CAPTION 5 6 7 8 1 2 3 4 9 10 0 10 AUTO REPEAT P MODE A MODE SU...

Страница 15: ...p red NOTE Even though the TV is turned off a small amount of power is used to maintain various functions TURNING OFF THE POWER 1 Press CH to increase channel number 2 Press CH to decrease channel number NOTE CH on the TV set operates the same as CH on the remote unit CH You can change channels in several ways Using CH on the remote unit SIMPLE BUTTON OPERATIONS FOR CHANGING CHANNELS VOL TV AUX PC...

Страница 16: ...channels directly by pressing the number buttons EXAMPLE To select a 1 digit channel e g channel 2 Press 2 To select a 2 digit channel e g channel 12 Press 1 followed by 2 USING LAST ON THE REMOTE UNIT NUMBER BUTTONS MUTE OSD POWER LAST OPEN CAPTION 5 6 7 8 1 2 3 4 9 10 0 10 AUTO VOL CH MPX LAST DVD MENU DVDTITLE MUTE OSD TV MENU OK POWER LAST OPEN CAPTION 5 6 7 8 1 2 3 4 9 10 0 10 AUTO VOL CH TV ...

Страница 17: ...e15 1 Press MUTE will display on the screen 2 Press MUTE again to cancel the mute 1 Press VOL to increase the volume 2 Press VOL to decrease the volume SIMPLE BUTTON OPERATION FOR CHANGING VOLUME SOUND VOLUME MUTE OSD TV MENU OK POWER LAST OPEN CAPTION 5 6 7 8 1 2 3 4 9 10 0 10 AUTO VOL CH TV DVD AUX PC MPX MUTE MUTE OSD POWER LAST OPEN CAPTION 5 6 7 8 1 2 3 4 9 10 0 10 AUTO VOL CH MPX ...

Страница 18: ...tus there is Settings option Make sure press TV MENU to exit TV menu screen before other operatings MENU ADJUSTMENT page16 TV TUNER ADJUSTMENT TV Source This will help you to select the TV s signal source 1 Press TV MENU to bring up the TV menu screen 2 Press to select Settings and press to select TV Tuner 3 Press to enter TV Tuner menu off 2 ...

Страница 19: ...m the actual operations Fine tune 1 Press TV MENU to bring up the TV menu screen 2 Press to select Settings and press to select TV Tuner 3 Press to enter TV Tuner menu 4 Press to select Fine Tune 5 Press to enter Fine Tune screen 6 Press to tune for a better picture and sound press OK to return press TV MENU to exit Channel skip 1 Press TV MENU to bring up the TV menu screen 2 Press to select Sett...

Страница 20: ... and press to change the selected digit 6 Press to select OK and press OK to check the password Then there will be Change and Clear under Enter 7 Press to select Change and press to change the password 8 Press to select digit and press to change the selected digit 9 Press to select OK and press OK to confirm your change 10 Press to select Clear and press to clear the password press OK to return pr...

Страница 21: ...tness press OK to return press TV MENU to exit Color 1 Press TV MENU to bring up the TV menu screen 2 Press to select Picture 3 Press to move to Color 4 Press to adjust the picture color press OK to return press TV MENU to exit Sharpness 1 Press TV MENU to bring up the TV menu screen 2 Press to select Picture 3 Press to move to Sharpness 4 Press to adjust the picture sharpness press OK to return p...

Страница 22: ...o adjust the bass weaker or stronger press OK to return press TV MENU to exit Press TV MENU to bring up the TV menu screen Press to select Audio and press to enter into below items AUDIO ADJUSTMENT down for audio settings 6 16 16 16 MPX equalizer Mono PICTURE ADJUSTMENT Tint 1 Press TV MENU to bring up the TV menu screen 2 Press to select Picture 3 Press to move to Tint 4 Press to adjust the tint ...

Страница 23: ... can also use the MPX button on the remote control to select a MPX mode 2 Only when in TV status there is MPX option Equalizer 1 Press TV MENU to bring up the TV menu screen 2 Press to select Audio 3 Press to move to Equalizer 4 Press to enter Equalizer menu 5 Press to select every options and press to adjust 6 Press OK to return press TV MENU to exit MENU ADJUSTMENT page21 AUDIO ADJUSTMENT CONTIN...

Страница 24: ...will be applied in most of the case 1 First click on Setting on the Windows Start menu While Setting is selected move the cursor to submenu Control Panel MENU ADJUSTMENT page22 WINDOW ADJUSTMENT Resolution VGA SVGA XGA 640 480 640 480 640 480 640 480 720 400 800 600 800 600 800 600 800 600 1024 768 1024 768 1024 768 60 70 75 48 4 56 5 60 2 60 75 85 72 37 9 46 9 53 7 48 1 60 72 75 85 70 31 5 37 9 3...

Страница 25: ...log box The correct setting of size resolution is 1024 x 768 pixels Check the vertical frequency of your PC MENU ADJUSTMENT page23 WINDOW ADJUSTMENT CONTINUED 2 When the control panel screen appears click on Display and a display dialog box displays ...

Страница 26: ...status there are only Display mode and H position options In PC status there is only Display mode option Display Mode 1 Press TV MENU to bring up the TV menu screen 2 Press to select Window 3 Press to move to Display Mode 4 Press to select a display mode between Fill All and Force 4 3 press OK to return press TV MENU to exit MENU ADJUSTMENT page24 H Position 1 Press TV MENU to bring up the TV menu...

Страница 27: ... items OPTIONS ADJUSTMENT Menu Background 1 Press TV MENU to bring up the TV menu screen 2 Press to select Options 3 Press to move to Menu Background 4 Press to select the menu background between Translucent and Opaque press OK to return press TV MENU to exit down for option settings sleep time 0 minutes never osd timeout ...

Страница 28: ...er the menu will not disappear automatically you must press TV MENU to exit the LCD menu 4 Press TV MENU to exit 3 When you have set the Sleep Time the count down will be applied automatically and the time remaining displays the remain time If you set the Remaining time at 10 minutes or 240 minutes Time Remaining displays 4 If you want to cancel the Sleep Time you can set the Sleep Time on OFF 5 P...

Страница 29: ...rly Check the antenna or its connection is correct and if not correct the antenna fault or connection cable fault Check if car traffic or neon sign disturbs the sound effect Check the susceptible interference by other electronic devices such as radio and television and keep magnetic or electronic devices away from the TV Long distance from the station or other radio waves can generate bad sound Re...

Страница 30: ...ONE PC IN ANTENNA IN LCD DIMENSION WEIGHT WITHOUT ACCESSORIES TV FUNCTION TERMINALS INPUT POWER SOUND OUTPUT POWER CONSUMPTION 17 WIDE TFT LCD 1280 X RGB X 768 WXGA 370 X 222 45 45 60 60 400 1 450 500 X 352 X 220 500 X 292 X 83 13 7lbs 6 6kg NTSC ELECTRIC TUNING SYSTEM VHF UHF NICAM 125 CHANNELS DC12V AC100 240V 50 60Hz 4W 4W 45W VIDEO S VIDEO AUDIO L R Y Pb Cb Pr Cr VIDEO OUT 3 5mm STEREO MINI JA...

Страница 31: ...page29 LCD VIEWING ANGLE ADJUSTMENT Horizontal Adjustment Vertical Adjustment 5 5 10 ...

Отзывы: