Infranor CD1-k Скачать руководство пользователя страница 10


10 

CD1-k – User Guide   

Chapter 2 -  Commissioning

4.2 - I

2

T PROTECTION 


2 selection modes are available: 

Fusing

 or 

Limiting

It is advisable to use the 

Fusing

 mode during commissioning phases.  

 
In 

Fusing

 mode, the amplifier is disabled when the current limitation threshold is reached. 

 
In 

Limiting

 mode, the motor current is only limited at the value defined by the 

Rated current

 parameter when the 

limitation threshold is reached.  

4.2.1 - OPERATION OF THE CURRENT LIMITATION IN "FUSING" MODE  

 
When the amplifier output RMS current (I

2

t) reaches 85 % of the rated current, the 

OK

 LED is blinking on the 

amplifier front panel. If the RMS current (I

2

t) has not dropped below 85 % of the rated current within 1 second, the 

I

2

t error is released and the amplifier disabled (otherwise, the blinking is inhibited).  

 
When the amplifier output RMS current (I

2

t) reaches the rated current value, the I

2

t limits the amplifier output 

current at this value.  
 
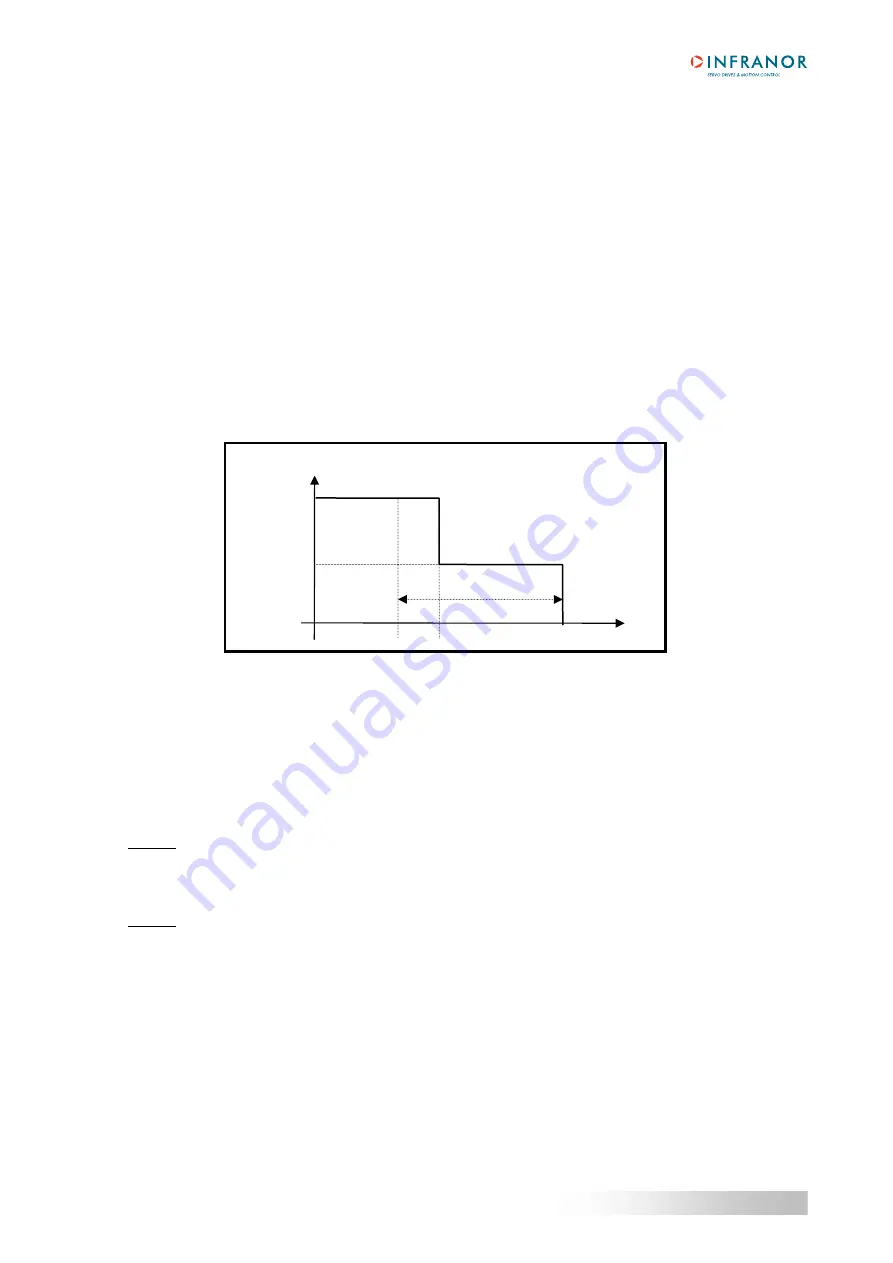
Diagram of the amplifier output current limitation in an extreme case (motor overload or shaft locked):  


The maximum current duration before release of the blinking display is depending on the value of the parameters 

Rated current

 and 

Max. current

. This value is calculated as follows: 


dyn

 (second) = t

1

-t

0

 = 3,3 x 

[

 rated current (A) / max. current (A)

]

2


The maximum current duration before limitation at the rated current is also depending on the value of the 

Rated 

current

 and 

Maximum current

 parameters.  This value is calculated as follows: 


max

 (second) = t

2

-t

0

 = 4 x 

[

rated current (A) / max. current (A)

]

2


NOTE 1 
When the "Max. current / Rated current" ratio is close to 1, the Tdyn and Tmax values given by the formula above 
are quite below the real values. But this formula remains very precise as long as the "Max. current / Rated current" 
ratio is higher than 3/2. 
 
NOTE 2  
The amplifier I

2

t signal can be displayed on the digital oscilloscope by selecting the 

I

2

signal in the 

Channel 

menu. The threshold values of the I

2

t signal, for the protection mode described above, are calculated as 

follows:  
 
Triggering threshold of the Idyn signal (%) = 

[

Rated current 

(%)

]

/ 70 

Current limitation threshold (%) = 

[

Rated current

 (%)

]

 / 50 

Rated current (%) = 100 x Rated current (A) / amplifier current rating (A) 
 
The corresponding RMS current value of the amplifier can be calculated as follows:  
 
Amplifier RMS current (A) = 

[

I

2

t signal value (%) x 50

]

1/2  

x


amplifier current rating (A) / 100 

Max. current


t0


t3

Rated current


t1

t2

Amplifier output current

1 second

t1 = Blinking 
 
t2 = Current limitation 
 
t3 = I

2

t error 

time


Содержание CD1-k

Страница 1: ...CD1 k 1 INFRANOR CANopen Amplifier CD1 k User Guide gb ...

Страница 2: ...erves the right to change any information contained in this manual without notice INFRANOR September 2005 All rights reserved Issue 2 0 ELIMINATION In order to comply with the 2002 96 EC directive of the European Parliament and of the Council of 27 January 2003 on waste electrical and electronic equipment WEEE all INFRANOR devices have got a sticker symbolizing a crossed out wheel dustbin as shown...

Страница 3: ...NCREMENTAL ENCODER OUTPUTS 13 8 COGGING TORQUE COMPENSATION 13 CHAPTER 3 FUNCTIONAL FEATURES 15 1 LOGIC INPUTS 15 1 1 INHIBIT INPUT 15 1 2 LIMIT SWITCH INPUTS 15 1 3 LOW SPEED INPUT 15 1 4 INDEX INPUT 15 2 BRAKE CONTROL 15 3 ADDRESSING SWITCH SPEED SELECTION 16 CHAPTER 4 CANOPEN COMMUNICATION 17 CHAPTER 5 TROUBLESHOOTING MAINTENANCE 18 1 ERRORS 18 1 1 SYSTEM ERROR 18 1 2 NON STORED ERRORS 18 1 3 S...

Страница 4: ...ly unit and mains filters It is available in both 230 VAC and 400 480 VAC mains operated voltages CD1 k amplifiers are working via a bus with CANopen communication protocol The amplifier parameter setting can be made either by means of the CANopen bus or the specific parameter setting software Visual Drive Setup via the serial port RS 232 2 ARCHITECTURE OF THE AMPLIFIER CANopen interface Position ...

Страница 5: ...mplifier Electric device for the control of electric motors It also includes a current regulator a speed regulator and often a position regulator Current loop Current regulator Used for the motor current control The motor torque is generally proportional to the current amplitude Speed loop Speed regulator Allows the motor speed control Position loop Position regulator Allows the motor position con...

Страница 6: ... 0 5 For the adjustment to other motor types please see CD1 k Installation Guide 3 POWERING OF THE AMPLIFIER Please see manual CD1 k Installation Guide before switching on the amplifier for the first time For switching on the amplifier please proceed as follows Switch on the 24V auxiliary supply The green front panel LED OK must blink quickly Undervolt error displayed The AOK relay contact pins 9 ...

Страница 7: ... that the INHIBIT input is enabled and the amplifier is on before moving manually the motor over one revolution or one pole pitch on linear motors If the HES error is displayed switch off the amplifier and check the following points before switching it on again The Hall effect sensors HES must be correctly connected on the amplifier X3 connector if 60 Hall sensor types are used check the various w...

Страница 8: ...llows the detection of pulse counting errors and immediately disables the amplifier for reasons of security The encoder counting protection checks that the number of encoder pulses between to successive Z marker pulses or R reference signals is equal to the value of the Motor encoder resolution parameter multiplied by the one of the Zero mark pitch parameter The encoder counting protection also ch...

Страница 9: ...n or with a CTP sensor ohmic resistance increasing temperature function Check that the selected thermal sensor type actually corresponds to the sensor type mounted on the application motor 4 1 6 2 Triggering threshold adjustment Enter the sensor ohmic value kOhm corresponding to the required temperature value for the release of the Motor overtemperature protection according to the manufacturer s s...

Страница 10: ...ameters Rated current and Max current This value is calculated as follows T dyn second t1 t0 3 3 x rated current A max current A 2 The maximum current duration before limitation at the rated current is also depending on the value of the Rated current and Maximum current parameters This value is calculated as follows T max second t2 t0 4 x rated current A max current A 2 NOTE 1 When the Max current...

Страница 11: ...entical to the Position mode The operator can select a bandwidth Low Medium or High as well as the filter type standard antiresonance or max stiffness The Autotuning procedure can be executed with the motor disabled or enabled i e vertical load Before executing the Autotuning procedure check that the motor shaft is free and that its rotation over one revolution is not dangerous for operator and ma...

Страница 12: ...can be reversed by selecting the Reverse movement in the Visual Drive Setup parameter setting software 5 PARAMETER SAVING When all adjustments have been made the parameters may have to be stored in a non volatile EEPROM the amplifier must be disabled 6 MOTOR PHASING PHASING AT POWER ON In the Incremental encoder without HES configuration the motor phasing procedure Phasing must be performed at eac...

Страница 13: ...isturbance is due to the difference of reluctance between the copper of the windings and the iron of the stator teeth For a given motor the cogging can be easily evaluated by simply moving the motor manually when the amplifier is disabled The Cogging compensation option available in the CD1 amplifier range allows to cancel the motor cogging effects for specific applications where torque accuracy o...

Страница 14: ...d in the PC COG file Note 1 The motor cogging torque value is checked at the amplifier power up If it contains some errors storage problems in the amplifier memory the EEPROM error is displayed and the Enable cogging torque compensation function is disabled Note 2 When exchanging an amplifier on an axis the file of the adjustment parameters PAR as well as the cogging torque file COG corresponding ...

Страница 15: ...m the rotation counting direction selection For checking the wiring of the limit switch inputs move the motor in one direction activate the limit switch placed in the rotation direction artificially if necessary check then the motor stopping if the motor goes on moving reverse the wiring of the limit switch inputs Notes When activating a limit switch input the motor is stopped with maximum deceler...

Страница 16: ...ll as of the of the CANopen bus communication speed Addressing 6 selection bits Status of the cursors Address 6 5 4 3 2 1 OFF OFF OFF OFF OFF OFF 0 OFF OFF OFF OFF OFF ON 1 OFF OFF OFF OFF ON ON 3 ON ON ON ON ON ON 63 Communication speed 2 selection bits Status of the cursors Speed 8 7 OFF OFF 1Mbits OFF ON 500Kbits ON OFF 250Kbits ON ON 125Kbits Note Address 00 must only be used in Local mode An ...

Страница 17: ...17 CD1 k User Guide Chapter 4 CANopen communication Chapter 4 CANopen communication For the commissioning of the CANopen communication protocole please see manual CD1k CANopen Communication Profile ...

Страница 18: ...stic and maintenance easier the errors are displayed and processed with the precedence described below For safety reasons the power must be turned off for the cancelling of some errors that requires the handling of the amplifier in this case the amplifier is automatically reset when power is turned on again If power is not turned off do not forget to make a RESET immediately after the error is can...

Страница 19: ... the error remains the EEPROM may not be correctly initialized CHECKSUM or is not compatible with the amplifier software To cancel this error make a new parameter setting of the amplifier and save the new parameters 1 3 3 C MOTOR ERROR If the error occurs when commissioning the amplifier Check the CTN CTP parameter setting the Triggering threshold and the Warning threshold Check the wiring of the ...

Страница 20: ...ERROR Check the encoder supply connection on the amplifier connector X3 Check the encoder A channel and B channel connections on the amplifier connector X3 Note In the Incremental encoder without HES configuration the motor Phasing procedure must be carried out again after an Encoder fault release 1 3 8 COUNTING ERROR Check the marker pulse connection on the amplifier connector X3 If the motor enc...

Страница 21: ...the correct encoder amplifier motor ground and shield connections with regard to the recommendations of chapter 4 of the CD1 k Installation Guide Check for the correct encoder A channel B channel and R reference signal waveforms A A B B R R A A B B R R Forward direction Reverse direction Check that the Motor encoder resolution and the Zero mark pitch parameter values are correct Check that the num...

Страница 22: ...on Check the position loop adjustment Check the coherence of the Static threshold parameter with regard to the motion cycle 1 3 11 LOW SPEED ERROR Check that the Low speed parameter is coherent with regard to the axis motion speed Check the wiring of the Low speed input 1 3 12 CURRENT OFFSET ERROR If the Current offset error occurs at power on this means that the offset compensation procedure has ...

Страница 23: ...n in the MOTOR LIST module Check the value of the Motor parameters in the Advanced Functions menu and renew the AUTO PHASING command with unloaded motor if required 3 4 DISCONTINUOUS MOTOR ROTATIONS WITH ZERO TORQUE POSITIONS Check the wiring of the three phases between motor and amplifier 3 5 LOUD CRACKLING NOISE IN THE MOTOR AT STANDSTILL Check that the Motor Amplifier Host system ground connect...

Отзывы: