INFODRAW PMRS-201 Скачать руководство пользователя страница 52

September 28, 2016 

INFODRAW R&D          PMRS/TMRS-201 User Manual v6.0.0.2


52 


4-1-3   Viewing Video


Drag & Drop a video channel on the left hand side to the desired window to open it for live 
video streaming. Alternatively, double click on a video channel to open it for live streaming.  


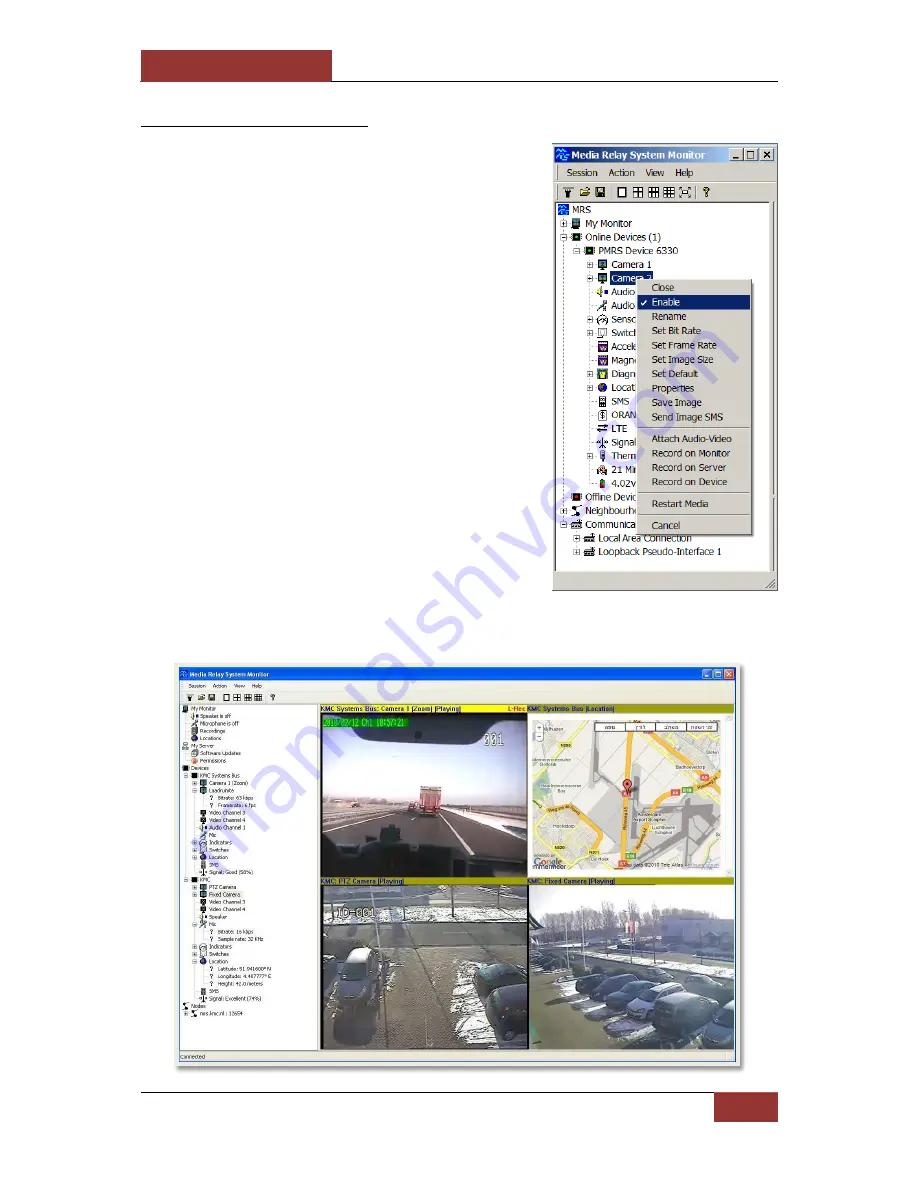
Before viewing a video channel, it must be 
enabledIn order to enable a specific 
channel, point the cursor over the channel 
and right click. Alternatively open the 
action menu at the top of the screen, then 
select the “Enable” item. 


Содержание PMRS-201

Страница 1: ...ersonal Media Relay System PMRS 201 device This User Manual has been specifically designed to guide you through the setup configurations the features and operational functions of the PMRS 201 Unit PMR...

Страница 2: ...all the features the PMRS device possess with the addition of Wireless LAN WiFi capabilities Version Author s Firmware Version Date Main Changes 5 5 Gidon Teff 5 3 0 3 09 2015 First manual 5 6 Gidon...

Страница 3: ...l may differ in appearance from the actual software depending on the software version in use The stability and performance of the PMRS 201 unit s wireless data streaming may vary in different countrie...

Страница 4: ...the built in lithium battery is damaged or leaking Avoid exposing the PMRS 201 device to very hot or very cold temperatures Extreme temperatures may cause deformation of the device and reduce the cha...

Страница 5: ...nit s Dip Switches The PMRS 201 Unit has 4 Dip Switches used for setup and operation located on the side of the unit The functions of each dip switch can be found in the Dip Switch section of the Unit...

Страница 6: ...er Adapter Cable 19 2 3 Audio In Out 20 2 4 Audio In Out Adapter Cable 20 2 5 Antennas Option 1 External GSM and GPS 21 2 6 Antennas Option 2 Internal GSM and External GPS 22 2 7 SIM Card Slot 23 2 8...

Страница 7: ...3 Viewing Video 52 4 1 3 1 Video Properties 55 4 1 3 2 Multiple Video Encoders 58 4 1 3 3 Video Frame Text 61 4 1 4 Other Options 62 4 1 5 Device Location 63 4 1 5 1 System Level Map 64 4 1 5 2 Device...

Страница 8: ...4 1 12 Session 115 4 1 13 Neighbourhood 116 4 1 14 Communication 117 4 2 MRS AV Player Application 118 4 2 1 Playing Recorded Files 119 4 2 2 Verifying Digital Signatures 121 4 2 3 Decrypting Recorde...

Страница 9: ...4 4 4 Clients Menu 170 4 4 5 Recordings Menu 172 4 4 6 Software Updates Menu 174 4 4 7 User Area 175 4 4 8 Sleep Management 176 4 4 9 License Menu 180 4 5 MRS Monitor Application 181 4 5 1 Permissions...

Страница 10: ...e There are 3 forms of the PMRS device 1 Plastic Plastic cover is light and cheap and has mini PL video and audio plug 2 Ruggedized Metal cover to prevent the device from falls 3 IP65 Metal case water...

Страница 11: ...ptember 28 2016 INFODRAW R D PMRS TMRS 201 User Manual v6 0 0 2 11 Box Contents Video Power Adapter Cable Audio In Out Adapter Cable GPS Antenna GSM Antenna 5V Power Charger PMRS Unit Option 1 Option...

Страница 12: ...The equipment shown in this manual is compatible with the plastic form of the PMRS device Different forms of the PMRS may have different connectors Video cables can have a RCA female male connection a...

Страница 13: ...be of high speed HSPA or faster and have a large browsing package at least 3GB A Micro SD Card is required if you would like to record in the PMRS 201 device The speed of the Micro SD Card will vary...

Страница 14: ...rating the unit and for upgrading the unit s firmware The unit is configured through a USB Cable interface on any PC Windows XP or higher MRS AV Player Application This application is used for viewing...

Страница 15: ...ent MRS Android Client is used for monitoring video audio location streams from MRS PMRS devices on your Android powered mobile device A full manual is available for download at http www infodraw com...

Страница 16: ...ocol TCP Transmission Control Protocol UDP User Datagram Protocol GPS Global Positioning System GSM Global System for Mobile Communications 3G 4G 3rd 4th Generation Mobile Telecommunications LTE Long...

Страница 17: ...G HSPA EDGE GPRS or LAN or WiFi for TMRS devices and can be monitored and controlled from any location upon alarm request The media streaming is done using PMRS units which can be carried handheld or...

Страница 18: ...ecture is based on a server with a fixed IP address Multiple units can communicate with the server as well as multiple clients All clients are connected to the server only and have viewing and control...

Страница 19: ...wer output to the camera from the unit The input is labelled A V IN on the PMRS Unit The connector from this plug can connect to 2 different cameras 2 2 Video 5V Power Adapter Cable The unit comes wit...

Страница 20: ...V IN input Headphones can be connected here directly 2 4 Audio In Out Adapter Cable The unit comes with a 2 5mm TRRS Male Jack splitter cable which has a 2 5mm TRRS Female connector for Audio In Pink...

Страница 21: ...st the GSM Antenna on to the GSM Antenna Base 2 Connect the GSM and GPS Antennas to their appropriate antenna connectors shown above WARNING Before turning the unit ON please make sure that the GSM An...

Страница 22: ...tion 2 Internal GSM and External GPS With this antenna setup the PMRS unit has an Internal Antenna for GSM and an External SMA Antenna connector for GPS located on the top side of the unit GPS Antenna...

Страница 23: ...your fingernails to insert the SIM card Once the SIM card is inserted properly close the notch by carefully pushing it all the way into the unit 2 8 Alarm Button The PMRS unit has a built in alarm bu...

Страница 24: ...e device s parameters using the Device Configurator application Connect the USB cable between the Mini USB Input shown here and a PC when configuring the unit 2 10 Micro SD Slot The Micro SD Slot is l...

Страница 25: ...n on To turn the unit OFF carefully move the switch back to the OFF position until it clicks and the LED lights turn off After switching the unit off the LED lights may take up to a few seconds to tur...

Страница 26: ...C DC Power Charger Connect the AC Charger to a wall power outlet Connect the DC tip to the PMRS Unit s 5V Power Input shown above The unit s battery takes about 10 12 hours to charge from flat to full...

Страница 27: ...T i Up Position USB out to connector configure through PC ii Down Position USB in on board modem operation Configure through Bluetooth 2 15 LED Lights The PMRS has 3 LEDs located on the top side of th...

Страница 28: ...Black have to be connected to the trigger The GPIO PTZ Cable Input is located on the bottom side of the PMRS unit Connect the GPIO PTZ cable to its correct input shown above Make sure it is firmly co...

Страница 29: ...ated on the bottom side of the PMRS unit next to the GPIO PTZ Cable Input Connect the Ethernet Interface cable to its correct input on the PMRS unit shown above Make sure it is firmly connected WARNIN...

Страница 30: ...stalling the MRS Service The control centre server software can be installed on any PC using Windows XP or later The server requires a Fixed Static IP address which is publicly accessible in order for...

Страница 31: ...nicate with all MRS PMRS units and clients and to stream video audio location from units to clients To setup the MRS Service Program Web Admin Interface Server follow these instructions 1 Make sure th...

Страница 32: ...indows OS takes form of a Windows Service A Windows Service has no application like user interface as does the MRS Monitor Server Application so it is instead configured using a Web Administration Int...

Страница 33: ...ing MRS Monitor server Application The MRS Monitor Server can be set up on any PC using Windows XP or later To setup the MRS Monitor Server application follow these instructions 1 Run the Setup_MRS_PC...

Страница 34: ...ned to setup the PC to act as a server using Server Based Architecture follow these instructions 1 Open the session menu on the top left hand side 2 Open the Connection screen 3 Select local server an...

Страница 35: ...RS PMRS units to the server it is recommended NOT to view the video audio GPS streams from the MRS Monitor Server Application itself The system will be more stable if the data streams are only viewed...

Страница 36: ...of the cellular provider in use In particular the cellular provider s APN Access Point Name must be provided The unit is configured using the Device Configurator software by connecting a USB cable be...

Страница 37: ...minute 4 After a few seconds the system will show 5 After another few seconds the system will detect new hardware 6 For the first time connecting the unit to a PC the PC will detect new hardware and a...

Страница 38: ...g systems please follow these instructions To setup the USB Drivers on Windows XP Vista or 7 32Bit please make sure that the device is activated with DIP switches 1 2 in an Up and that you have the pa...

Страница 39: ...on the Infodraw MRS Device file c Choose the update driver option If the device appears as an Unknown device please connect the USB cable to another USB port or to a USB hub until the device is identi...

Страница 40: ...the initial configuration a Click the Search for the best driver in these locations option b Tick the Include this location in the search option c Press the Browse button and search for the folder whe...

Страница 41: ...lation for Windows Vista 7 64Bit Open the MRS device Configurator program Open the Driver menu Choose Download driver Open the Driver menu Choose Test mode Restart your PC After restarting in the bott...

Страница 42: ...se instructions to install the Drivers manually a On your desktop right click on Computer Select the Properties option b In the System window select Device Manager on the left hand side of the screen...

Страница 43: ...10 64bit OS The detection of the USB in Windows 8 1 and 10 OSs is automatic So all that needs to be done is Raise the 2 DIP switches Connect the USB cable Activate the PMRS device After successfully...

Страница 44: ...the log on the bottom left side of the program should read Parameters Loaded 2 Enable the Remote Server and type in the IP address of your server 3 Click on the candle icon to save the changes you hav...

Страница 45: ...3 3 MRS Monitor Client The MRS Monitor Client can be set up on any PC Laptop using Windows XP or later To setup the MRS Monitor Client Application follow these instructions 1 Run the Setup_MRS_Client...

Страница 46: ...Client application is installed and opened to setup the PC Laptop to act as a client follow these instructions 1 Open the session menu on the top left hand side 2 Open the Connection screen 3 Select...

Страница 47: ...47 The Client is now connected and can communicate with the server The client has viewing and control capabilities as defined on the server 4 Once the client is connected to the server the status bar...

Страница 48: ...ction event alarms Contacts Alarm Configure trigger actions for the Alarm button and GPIO event alarms Online Devices Will display all online MRS PMRS devices Offline Devices Will display all devices...

Страница 49: ...18 different languages Follow these instructions to change the language of the application 1 Open the Session menu at the top left hand corner of the screen 2 Select Language 3 The Select Language win...

Страница 50: ...MRS Monitor Client on another PC Laptop and connect to the server 5 If your server is running through the MRS Monitor Server Application you can either connect to it using the MRS Monitor client on a...

Страница 51: ...of Input Sensors Switches View the status and control Output Switches Location a View the GPS location of that specific device only b Set location event alarms SMS Allows you to add mobile phone numbe...

Страница 52: ...red window to open it for live video streaming Alternatively double click on a video channel to open it for live streaming Before viewing a video channel it must be enabled In order to enable a specif...

Страница 53: ...m expands the size to full screen Double clicking again returns it to the previous setting If the video looks like it is not centred correctly right click on the video channel and select Restart Media...

Страница 54: ...201 User Manual v6 0 0 2 54 The viewing area can be split into 1 4 6 9 12 16 or 20 viewing channels To change the number of channels viewed on the screen open the View menu at the top of the window a...

Страница 55: ...1 3 1 Video Properties Right clicking on an open video stream opens a small menu Select Properties Selecting a specific video channel on the left hand side of the screen and pressing F3 brings up the...

Страница 56: ...just the Frame Rate of the video channel to fit the bandwidth at your disposal The Frame Rate can be set to any number from 1 to 25 fps for PAL 1 to 30 fps for NTSC Bitrate Adjusting the Bit Rate of t...

Страница 57: ...bitrate in the video parameter please consider the SIM card package provided to you by your cellular provider please consider the amount of data the unit will consume The table below provides an exam...

Страница 58: ...t rate of the video channel By default the same encoder is used for viewing and recording the video channel Different video encoders can be applied for viewing the video channel and recording the vide...

Страница 59: ...September 28 2016 INFODRAW R D PMRS TMRS 201 User Manual v6 0 0 2 59 3 Enter in the desired Image Size Frame Rate and Bit rate 4 In the Destination list box select Recording...

Страница 60: ...n viewing the video channel and when recording the video channel 5 Enter in the desired Image Size Frame Rate and Bit rate Once you have finished press OK To switch back to a single video encoder for...

Страница 61: ...ates Motion Detection Status will be displayed on the upper left side of the video channel Shown Below To activate the video frame text tick the Frame Text option located at the bottom right hand side...

Страница 62: ...This option restarts the video controller Set Packet Data Size Default is 1000 recommended not to change this parameter Set Time Select this option to set the time on the PMRS device to the current ti...

Страница 63: ...ilding without clear sky it will struggle to find its location It will take about 3 minutes for the unit to give up and continue with the rest of the system connecting to GSM Therefore it is better to...

Страница 64: ...0 0 2 64 4 1 5 1 System Level Map To view the system level map double click on Locations under My Monitor You will now be able to see all devices on one full screen map as moving icons If there are m...

Страница 65: ...el map double click on Location under a specific PMRS device tree You can also open this Location tree to see the GPS Co ordinates You will now be able to see the location of the specific device in a...

Страница 66: ...Manual v6 0 0 2 66 4 1 5 3 Map Views The GPS map can be viewed in 4 ways To change the view of the map select one out of the four options on the top right hand corner of the map window Map View Terra...

Страница 67: ...User Manual v6 0 0 2 67 4 1 5 4 Video Over Map To view a video channel over the map click on a floating icon A menu will appear with a list of all that device s video channels Click on the desired ch...

Страница 68: ...connected monitor The location history is stored per day and per device You can view the GPS location history by opening the view menu and selecting Locations History The Locations History Viewer wind...

Страница 69: ...cation event trigger can be set to perform the following actions on the MRS monitor Beep Display device location View default video channel Make a Pop up Window appear Play a custom sound The unit can...

Страница 70: ...in the desired maximum number of meters that the PMRS device can move from its current position before the alarm is triggered Then press OK Once the Location event alarm is activated you will see Dis...

Страница 71: ...track changes in location throughout time Double click on the location icon under the Monitor tree If you want the location of a device to be recorded in your monitor recordings enable the Display Lo...

Страница 72: ...ver Map The speed of each connected PMRS unit can be viewed over the GPS map in km h The speed will only be displayed if the unit is moving When using Google Maps simply hover your cursor over the flo...

Страница 73: ...September 28 2016 INFODRAW R D PMRS TMRS 201 User Manual v6 0 0 2 73 When using Open Street Maps open the full screen map and click on the floating icon on to bring up the device speed...

Страница 74: ...microphone using the MRS Monitor application Speakers Here you can a Enable Disable your computer s speakers by ticking or un ticking the box b Select from the Device list box which connected speaker...

Страница 75: ...oise below the detected noise level When detecting noise you must not speak and allow the monitor to calculate the maximal noise received by the microphone Announcement Disable If you enable this opti...

Страница 76: ...t splitter cable included with the PMRS unit Ensure that you have a speakers connected to the PC Audio Out Double clicking on the Audio Out 1 channel opens the audio stream of the Microphone and speak...

Страница 77: ...Name Allows you to rename the audio channel Sample Rate Allows you to change the sample rate of the audio channel The higher the sample rate the better the quality of sound but it requires more CPU r...

Страница 78: ...window Follow these instructions to do so Right click on either the Audio In 1 channel or the Audio Out 1 channel of the PMRS unit Then select the Controls option The following windows will appear Her...

Страница 79: ...vating them one by one Recordings can be viewed using either the MRS Monitor Player MRS AV Player Application or by using VLC player 4 1 7 1 Local Recorder Settings The recordings can be saved in any...

Страница 80: ...is button to open the recordings folder on your PC Local Export Copy the recoding files from your monitor to an external folder you can choose the time period from which to copy the files Server Expor...

Страница 81: ...every recording file made from that device Record Locations This option allows you to choose whether the MRS monitor records GPS information Record Events Documents events such as activating or deacti...

Страница 82: ...ctions 1 Select the channel that you want to record by clicking on the channel name under the PMRS device on the left hand side 2 Open the Action Menu and enable the recording by clicking on Record on...

Страница 83: ...hannel name Double click on the file to play it in the MRS Monitor player Alternatively to play recordings locate and open the recordings folder on your PC laptop The files are arranged by date Select...

Страница 84: ...se instructions 1 Select the channel that you want to record by clicking on the channel name under the PMRS device on the left hand side 2 Open the Action Menu and enable the recording by clicking on...

Страница 85: ...insert it into a PC Copy the files onto your PC to view them 2 Download the device recordings from the Micro SD card to your PC remotely over the cellular network To download the files remotely follow...

Страница 86: ...TMRS 201 User Manual v6 0 0 2 86 Right click on the desired recording and select Download The recorded file will download to your PC laptop over the cellular network Once the file has downloaded succ...

Страница 87: ...le click on it to play it in the MRS Monitor Player The device recorded file will also be saved in your recordings folder on your PC laptop Alternatively to play recordings locate and open the recordi...

Страница 88: ...ent Application Follow these instructions to do so 1 Select the channel that you want to record by clicking on the channel name of a PMRS device that is connected to the server 2 Open the Action Menu...

Страница 89: ...instructions to do so After you enable the recording action the corresponding message will appear at the top of the video channel S This message means that Server recording has commenced successfully...

Страница 90: ...September 28 2016 INFODRAW R D PMRS TMRS 201 User Manual v6 0 0 2 90 The AV player will upload and will play the recording you have created...

Страница 91: ...video channel every 3 seconds Clicking those snapshots will activate a playback that will commence from the point the snapshot was taken in and will continue until the recording that existed from the...

Страница 92: ...to finish the recording View the audio recordings the same way as video recordings are viewed 1 Select the audio channel for recording by clicking on the Audio In 1 channel name of the PMRS device on...

Страница 93: ...User Manual v6 0 0 2 93 4 1 7 8 Synchronized Video and Audio Recording To record video and audio together follow these instructions 1 Select the PMRS device on the left hand side of the screen 2 Open...

Страница 94: ...94 Once you record that video channel the recorded file will have synchronised audio in it 4 Select the Audio channel from the Audio Channel list box Then Press OK 3 The Attach Channels menu window w...

Страница 95: ...thernet external network storage drives can be purchased from your local IT store In order to communicate with the external network storage device a Local Area Network needs to be created in the PMRS...

Страница 96: ...ox enter the address of the folder on your external network storage device that you want the recordings saved to c Enter the User Name for your storage device in the User Name box d Enter the Password...

Страница 97: ...sert the SIM card into the PMRS unit 7 Ensure the GSM GPS Antennas are connected to the unit Once you activate the PMRS unit you will be able to record on the External Network Storage Device the same...

Страница 98: ...bled in 1 The Device Configurator Application for Device Recordings 2 The MRS Monitor server client Application for Local Monitor Recordings As a result of enabling the Digital Signature there will be...

Страница 99: ...e Select Properties b The Local Recorder Settings will appear c Enable the option Sign Files d Press OK After you enable this option in either the Device Configurator or the MRS Monitor and record a v...

Страница 100: ...Device Configurator Application for Device Recordings 2 The MRS Monitor server client Application for Local Monitor Recordings For Device Recordings Encryption a In the Device Configurator go to the R...

Страница 101: ...ecordings The longer the code the harder it is to break e Then press OK After you enable your encryption code in either the Device Configurator or the MRS Monitor and record a video audio file you wil...

Страница 102: ...w 4 1 7 12 Recording History in Graphic Format All recordings can be viewed graphically per day and per device in the Historic Activity window of the MRS Monitor Application Open the View menu and sel...

Страница 103: ...Close Channel After Allows the user to determine the amount of time the channel will be viewed after VMD is triggered Popup Video Channel The video channel will appear on the screen in a separate win...

Страница 104: ...etected Click the Browse button to search for an audio file on your PC wav mp3 wma formats are supported Navigate tree If this box Is ticked the monitor will open in the device tree the monitor will a...

Страница 105: ...Under the video channel s name the following message will appear No motion detected This means VMD is now activated Once there is motion past the camera the following message will appear under the vid...

Страница 106: ...ttings that were previously set for VMD in the MRS Device Configurator Device Monitor and MRS Service are carried out Motion Detection will still be active even if the video channel is closed Once mot...

Страница 107: ...triggered change the Output port to the switch you choose to activate and change the Detection value to 1 Internal Rectangle To create a limited space when motion could be detected manually draw a rec...

Страница 108: ...e set up to trigger a variety of alarms including live video streaming video audio recording GPS tracking etc These features are set on the MRS monitor The unit can also send a SMS to any number of ph...

Страница 109: ...ith the video channel will open when alarm is triggered Record Default Video Channel Enable this option to cause the video channel to automatically start recording once a GPIO alarm is activated Recor...

Страница 110: ...e at TTL Level To connect peripheral devices to the Output Switch Ports on the PMRS unit you must close a connection between the following wires on the GPIO PTZ cable Port 1 Output 1 wire and GND wire...

Страница 111: ...n be written in any language The contact details must be supplied in the SMS settings window located on the left hand side of the screen Follow these instructions to activate SMS alerts Open the SMS S...

Страница 112: ...Events select the desired triggers from which an SMS will be sent Contact Alarm GPIO events Motion Detection VMD events Location Events GPS events In the Common Message box write a message that you wo...

Страница 113: ...the bottom of the window If you own a Smartphone enable the Send Image option to attach a still picture of the video stream to the SMS Once the details are inserted press the Add button to add the mob...

Страница 114: ...ur local recordings folder You can access and view the images the same way video recordings are viewed Follow these instructions Right click on an open video stream and select Save Image Open the Reco...

Страница 115: ...s any open channels and channel parameters A session can be saved to a file and reloaded at any time To do so open the Session menu and select Save As Users can enable the Automatic button in the Sess...

Страница 116: ...vices and clients under the Neighbourhood tree The details include IP addresses Software Versions and Tolerance CT In the MRS Monitor Client Application In the MRS Monitor Client Application the user...

Страница 117: ...28 2016 INFODRAW R D PMRS TMRS 201 User Manual v6 0 0 2 117 4 1 14 Communication The communication node allows users to see their available connections Bluetooth Local area wireless and its loopback c...

Страница 118: ...AV Player Application The MRS AV Player Application is used for viewing recorded video audio files verifying digital signatures on recorded files and decrypting recorded files 1 Run the Setup_MRS_AV_...

Страница 119: ...H264 file to a FLV file which is identifiable to most players open the file menu and click on the Export FLV option Once the MRS AV Player is installed and opened follow these instructions to play re...

Страница 120: ...up Choose from x2 x3 x4 x6 x8 and x10 Slower Enable this option to slow the recording playback down In the list box select how slow you want the recording to slow down Choose from 2 3 4 6 8 and 10 Af...

Страница 121: ...ecorded file it can be verified in the MRS AV Player Application Follow these instructions Once the recorded file is opened in the MRS AV Player open the Misc menu and select Verify Signature This wil...

Страница 122: ...crypted in the MRS AV Player before you can view it Follow these instructions to do so Once the recorded file is opened in the MRS AV Player open the Misc menu and select Decryption The Decryption win...

Страница 123: ...w infodraw com support downloads php 1 After the MRS USB driver installation is complete open the Device Configurator application This program allows you to configure the unit through the USB cable 2...

Страница 124: ...cting to the same server has a Unique ID Number Device Client Password If a PMRS device ID has been assigned a password in the permissions feature of the server the password will need to be inserted h...

Страница 125: ...olerance Keep this option set to UDP Local server The PMRS unit can also act as a server by selecting the Local server option However for this configuration the unit will require a SIM card with a fix...

Страница 126: ...ress the Manage button to open the Multiple Connections Window In the Multiple Connections Window press on the Add button to insert another server to which the PMRS device will connect to The Local Se...

Страница 127: ...he cellular provider in use Hardware Keep this parameter the same set to Automatic Dial String Keep this parameter the same APN The Access Point Name APN of your cellular provider must be entered in t...

Страница 128: ...he modem to only search for one cellular frequency band To add an extra command click the button Enter the correct lines of code which should be obtained from Infodraw or your local Infodraw dealer Th...

Страница 129: ...n the PMRS 1 Open the Device Configurator Application 2 Turn the PMRS OFF 3 Ensure the 2 left dip switches on the PMRS unit numbers 1 2 are in up position 4 Ensure the SIM card is NOT inserted into th...

Страница 130: ...Go to the Local Network menu on the left hand side Under the Address Configuration Method menu select DHCP After inputting the above settings the configuration must be saved into the unit This is don...

Страница 131: ...ce 9 Turn the PMRS device off 10 Change back the left 2 dip switches numbers 1 2 to down position 11 Connect the Ethernet cable to the PMRS unit You can now connect the Ethernet cable to any local net...

Страница 132: ...8 0 1 Subnet Mask 255 0 0 0 or 255 255 0 0 Leave the rest of the settings blank 5 Tick the Enable DHCP Server option 6 Select File Write to Device 7 Select File Shutdown Device 8 Disconnect the device...

Страница 133: ...ivity to the WiFi network Network Identifier The username of the network SSID Network Passphrase The password of the network available on PCs or smartphones connected to the network Address Configurat...

Страница 134: ...process is simple 1 Insert a SIM card and connect to a GSM antenna 2 Connect to the configurator 3 Enter the Network Identifier SSID and the Passphrase 4 In the Access Point role enter Host 5 In the...

Страница 135: ...e Some SIM cards require a PIN number but most don t The PIN number is obtained from your cellular provider PUK Here you can update the PUK numbers for the SIM card in use A PUK number will only be re...

Страница 136: ...e TLS supports a number of ciphers including DES 40 bits 3DES 168 bits AES 256 bits and RC4 128 bits The selected encryption cipher is a result of the negotiation between the TLS client and the TLS se...

Страница 137: ...ed in two ways Manual configuration or import from an OpenVPN client configuration file Manual configuration Step 1 Open the VPN Tab in the Device configurator program Step 2 In the VPN window select...

Страница 138: ...xt window will appear In this window fill in the necessary OpenVPN certificates Private Key CA Certificates and Authentication It s also possible to import these from a file More information about how...

Страница 139: ...ort an OpenVPN configuration file or copy paste the configuration from an OpenVPN configuration file Select Use configuration file In the following window you can either copy paste the OpenVPN Client...

Страница 140: ...er 28 2016 INFODRAW R D PMRS TMRS 201 User Manual v6 0 0 2 140 Enable OpenVPN Open the modem tab in the Device configurator To enable the VPN connectivity select Enable VPN in the Modem Configuration...

Страница 141: ...etwork it will send an SMS to this phone number containing the new IP address Send Service Type This is a parameter defining the technology used for sending SMS messages It depends on the cellular ser...

Страница 142: ...pen the SMS tab menu c In the Authentication Code box write down a code You will need to put this code at the start of each SMS you send to the PMRS device As was said above there are 4 options to thi...

Страница 143: ...input port to Active Low Associated Camera Add or remove the camera for the selected port Associated Microphone Add or remove the microphone for the selected port Record Video Enable this option to re...

Страница 144: ...n in the Device Configurator Application Follow these instructions to do so 1 Open the Device Configurator Application 2 Turn the PMRS unit off 3 Ensure the 2 DIP switches on the PMRS unit numbers 1 2...

Страница 145: ...d to the unit After inputting the above settings the configuration must be saved into the unit This is done by opening the File menu and clicking Write To Device The candle icon After pressing Write t...

Страница 146: ...2 Input 2 wire and Port 14 GND wire Port 3 12V and Port 14 GND wire Once an Input Sensor is triggered the Sensor number signal on the left hand side will light up The pre set trigger actions will als...

Страница 147: ...Deletes old recording files on the Micro SD when the remaining storage capacity reaches below 10 Delete all files now Deletes all the files of the connected storage device Sign media files Tick this...

Страница 148: ...crypt the recording files on the storage device with a password For more information please view the Recorded Files Encryption section of this user manual File Size Limit Setup the file size limit of...

Страница 149: ...enable disable the GPS capability Reset GPS This option if enabled resets the GPS every time the system shuts down thus clearing the unit s memory of old satellite information Enable Motion Estimatio...

Страница 150: ...and Camera ID As the PMRS unit only has one video channel set the Video Channel and Camera ID both to 1 Baud Rate This list box allows you to set the PTZ control Baud Rate The unit supports the follow...

Страница 151: ...en the PTZ tab menu 7 Click the Add button to add the Video Channel and Camera ID As the PMRS unit only has one video channel set the Video Channel and Camera ID both to 1 8 Set the PTZ Baud Rate from...

Страница 152: ...There are 2 RS 485 wires T and T built into the PMRS unit through the GPIO PTZ Cable Refer to GPIO PTZ Cable section for colour definitions These wires must be connected to the PTZ camera Once you ha...

Страница 153: ...sing the yellow ball Enter in a name for that position in the Name box Then press Save To view the pre set camera position choose the pre set name from the Move to list box The camera will then automa...

Страница 154: ...yption License to secure all the transmitted data from the unit to the server clients To add a license click on the Add License button The License Text window will appear Insert the license code that...

Страница 155: ...n existing unit that you already have you will need to get an encryption license code The license code is based on the Hardware Identifier number of your unit Speak to your local Infodraw dealer about...

Страница 156: ...tick the Secure box Tick this Secure box to encrypt the data streaming from the unit to the server After inputting the above settings the configuration must be saved into the unit This is done by ope...

Страница 157: ...Application In the connection window tick the Secure box before you connect This will encrypt the communication from the MRS Client to the MRS server After the parameters are saved open the File menu...

Страница 158: ...tor it should now be upgraded to the new version Download button Click the Download button to automatically download the latest PMRS firmware version file Once the file is downloaded it will automatic...

Страница 159: ...rator Application 2 Turn the PMRS unit OFF 3 Ensure the 2 DIP switches on the PMRS unit are lifted 4 Ensure the SIM card is NOT inserted into the unit 5 Connect the PMRS unit to the PC using the USB C...

Страница 160: ...Menu Here you can log information while running 4 Once the firmware has been downloaded a pop up will appear asking you to commence programming Click OK 5 The firmware programming will commence DO NO...

Страница 161: ...vide an automatic connection to the cellular network in use For Manual Modem Setup click the Manual option a Enter the APN Access Point Name of your Cellular Provider b A User Name and Password for yo...

Страница 162: ...e PMRS device off 3 Push down the 2 DIP switches to return to normal operation Initial setup can also be achieved through the MRSConfig android app For the full manual After the parameters are saved o...

Страница 163: ...ternet Protocol Displays network information Logging Menu Latest Messages Displays the server s latest log messages use for debugging Configure Configure the server s logging parameters such as how ma...

Страница 164: ...he server Recordings Menu Configure Configures the server s recording attributes List Lists the devices with video and audio channels that are being recorded Software Updates Menu Configure Allows the...

Страница 165: ...e a new password where it says New password and retype the new password where it says Retype new password Then click on Set This will take you back to the main menu page Files and Folders Page The Dat...

Страница 166: ...just saved the XML file Latest Log Messages Page This page will let you view the server s latest log messages It displays the time and date the message and its parameters Click on Refresh to refresh t...

Страница 167: ...rasing recordings Renaming Disabling Video Audio channel Disabling VMD Changing VMD settings Default Access Page Here you can determine the default situation for all unlisted devices and users connect...

Страница 168: ...t User Details page will appear Fill in the user name and password Retype the new password and click Apply All added User Names will appear in the list on the Users Page Click on Edit to change a pass...

Страница 169: ...vices page Click on Edit to change the device ID or the access permission level for a certain entry in the list Click on Delete to delete a specific entry from the list User Device Access Page The Use...

Страница 170: ...data rate and the sent data rate for observing the server s currently consumed bandwidth Click on the Main Menu link to return to the main menu Connected Devices This page lists the connected devices...

Страница 171: ...This page lists the active file uploads Downloading client s IP address as seen from the server file path and progress information It is activated when upgrading the firmware of the PMRS device via S...

Страница 172: ...ends after motion is not detected for a full minute Delete old files to free space Check this option to automatically delete old server recordings after the free space on the storage device drops belo...

Страница 173: ...evice is connected to the server or scheduled if the recorded capture device is disconnected from the server Automatic device backup Device Choose the device from which to download the recording files...

Страница 174: ...es feature of the MRS Service program Software Updates List Page This page lists the update files to be sent to devices in order to upgrade their firmware The software updates can generally be enabled...

Страница 175: ...e via archive folder Files My files Recording files made by the user 4 4 7 User Area The User area allows users that are not the administrator to make changes to some server settings without the inter...

Страница 176: ...nd later 1 Activate your device and connect it to your server in this example we connected the PMRS device to the IP address mrs1 infodraw com 2 After connecting the device open the MRS Service progra...

Страница 177: ...ng a To change the sleeping regiment simply click on the Change option b To terminate the sleep mode and allow the device to go online click on the Remove option and then after the pre set time period...

Страница 178: ...cal recordings offline This feature is a pay to use feature and license needs to be acquired and installed 1 After receiving the license open the MRS Configurator and insert the license if inserted co...

Страница 179: ...ms Disabled to activate the feature After these steps are taken the modem will go offline until the sleep regiment is removed or wake up time has arrived in case of a wakeup date but will not cancel t...

Страница 180: ...ice a license is required The license depends on the hard disk volume serial number as displayed in this page You can obtain a license by pushing Request License After you receive the license copy the...

Страница 181: ...igure trigger actions for the Alarm button and GPIO event alarms Permissions Set permissions and access levels for connecting units and clients Online Devices Will display all online MRS PMRS devices...

Страница 182: ...re permitted to each of those levels Follow these instructions on how to setup user permission and access levels in the MRS Monitor Server Application Level of Permission Forbidden Searchable Aware Lo...

Страница 183: ...vices and users If you wish to assign all devices to specific users then in the Default Device Access Level list box select Forbidden Also un tick Allow Unlisted Devices and Allow Unlisted Users Users...

Страница 184: ...device will appear in the Device ID list This password will need to be entered in the Device Client password box in the Device Identification menu of the Device Configurator in order for the unit to...

Страница 185: ...ied setting highlight the user and select the Delete button Default Device Access Menu The default device access screen defines the access level of each device which is not specified in User Device Ac...

Страница 186: ...rmware are listed below The four main applications MRS Monitor Server MRS Monitor Client MRS Device Config and MRS AV Player can be upgraded in each application To do so follow these instructions 1 Op...

Страница 187: ...MRS TMRS 201 User Manual v6 0 0 2 187 2 A newer version if available of the application will automatically download 3 You will then be prompted to install the new software Follow the installation inst...

Страница 188: ...self section 4 6 1 Web Browser Client To view the live video streams using an Internet browser open the following address http server ip 12654 videostreams html This will let you view the video GPS st...

Страница 189: ...na External Frequency SMA Connector 850 900 1800 1900 2100 MHz Bandwidth control Automatic Video Video Input 2x Video Input RCA Male Connector through video power splitter cable Supported Cameras Any...

Страница 190: ...ng Recording SMS Noise GPS Tracking Memory Micro SD Slot FAT32 file system Micro SDHC Max bit rate based on micro SD write speed recommended at least class 10 GPIO Input 2x Input Sensor Ports Logic Le...

Страница 191: ...l Weight 140g Plastic 320g Metal Other Interfaces USB Client Built in Mini USB Input For Setup Configuration Through USB Cable and PC video power cable Splitter cable for video 5V power output RCA DC...

Страница 192: ...2008 2012 MRS Monitor Client Windows Application Monitoring Program Windows XP Vista 7 8 MRS Device Configurator Windows Application Setup Configuration Program Windows XP Vista 7 8 MRS AV Player Wind...

Страница 193: ...more units clients connected to the server the more RAM will be required in the server machine Hard Disk 500GB hard drive 7200RPM or SSD 50 GB have to be free at any given time Operating System Window...

Страница 194: ...hapter 6 Support For FAQ please visit our help centre at common help section http www infodraw com support help_centre php Contact Us Infodraw Israel R D LTD Global Headquarters 14 Aba Hillel St Ramat...

Отзывы: