background image

11

Connecting a video device

You can connect video devices such as VCRs, DVD players, camcorders, 
digital cameras, video game consoles, HDTV receivers, and TV tuners to the 
projector. There is also an audio input. You can connect the audio directly to 
the projector to get sound from the built-in speaker, or you can connect the 
audio to your stereo system.

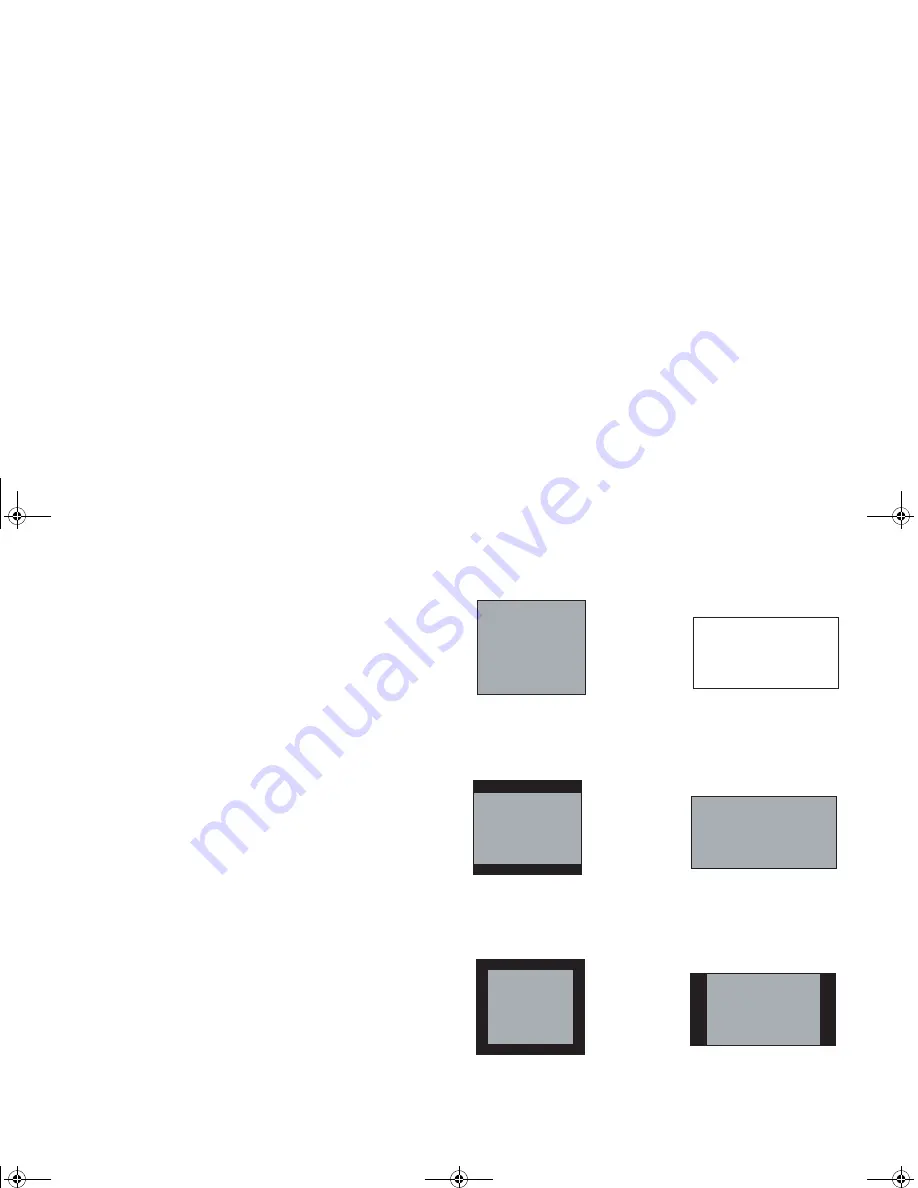
Before connecting your projector, you should decide which aspect ratio you 
want to use. The projector’s Aspect Ratio setting is accessed through the 
projector’s Menu. See page 32 for more information.

Aspect ratio is the ratio of the image width to image height. TV screens are 
usually 4:3. HDTV and most DVDs are 16:9, which is the default for this 
projector. If you’re projecting onto a screen, the size/shape of the screen 
may answer this question for you. If you are projecting onto a blank wall, 
you don’t have the screen size restriction. What you plan to project will also 
help you choose between 4:3 and 16:9. Most regular TV shows are 4:3, while 
most movies are 16:9.

If a have a 16:9 screen then you should select an aspect ratio of 16:9 for 
anamorphic movies or HDTV, and Native for 4:3 content. If you have a 4:3 
screen you should still use 16:9 for anamorphic movies or HDTV, but you 
also have the option of using either 4:3 (to fill the screen) or Native (for 
direct pixel mapping) for 4:3 content. Keep in mind that anamorphic movies 
only appear correctly if the DVD player is set to output to a 16:9 television. 

You can connect the projector to most video devices that can output video. 
You cannot directly connect the coaxial cable that enters your house from a 
cable or satellite company, the signal must pass through a tuner first. Exam-
ples of tuners are digital cable boxes, VCRs, digital video recorders, and sat-
ellite TV boxes. Basically, any device that can change channels is considered 
a tuner.

4:3 screen

16:9 screen

Do Not Use

4:3
mode

16:9
mode

Native
mode
(NTSC
only)

sp4800_ug_en.fm  Page 11  Monday, September 29, 2003  2:08 PM

Содержание ScreenPlay 4800

Страница 1: ...User s Guide English Français Deutsch Español Italiano Norsk ...

Страница 2: ...sp4800_ug_en fm Page 1 Monday September 29 2003 2 08 PM ...

Страница 3: ... for a Class B digital device pursuant to part 15 of the FCC Rules These limits are designed to provide reasonable protection against harmful interference in a residential installation This equipment generates uses and can radiate radio frequency energy and if not installed and used in accordance with the instructions may cause harmful interference to radio communications However there is no guara...

Страница 4: ...ustomizing the projector 30 Using the menus 31 Picture menu 32 Settings menu 35 Maintenance 37 Cleaning the Lens 37 Replacing the Projection Lamp 37 Cleaning the Lamp Housing Screens 39 Using the security lock 39 Appendix 40 Specifications 40 Accessories 40 Projected image size 41 Red LED Behavior and Projector Errors 41 If you are experienced in setting up projection systems use the Quick Setup c...

Страница 5: ...solution Apple Macintosh and PowerBook computers up to 1024x768 reso lution The projector has native SVGA 800x600 resolution and comes with the fol lowing standard accessories User s Guide remote power cord computer cable lens cap projector country dependent AV cable control user s guide and quick setup card S video to component adapter S video cable VGA to component adapter carrying case keypad a...

Страница 6: ...ctor to the screen the zoom setting and the video format determine the size of the projected image The top illus tration to the right shows three projected image sizes For more infor mation about image sizes at different distances see Projected image size on page 41 The image exits the projector at a given angle This image offset is 132 9 when the projector is in 16 9 mode default This means that ...

Страница 7: ...uter and to the Audio In connector on the projector Visit www infocus com accessories to view optional cables If you are using a desktop computer and want to see the image on your computer screen as well as on the projection screen connect the computer s monitor cable to the Monitor Out connector on the projector You can use your computer s mouse with an optional remote control to operate the navi...

Страница 8: ...pad If your computer has Windows 98 as its operating system see Using the projector with Windows 98 for the first time on page 9 regarding the driver setup process Make sure your laptop s external video port is active Many laptops do not automatically turn on their external video port when a projector is connected Usually a key combination like FN F5 is used to turn the external display on and off...

Страница 9: ...sting screen sizes and distances Adjust the zoom or focus If the image is not square adjust the keystone using the buttons on the key pad Press the top Keystone button to reduce the upper part of the image and press the bottom Keystone button to reduce the lower part Adjust the Contrast or Brightness in the Picture menu See page 32 for help with these menu adjustments adjust height elevator foot r...

Страница 10: ...rating system If you are running Windows 2000 or Windows ME skip these steps and go to Adjusting the image on page 8 a Click Next to begin searching for the driver b Make sure Search for the best driver is selected then click Next c Uncheck any checked boxes then click Next Windows automatically locates the driver If this driver has been removed reload the driver using your Windows operating syste...

Страница 11: ...USB functionality The Wizard launches three times The first time it detects a USB Composite Device The second time a USB Human Interface Device for the keyboard is detected The third time it detects a USB Human Interface Device for the mouse For Windows 2000 Windows ME and Windows XP The USB drivers are automatically installed sp4800_ug_en fm Page 10 Monday September 29 2003 2 08 PM ...

Страница 12: ...at you plan to project will also help you choose between 4 3 and 16 9 Most regular TV shows are 4 3 while most movies are 16 9 If a have a 16 9 screen then you should select an aspect ratio of 16 9 for anamorphic movies or HDTV and Native for 4 3 content If you have a 4 3 screen you should still use 16 9 for anamorphic movies or HDTV but you also have the option of using either 4 3 to fill the scr...

Страница 13: ... remote See page 6 for computer projector setup information Video connections The first step for connecting video is deciding what type of output connector you want to connect to the projector If there is more than one output select the one with the highest quality The best quality ranking with 1 being the highest and 3 being the lowest is 1 Component video 2 S video 3 Composite video If you are c...

Страница 14: ...ge 16 Standard Video Camera NTSC PAL and SECAM formats Component 480i Composite video or S video Component Video Composite video or S video S video via the Com ponent to S video adapter Not for progressive i e HDTV sources See next page Composite video connection on page 15 S video connection on page 15 Component video connection on page 16 Standard Video Game NTSC PAL and SECAM formats Component ...

Страница 15: ...dapter Not for Component 480i Component video connection on page 16 Progressive DVD 1080i 720p Component 480p VGA Component video Computer In Computer In via the Component to VESA adapter Not for Component 480i VGA connection on page 16 Component video connection on page 16 Progressive Video Game 1080i 720p Component 480p VGA Component video Computer In Computer In via the Component to VESA adapte...

Страница 16: ...evice Keep in mind that video output from composite connections are not as high quality as S video or component S video connection If your video device uses a round four prong S video connector plug an S video cable into the S video connector on your video device and into the S video connector on the projector Also plug the red and white AV cable con nectors into your video device s audio out conn...

Страница 17: ...one end of the com puter cable to the VGA connector on your video source This connector may be labeled To Monitor on the video source Plug the other end of the cable into the Computer In connector on the projector For audio connect the white and red AV cable connectors into your video device Plug the blue connector into the projector s Audio In connector Connect the power cord to the Power connect...

Страница 18: ...projection screen If it doesn t press the Video button on the keypad No image Get help on page 21 Adjusting the image Adjust the height of the projector by pressing the release button to extend the foot Rotate the leveling foot at the rear of the projector if necessary Position the projector the desired distance from the screen at a 90 degree angle to the screen See page 41 for a table listing scr...

Страница 19: ...trast Brightness Color Tint or Aspect Ratio in the Picture menu See page 32 for help with the menus and these adjustments For Aspect Ratio keep in mind that DVD players must be configured for 16 9 in order to view the highest quality image For more information regarding Aspect Ratio see page 11 adjust zoom and focus focus thin ring thick ring zoom adjust keystone adjust volume adjust Picture menu ...

Страница 20: ... for one 1 minute before turning the projector on again This allows the lamp to prop erly cool However if the remote was used to power the projector to the Off state you do not need to wait one minute to turn it on again Troubleshooting your setup If your image appears correctly on the screen skip to the next section If it does not troubleshoot the setup The LED on top of the projector indicates t...

Страница 21: ...remove lens cap toggle power switch correct image only start up screen appears press the Computer button activate laptop s external port computer image projected toggle power switch on side ScreenPlay A ScreenPlay restart laptop A A sp4800_ug_en fm Page 20 Monday September 29 2003 2 08 PM ...

Страница 22: ...e projected A Signal out of range Panel Display Settings Advanced Adapter location varies by operating system you may also need to set a different resolution on your computer as shown in the following problem image fuzzy or cropped adjust computer refresh rate in Control A A sp4800_ug_en fm Page 21 Monday September 29 2003 2 08 PM ...

Страница 23: ...rol Panel Display Settings tab select 800x600 image clear and not cropped image not centered on screen move projector adjust zoom adjust height correct image A A A For a laptop disable laptop monitor or turn on dual display mode A adjust horizontal or Picture Advanced vertical position in menu sp4800_ug_en fm Page 22 Monday September 29 2003 2 08 PM ...

Страница 24: ...ge image not sharp adjust Sharpness video sources only in the Picture Advanced menu correct image image does not fit 4 3 or 16 9 screen change aspect ratio to 4 3 or 16 9 in Picture Aspect ratio menu correct image A B A B A B sp4800_ug_en fm Page 23 Monday September 29 2003 2 08 PM ...

Страница 25: ...ect image image reversed left to right turn off rear in Settings System menu correct image projected colors don t match source adjust color tint color temperature brightness contrast in the menus correct image A B A B A A B COLOR COLOR sp4800_ug_en fm Page 24 Monday September 29 2003 2 08 PM ...

Страница 26: ...low it to cool for a minute lamp turns on Change lamp message appears at startup or lamp won t turn on and LED blinking red if lamp hours up to 4 000 lamp must be replaced see page 37 lamp turns on LED ScreenPlay LED check lamp hours replace lamp Main About ScreenPlay sp4800_ug_en fm Page 25 Monday September 29 2003 2 08 PM ...

Страница 27: ...is backed by a limited two year warranty page 45 An extended warranty plan may be purchased from your dealer When sending your projector in for repair we recommend shipping the unit in its original packing material or having a professional packaging company pack the unit for shipping Please insure your shipment for its full value Regarding this projector When sending your projector in for repair w...

Страница 28: ...t button to light the remote s buttons in the dark Brightness and Contrast buttons to adjust the image Blank button to display a blank screen instead of the current image to change the color of the screen see page 36 Source buttons to switch among sources to assign a particular source to a source button see page 35 and a source toggle Resize button to change the Aspect Ratio see page 32 Auto Image...

Страница 29: ...If playing a video make sure the playback has not been paused Using the keypad buttons Most buttons are described in detail in other sections but here is an over view of their functions Menu opens the on screen menus page 31 Select confirms choices made in the menus page 31 Up Down arrows navigates to and adjusts settings in the menus page 31 Auto Image synchs the projector to the source Presets c...

Страница 30: ...optimized the image for a particular source you can save the settings using Presets This allows you to quickly recall these settings later page 33 Presentation features Several features are provided to make giving presentations easier Here is an overview details are found in the menu section The Blank button on the remote allows you to display a blank screen instead of the active source You can de...

Страница 31: ... value page 34 Turn on Overscan to remove noise on the edges of the image Customizing the projector You can customize the projector for your specific setup and needs See page 35 to page 37 for details on these features For rear projection turn rear mode on in the Settings System menu For ceiling mounted projection turn ceiling mode on in the Set tings System menu Specify which source the projector...

Страница 32: ...the menu name The number of dots indicate menu s level ranging from one the Main menu to four the most nested menus The menus are grouped by usage The Picture menu provides image adjustments The Settings menu provides set up type adjustments that are not changed often The About menu provides a read only display of information about the projector and source Certain menu items may not be visible or ...

Страница 33: ...justs a video image from black and white to fully saturated color The color setting applies to video sources only Tint adjusts the red green color balance in the image of NTSC video images The tint setting applies to NTSC video sources only Aspect Ratio Aspect ratio is the ratio of the image width to image height TV screens are usually 4 3 HDTV and most DVDs are 16 9 The default is 16 9 Select Nat...

Страница 34: ...ough the preset inten sity configurations and pick the one you like the best Presets are user definable You can use the preset as a starting point then further customize the settings for each source The settings you customize are saved in the preset for each source To restore the factory default set tings choose Factory Reset in the Settings Service menu page 36 To set a preset for the current sou...

Страница 35: ...the colors may not look right or the image may appear torn If this happens manually select a video standard by selecting NTSC PAL or SECAM from the Video Stan dard menu Overscan video sources only removes noise around the video image Sync Threshhold Adjust If a hardware device such as a DVD player is not syncing properly with the projector select this option to help it to sync when connected to th...

Страница 36: ...age so you can project from behind a translu cent screen Ceiling turns the image upside down for ceiling mounted pro jection Display Messages displays status messages such as Searching or Mute in the lower left corner of the screen NND prevents your notebook computer from going into Screen Save mode if the USB cable is connected Power Save automatically turns the lamp off after no signals are dete...

Страница 37: ...e for the onscreen display Service To use these features highlight them and press Select Factory Reset restores all settings to their default Service Code only used by authorized service personnel About provides information about the projector and the active source Showing the About box is the default action assigned to the Effect button Startup Logo Blank Screen Language menu Service menu About m...

Страница 38: ...to 4 000 hours is exceeded the lamp will not light In this case after replacing the lamp you must reset the lamp hours by simultaneously press ing both Volume buttons on the projector s keypad and holding them for 10 seconds NOTE You can order new lamp housings from your dealer See Accesso ries on page 40 for information Use only a replacement lamp with the same type and rating as the original lam...

Страница 39: ... bulb ruptures small glass fragments may be generated The lamp housing is designed to contain these frag ments but use caution when removing the lamp housing 6 Carefully remove the lamp housing Dispose of the lamp in an environ mentally proper manner 7 Install the new lamp housing and tighten the screws 8 Re attach the lamp connector to the projector The locking tab should engage when the connecto...

Страница 40: ...e the dust filter screens on the lamp housing If necessary use a vacuum cleaner set on low power to clean the screens Be careful not to disturb any internal components when cleaning the screens 3 Replace the lamp housing and lamp door Using the security lock The projector has a security lock for use with a PC Guardian Cable Lock System If you have a PC Guardian Cable Lock System refer to the infor...

Страница 41: ...32 8 feet 1 5 10 m Lamp type 150 W DC SHP lamp Input Power Requirements 100 120 200 240 3 2A 50 60Hz Standard Accessories ship with the projector Part Number Shipping Box with packaging 110 0731 xx Soft Carrying Case 110 0580 xx Computer Cable 6 ft 1 8 m 210 0175 01 S video to Component Adapter 210 0206 xx VGA to Component Adapter 210 0261 xx AV Cable 301379B S video Cable 210 0125 10 Power Cable ...

Страница 42: ... 150 3 8 120 3 1 22 6 6 9 19 03 5 8 200 5 1 160 4 1 30 5 9 3 25 2 7 7 Table 3 Red LED Behavior Explanation One 1 blink The lamp won t strike after five 5 attempts Check the lamp and lamp door installations for loose connections Two 2 blinks The lamp counter hours have exceeded lamp life hours Replace the lamp and reset the lamp hours counter Three 3 blinks The projector has shut down Check to see ...

Страница 43: ...bility IBM compatible 4 Macintosh 4 video devices 4 component cable connector 16 Computer In connector 6 connecting video device 11 connectors on projector 13 14 Contrast 32 Customer Service 26 customizing the projector 30 D Display Messages 35 Drivers USB 10 Windows 98 10 DVDs 32 E e mail techical support 26 F Factory Reset 36 focus 8 18 H HDTV 4 12 32 Horizontal 34 I IBM compatible computers 4 i...

Страница 44: ...Save 19 Power switch 7 presentation features 29 Presets 33 projection distance 5 projector connecting video devices 11 customization 30 keypad buttons 28 maintenance 37 positioning 5 returning for service 26 setting up 5 troubleshooting problems 19 turning off 19 warranty 26 R Rear 35 Red LED behavior 41 replacing the lamp 37 S Screen Aspect 11 security lock 39 Service 36 Service Code 36 Settings ...

Страница 45: ...SB 6 USB using your mouse 6 V vents 3 Vertical 34 Video In connector 15 video optimizing 30 Video Standard 34 volume adjustment 18 Volume button 28 W Windows 2000 10 Windows 98 9 Windows ME 10 Windows XP 10 Z zoom 8 18 sp4800_ug_en fm Page 44 Monday September 29 2003 2 08 PM ...

Страница 46: ...TENDS ONLY TO PRODUCTS PUR CHASED FROM INFOCUS OR AN INFOCUS AUTHORIZED RESELLER InFocus shall have no further obligation under the foregoing Limited War ranty if the Product has been damaged due to abuse misuse neglect smoke exposure cigarette or otherwise accident unusual physical or electrical stress unauthorized modifications including use of an unauthorized mount tampering alterations or serv...

Страница 47: ...e dealer s name and I provides the model and serial num ber of the Product Upon request of InFocus Corporation or an authorized repair center for InFocus proof of legal import must accompany the warranty repair Prod uct otherwise the Product must be returned to the place of original pur chase to the manufacturer Purchaser must bear all tax duty and freight or the Purchaser must bear charges for th...

Страница 48: ...8888 Fax 503 685 8887 http www infocus com In Europe InFocus International B V Strawinskylaan 585 1077 XX Amsterdam The Netherlands Phone 31 20 5792000 Fax 31 20 5792999 In Asia 238A Thomson Road 18 01 04 Novena Square Singapore 307684 Telephone 65 6334 9005 Fax 65 6333 4525 6266SP4800_UG qxd 5 28 03 4 36 PM Page 1 ...

Отзывы: