background image

P l a c i n g   t h e   P r o j e c t o r

2

The distance from the projector lens to the screen 
determines the size of the projected image. Refer 
to the Appendix of the LitePro User’s Guide for 
charts and tables showing these measurements.

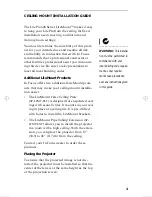
Figure 1

 shows an example of a proper LitePro 

600 LiteMount installation. The room in this 
example has a high ceiling, so the projector is 
mounted on the LiteMount Pipe Tubing Exten-
sion. Note that the projector’s lens is at the same 
height as the top of the projection screen.

F

IGURE

 1

Ceiling-Mounted LP600 Series Projector

010-0132-02-eng-ger.fm  Page 2  Monday, March 31, 1997  11:23 AM

Содержание LP610

Страница 1: ...Installation Guide LitePro 600 Series Ceiling Mount Installation Guide LitePro 600 Series Installationhandbuch zur Deckenbefestigung English page 1 Deutsch page 13 ...

Страница 2: ...010 0132 02 Copyright 1997 by In Focus Systems Inc Wilsonville Oregon All rights reserved Copyright 1997 by In Focus Systems Inc Wilsonville Oregon USA Alle Rechte vorbehalten ...

Страница 3: ...ecautions to meet all local building codes Additional LiteMount Products In Focus offers two additional LiteMount prod ucts that may make your ceiling mount installa tion easier The LiteMount False Ceiling Plate SP LTMT PLT is designed for suspended ceil ings with acoustic tiles It mounts in your ceil ing in place of a ceiling tile It is pre drilled with holes to install the LiteMount brackets The...

Страница 4: ...s Guide for charts and tables showing these measurements Figure 1 shows an example of a proper LitePro 600 LiteMount installation The room in this example has a high ceiling so the projector is mounted on the LiteMount Pipe Tubing Exten sion Note that the projector s lens is at the same height as the top of the projection screen FIGURE 1 Ceiling Mounted LP600 Series Projector ...

Страница 5: ...bracket 4 hardware for installing the projector mount ing bracket on the projector four 4 10 32 x 3 8 Phillips head screws with washers 5 hardware for installing the projector with mounting plate to the base box in the ceiling two 2 8mm hinge pin bolts two 2 10mm black spacers two 2 8mm washers four 4 6mm slotted angle locking bolts ...

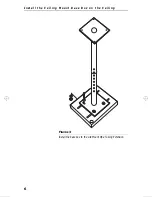
Страница 6: ...her facilities professional to ensure a safe installation Please refer to the LiteMount False Ceiling Plate and LiteMount Pipe Tubing Extension installa tion instructions for lists of included hardware 1 Center the ceiling mount base box on the ceil ing plate as shown in Figure 2 2a LiteMount False Ceiling Plate Align the holes in the base box with the threaded studs on the plate Install the 4 was...

Страница 7: ...pped ceiling is an air handling plenum the cables should be installed within conduit 4 Route the projector s cables through your ceiling and out the hole in the ceiling Figure 6 NOTE When the projec tor is mounted on the ceil ing from the LiteMount False Ceiling Plate it descends 12 25 inches 31 cm from the ceiling FIGURE 2 Install the base box to the LiteMount False Ceiling Plate ...

Страница 8: ...I n s t a l l t h e C e i l i n g M o u n t B a s e B o x o n t h e C e i l i n g 6 FIGURE 3 Install the base box to the LiteMount Pipe Tubing Extension ...

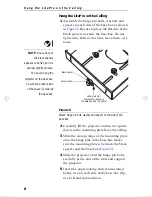
Страница 9: ... holes in the mounting plate with the holes in the bottom of the projector Figure 4 CAUTION Use only the hardware that is provided with the LitePro 600 Series Ceiling Mount Using different hardware may damage the projector 2 Install the 4 screws FIGURE 4 Attach the mounting plate to the projector ...

Страница 10: ...the spacer is towards the base box FIGURE 5 Attach hinge pin bolt washer and spacer to the side of the base box 2 Carefully lift the projector and turn it upside down so the mounting plate faces the ceiling 3 Slide the slot openings of the mounting plate onto the hinge pins in the base box Make sure the mounting plate is between the black spacers and the base box Figure 5 4 Slide the projector unt...

Страница 11: ... projector in posi tion 8 Check all fasteners to make sure they are properly tightened 9 Connect the power cord and the CableWizard cables to the projector Refer to your LitePro User s Guide for information about connecting the cables FIGURE 6 Install the projector in the ceiling base box angle locking bolt hinge pin bolt with washer and spacer ...

Страница 12: ... the disk mouse move the cursor to the Controls tab to display the Controls menu 3 Slide the cursor to the Ceiling Mount box 4 Click either of the two buttons below the disk mouse to invert the image Replacing the Lamp Module Remove the projector from the ceiling base box to replace the lamp Refer to the LitePro User s Guide for lamp removal instructions ...

Страница 13: ... ii the part number of the accessory item or the projec tor panel model number Warranty Limitation and Exclusion In Focus shall have no further obligation under the foregoing limited warranty if the Prod uct has been damaged due to abuse misuse neglect accident unusual physical stress unauthorized modifications tampering alterations or service other than by In Focus causes other than from ordinary...

Страница 14: ......

Страница 15: ...en ein Berufshandwerker bei der Befestigung dieses Geräts behilflich ist Vergewissern Sie sich daß alle örtlich geltenden Bauvorschriften beachtet werden LiteMount Zusatzprodukte In Focus bietet zwei zusätzliche LiteMount Pro dukte an die die Installation der Deckenbefesti gung erleichtern Die LiteMount Zwischendeckenplatte SP LTMT PLT ist für abgehängte Decken mit Schallschutzfliesen vorgesehen S...

Страница 16: ...talliert werden daß sich die Mitte des Objektivs auf der selben Höhe wie der obere Rand des Projektions schirms befindet Die Größe des projizierten Bildes hängt vom Abstand des Projektorobjektivs zum Bildschirm ab Der Anhang im LitePro Bedienerhandbuch ent hält Diagramme und Tabellen mit diesen Maßen ABBILDUNG 1 An der Decke befestigter Projektor der Serie LP600 ...

Страница 17: ...Lieferumfang Das Paket mit der Deckenbefestigung für Lite Pro Projektoren der Serie 600 enthält folgendes 1 Installationsanleitung 2 Deckenbefestigungssockel 3 Projektor Befestigungsbügel 4 Befestigungsmaterial zur Anbringung des Projektor Befestigungsbügels am Projektor vier 4 10 32 x 3 8 inch Kreuzschlitz schrauben 5 Befestigungsmaterial zur Anbringung des Projektors mit der Montageplatte am Soc...

Страница 18: ...den Sie in der Installationsanleitung zur Lite Mount Zwischendeckenplatte Eine Liste der mitgelieferten Befestigungsteile finden Sie in der Installationsanleitung zur Lite Mount Rohrverlängerung 1 Legen Sie den Deckenbefestigungssockel mit tig auf die Deckenplatte wie in Abbildung 2 gezeigt 2a LiteMount Zwischendeckenplatte Richten Sie die Löcher im Sockel an den Gewindestre ben auf der Platte aus...

Страница 19: ...e Kabel sind nicht zur Verwen dung in Luftverteilerkä sten geeignet Handelt es sich bei der abgehäng ten Decke um einen Luftverteilerkasten soll ten die Kabel in einem Kabelkanal verlegt wer den ABBILDUNG 2 Befestigung des Sockels an der LiteMount Zwischendeckenplatte HINWEIS Wenn der Projektor mit der Lite Mount Zwischendecken platte an der Decke befestigt wird hängt er ca 31 cm von der Decke her...

Страница 20: ...L i e f e r u m f a n g 18 ABBILDUNG 3 Befestigung des Sockels an der LiteMount Rohrverlängerung ...

Страница 21: ...den Löchern auf der Unter seite des Projektors aus Abbildung 4 ACHTUNG Verwenden Sie nur die mit der Dek kenbefestigung für Lite Pro Projektor der Serie 600 gelieferten Befesti gungsteile Die Verwen dung anderer Befestigungsteile kann zur Beschädigung des Projektors führen 2 Befestigen Sie die vier Schrauben ABBILDUNG 4 Montage der Befestigungsplatte am Projektor ...

Страница 22: ...ockel darauf daß die gewölbte Seite des Abstandshalters zum Sockel hin zeigt ABBILDUNG 5 Anbringung von Gelenkbolzen Unterlegscheibe und Abstandshalter an der Seite des Sockels 2 Heben Sie den Projektor vorsichtig hoch und drehen Sie ihn um so daß die Befestigungs platte zur Decke hin zeigt 3 Schieben Sie die Schlitzöffnungen der Monta geplatte auf die Gelenkbolzen im Sockel Achten Sie darauf daß ...

Страница 23: ...e die Gelenkbolzen und die vier Winkelsperrbolzen an um den Projektor in der gewünschten Position zu befestigen 8 Überprüfen Sie alle Befestigungsteile um sich zu vergewissern daß sie ordnungsge mäß angezogen sind 9 Schließen Sie das Netzkabel sowie die Cable Wizard Kabel am Projektor an Das LitePro Bedienerhandbuch enthält Anweisungen zum Anschließen der Kabel ABBILDUNG 6 Befestigung des Projekto...

Страница 24: ...it der Disk Maus zum Register Bedienelemente um das Menü Bedienelemente einzublenden 3 Führen Sie den Cursor zum Feld Deckenbefe stigung 4 Klicken Sie auf eine der beiden Tasten unter der Disk Maus um das Bild zu invertieren Die Lampe austauschen Nehmen Sie den Projektor zum Austauschen der Lampe vom Deckensockel herunter Anleitungen zum Herausnehmen der Lampe finden Sie im LitePro Bedienerhandbuc...

Страница 25: ...ummer des Projektors der Konsole enthält Einschränkung und Ausschluß der Garantie In Focus hat im Rahmen der oben genannten eingeschränkten Garantie keine weiteren Verpflichtun gen wenn das Produkt aufgrund von Mißbrauch unsachgemäßer Verwendung Fahrlässigkeit eines Unfalls ungewöhnlicher physikalischer Beanspruchung nicht genehmigten Änderungen bzw Mo difikationen Service Arbeiten die nicht von I...

Страница 26: ... Wilsonville OR 97070 9215 USA 1 800 294 6400 Planetenweg 91 NL 2132 HL Hoofddorp The Netherlands 31 23 5540300 9 Raffles Place 27 01 Republic Plaza Singapore 048619 65 334 9005 010 0132 02 English Deutsch http www infocus com ...

Отзывы: