InFocus IN3128HD Скачать руководство пользователя страница 25

24

Using the menus

1

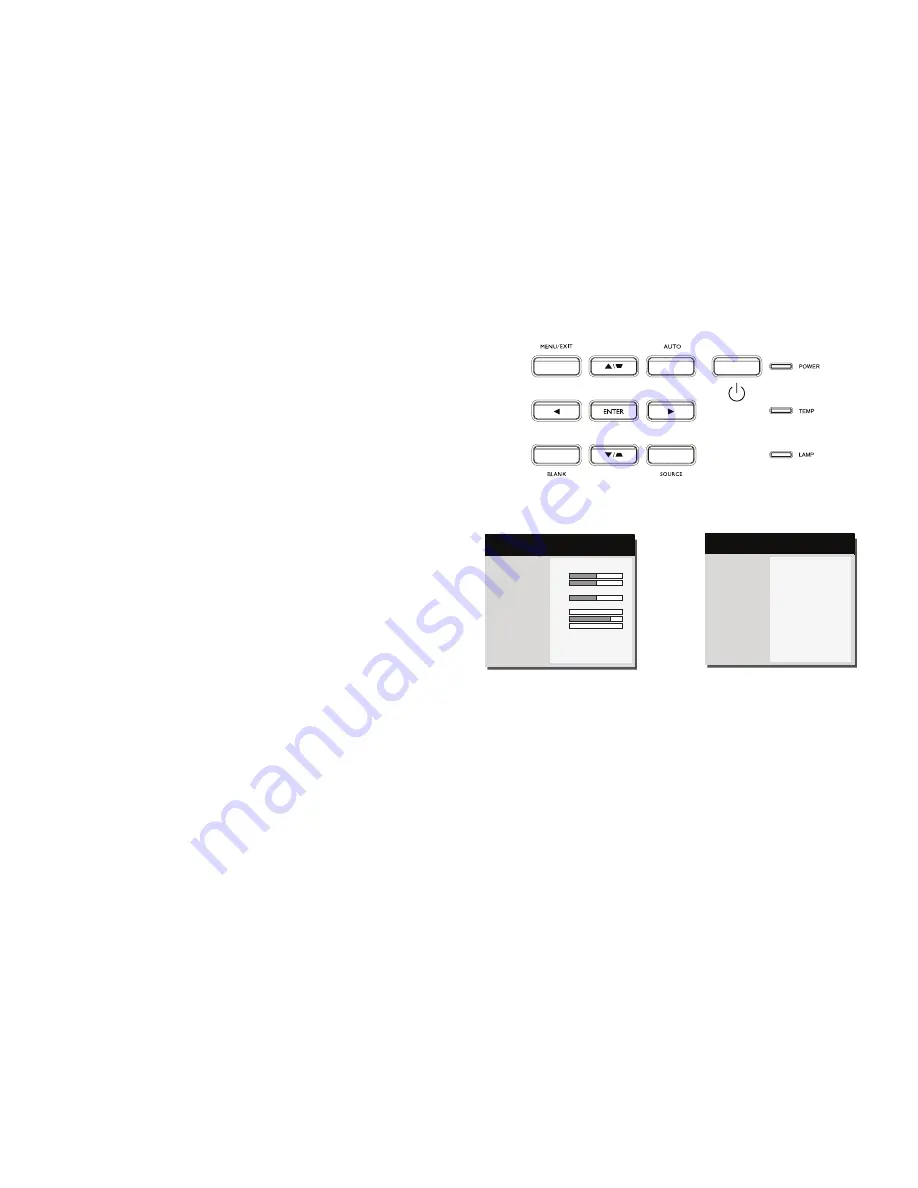
To open the menus, press the Menu button on the keypad or remote. (The 
menus automatically close after 60 seconds if no buttons are pressed.) Use the 
arrow buttons to move up and down to review the menu options.

2

To enter a submenu, highlight the desired submenu and press Enter on the 
keypad or remote.

3

To adjust a menu setting, highlight the desired menu option and press < or > 
to scroll through the available adjustments. 

4

Press the Menu button to exit the menu system.

The menus are grouped by usage:

The Basic Menu provides common adjustments.

The Advanced Menu provides more complex adjustments.

keypad navigation 
buttons

Image

Setup

Status/Service

Basic Menu

Color

PC

Video

(


Advanced Menu

 )

MDL: IN3128HD

FW: 0.10

Basic Menu

Advanced Menu

Aspect Ratio

Auto Image

Brightness

Contrast

Auto Keystone

Keystone

Presets

Sharpness

Volume

Microphone Volume

Ceiling Mount

Advanced Menu

16:9

Execute

50

50

On

+ 0

Presentation

0

16

0

Off

(


Basic Menu

 )

MDL: IN3128HD

FW: 0.10

Содержание IN3128HD

Страница 1: ......

Страница 2: ...wing two conditions 1 This device may not cause harmful interference and 2 this device must accept any interference received including interference that may cause undesired operation Note This equipme...

Страница 3: ...down the projector 11 Troubleshooting your setup 11 Using the remote control 19 Using the audio 20 Using the keypad buttons 21 Optimizing computer images 22 Presentation features 22 Optimizing video...

Страница 4: ...atteries in accordance with local disposal laws Use an InFocus approved ceiling mount kit for proper fitting ventilation and installation The warranty does not cover any damage caused by use of non ap...

Страница 5: ...ia projector be sure to visit our website at www infocus com as specifications are subject to change Accessories The standard accessories that came with your projector are listed in the included Quick...

Страница 6: ...ations from a USB flash drive for connecting a mouse keyboard or wireless adapter and for firmware upgrades USB mini B for presentation slide control LAN RJ45 for network control and video over LAN 12...

Страница 7: ...turn the image upside down see Ceiling mount on page 26 We recommend using an InFocus authorized ceiling mount Position the projector the desired distance from the screen The distance from the lens o...

Страница 8: ...nector on the rear of the projector and to your electrical outlet If the Power Saving Mode feature is off the Power LED on the Status Indicator Panel page 11 blinks blue If the Power Saving Mode featu...

Страница 9: ...op make sure its external video port is active Many laptops do not automatically turn on their external video port when a projector is connected Usually a key combination like FN F8 or CRT LCD key tur...

Страница 10: ...screen press the top Keystone button to reduce the upper part of the image and press the bottom Keystone button to reduce the lower part If the left or right side of the screen is larger or smaller t...

Страница 11: ...f the HDMI connectors HDMI 1 or HDMI 2 on the projector Composite video connection Plug the composite video cable s yellow connector into the video out connector on the video device Plug the other yel...

Страница 12: ...dicates the state of the projector and can help you troubleshoot Table 2 Status indicator light behavior and meaning Status Indicator Light Meaning POWER Solid blue POWER Blinking blue 1 If the Power...

Страница 13: ...creen Plug power cord into the projector press power button Startup Screen Correct image A Startup Screen Only start up screen appears Restart laptop Press the Source button activate laptop s external...

Страница 14: ...ings Adapter tab Varies per operating system You may also need to set a different resolution on your computer as shown in the following problem image fuzzy or cropped Computer image projected A A Only...

Страница 15: ...lay Screen Resolution Varies per operating system A Image clear and not cropped Image not centered on screen Phase Tracking Horz Position Vert Position Previous 100 69 30 100 PC MDL IN3128HD FW 0 10 A...

Страница 16: ...16 0 Off Basic Menu MDL IN3128HD FW 0 10 Adjust Sharpness in the Basic Menu Correct image Image does not fit 4 3 or 16 9 screen Aspect Ratio Auto Image Brightness Contrast Auto Keystone Keystone Pres...

Страница 17: ...c menu Correct image Image reversed left to right A Magnify Level Horz Shift Vert Shift Ceiling Mount Rear Project Previous 0 50 50 Off Off Image Setup MDL IN3128HD FW 0 10 Turn off Rear Project in Ad...

Страница 18: ...off the internal LCD display on your laptop Embedded video plays correctly A B Overheating indicator Lamp won t turn on the projector is overheating Make sure vents aren t blocked turn off the projec...

Страница 19: ...warranty plan may be purchased from your dealer When sending the projector in for repair we recommend shipping the unit in its original packing material or having a professional packaging company pack...

Страница 20: ...select features and adjust values in the menus See page 24 for more info on the menus The remote also has Volume buttons adjust the sound Custom button that can be assigned to a special function like...

Страница 21: ...e Troubleshooting Audio If you aren t hearing the audio check the following Make sure the audio cable is connected to the Audio In or Audio L R connectors on the projector and that the other end of th...

Страница 22: ...n the OSD menu and is used for USB storage device operation page 37 Up Down Left Right arrows When the menu is displayed the up and down buttons navigate through the menu the left and right buttons ar...

Страница 23: ...have optimized the image for a particular source you can save the settings using User Presets This allows you to quickly recall these settings later page 25 Presentation features Several features are...

Страница 24: ...he image page 26 Customizing the projector You can customize the projector for your specific setup and needs See page 26 for details on these features For rear projection turn Rear Project on in the A...

Страница 25: ...press or to scroll through the available adjustments 4 Press the Menu button to exit the menu system The menus are grouped by usage The Basic Menu provides common adjustments The Advanced Menu provide...

Страница 26: ...ystone adjusts the image vertically and makes a squarer image You can also adjust keystone from the keypad Presets Presets are provided that optimize the projector for displaying computer presentation...

Страница 27: ...l HDMI 2 select the audio input for HDMI 2 signal Closed Captioning Closed Captions controls closed captioning If the source is NTSC and contains captions on the selected channel then the projector wi...

Страница 28: ...star tup screen Enter the PIN Use the Up Down Left Right arrows buttons on the remote or keypad to enter the correct 4 button press sequence The default code is Left Right Up Down To change the PIN S...

Страница 29: ...or router to communicate across networks subnets that are divided by a Subnet Mask This function can only be used when DHCP is set to Off DNS Setup DNS server address when DHCP is disabled Apply Save...

Страница 30: ...display contact your network administrator If the RJ45 cables are not properly connected the IP Address Subnet Mask Default Gateway and DNS settings will display 0 0 0 0 Make sure the cables are prop...

Страница 31: ...and projector to the same AP router and make connections with the IP address Controlling the projector remotely through a web browser Once you have the correct IP address for the projector and the pr...

Страница 32: ...ges to your network administrator Network Setup Provides wired and wireless network settings Reset to Default Allows you to restore the device to the factory default settings About Crestron e Control...

Страница 33: ...ric characters on the Tools page After configuring the settings press the Send button and the data will be saved in the projector Press exit to go back to the Crestron remote network operation page Pl...

Страница 34: ...nnected to the same local area network For more information visit http www crestron com and www crestron com getroomview Crestron RoomView From the Crestron RoomView software in the Edit Room page ent...

Страница 35: ...local area network Click the desired projector in the Search result list and click Connect directly You can also type a desired projector name and click Search iii You can link to the InFocus webpage...

Страница 36: ...sages to appear click Yes Click Apply v The Software Information is available on this page 5 The Advanced Setting page allows you to configure ifPresenter i To adjust the image quality click the down...

Страница 37: ...o disconnect from the projector s click the Disconnect icon Be sure to turn off other virtual network control programs before using ifPresenter Icon Description Icon Description You are a standard use...

Страница 38: ...p arrow in the top left corner of the screen and press Enter To exit when you are displaying an image press Enter or Menu Thumbnail To access additional USB display options press the Menu button To cl...

Страница 39: ...FS format is not supported Some USB flash drives may not work correctly with the projector A security enabled USB flash drive is not supported Do not connect any apparatus other than USB storage devic...

Страница 40: ...before cleaning any part of the projector Do not touch or block the projector lens with any objects as this can damage the projector lens Scratches gouges and other lens damage are not covered by the...

Страница 41: ...hen you see the Replace Lamp message To avoid burns allow the projector to cool for at least 60 minutes before you replace the lamp Do not touch or block the projector lens with any objects as this ca...

Страница 42: ...environmentally proper manner 6 Install the new lamp module aligning the pins properly Be careful not to pinch the lamp connector 7 Tighten the screws NOTE If the pins have not been aligned properly t...

Страница 43: ...restron RoomView 33 D DC 12V Trigger 28 Default Gateway 28 Detect Film 26 DHCP 28 Digital Zoom 26 DNS 28 F Factory Reset 28 Focus 9 Freeze Screen 26 G Gamma 26 H HDTV 25 High Altitude Setting 27 Horz...

Страница 44: ...ector 28 S Screen Aspect 10 Search Screen 27 Service 28 Set Black Level 26 Sharpness 25 Show Messages 27 Source 26 Source Info 27 28 SSID 28 Status 28 Subnet Mask 28 T Tint 26 Tracking 26 Troubleshoot...

Отзывы: