background image

3

Important Operating Considerations for Safety

Refer to this guide for proper startup and shutdown procedures.

Follow all warnings and cautions in this manual and on the projector.

Place the projector in a horizontal position no greater than 8 degrees off 

axis.

Locate the projector at least 4' (1.2m) away from any heating or cooling 

vents.

Do not block ventilation openings. Locate the projector in a well-

ventilated area without obstructions to intake or exhaust vents. Do not 

place the projector on a tablecloth or other soft covering that may block 

the vents.

Do not place the projector in direct sunlight, humid, greasy or dusty 

places or in places where the projector may come into contact with 

smoke or steam.

Do not look directly into the lens while the projector is being used.

Do not drop the projector.

Do not spill liquid on the projector. Spilled liquid may damage the 

projector.

Use the power cord provided. Connect the power cord to a receptacle 

with a protective safety (earth) ground terminal. A surge-protected 

power strip is recommended.

Do not overload wall outlets.

When disconnecting the power cord, hold the plug, not the cord.

Wash hands after handling the cables supplied with this product.

The projector remote control uses batteries. Make sure the batteries’ 

polarity (+/-) is aligned correctly. Dispose of used batteries in 

accordance with local disposal laws.

Use an InFocus approved ceiling mount kit for proper fitting, 

ventilation and installation.  The warranty does not cover any damage 

caused by use of non-approved ceiling mount kits or by installing in an 

improper location. 

When the projector is ceiling mounted, wear protective eyewear to 

prevent eye injury before opening lamp door.

Refer all service to qualified service personnel. Servicing your own 

projector can be dangerous to you and will void the warranty.

Only use replacement parts specified by InFocus.  Unauthorized 

substitutions may result in fire, electrical shock, or injury, and may 

void the warranty

Only genuine InFocus lamps are tested for use in this projector. Use of 

non InFocus lamps may cause electrical shock and fire, and may void 

the projector warranty. 

Hg – Lamp contains mercury. Manage in accordance with local 

disposal laws. See 

www.lamprecycle.org

.

The projector uses a high-pressure mercury glass lamp.  The lamp may 

fail prematurely, or it may rupture with a popping sound if jolted, 

scratched, or handled while hot.  The risk of lamp failure or rupture 

also increases as the lamp age increases; please replace the lamp when 

you see the “Replace Lamp” message.

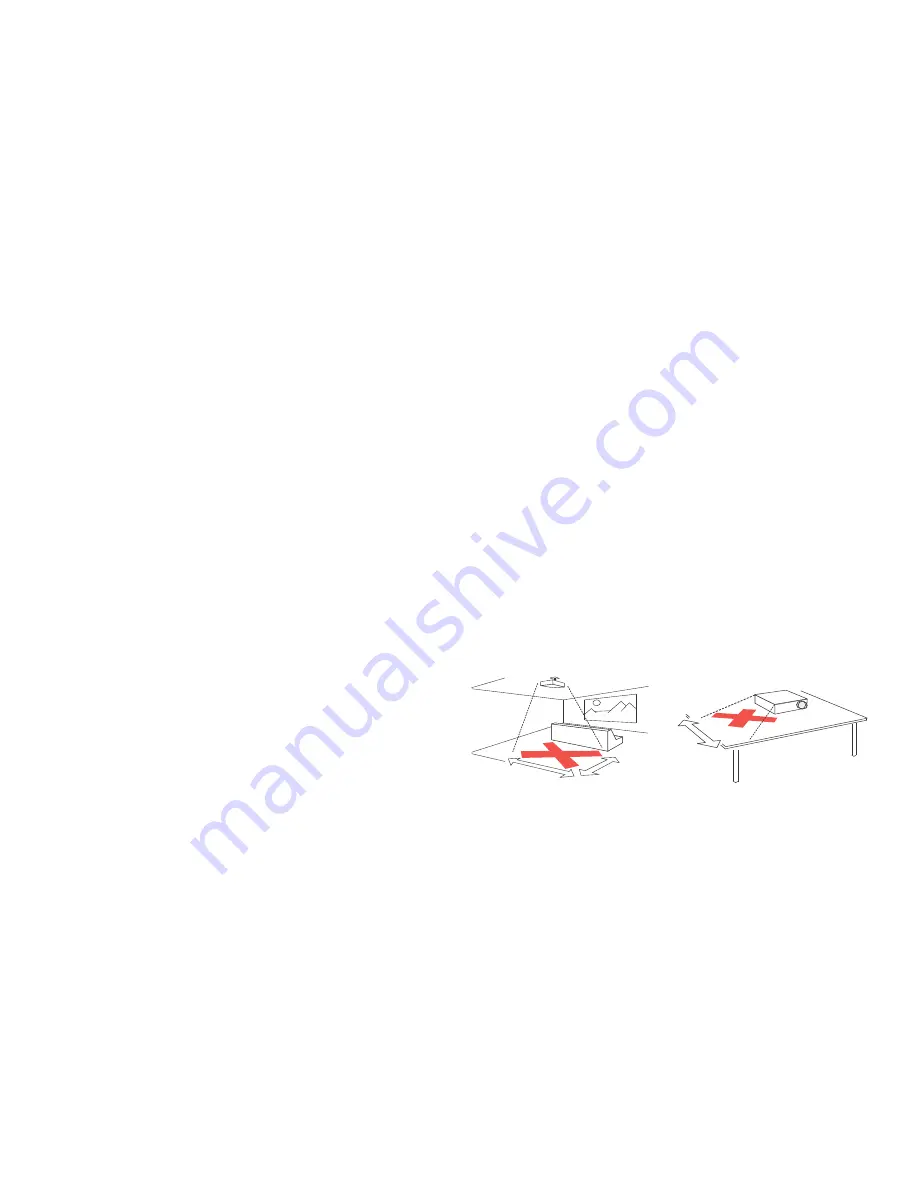
In the unlikely event of a lamp rupture, particles may exit through the 

projector vents. Keep people, food, and drinks out of the "keep out" 

area under and around the projector, as indicated by the "X" areas 

below.

5’ /

1.5

m

8’ / 2.4 m

2’ / 0.6 m

Follow these instructions to help ensure image quality and lamp life over 

the life of the projector. Failure to follow these instructions may affect the 

warranty. For complete details of the warranty, see the Warranty Booklet.

Содержание IN3114

Страница 1: ...Regulatory models M3100 IN3114 IN3116 010 0738 01...

Страница 2: ...nd to comply with the limits for a Class B digital device pursuant to part 15 of the FCC Rules These lim its are designed to provide reasonable protection against harmful interfer ence in a residentia...

Страница 3: ...ubleshooting your setup 14 Using the remote control 22 Using the audio 23 Using the keypad buttons 24 Optimizing computer images 24 Presentation features 24 Optimizing video images 25 Customizing the...

Страница 4: ...g mount kit for proper fitting ventilation and installation The warranty does not cover any damage caused by use of non approved ceiling mount kits or by installing in an improper location When the pr...

Страница 5: ...ons are subject to change Online registration Register your projector on our website at www infocus com register to activate your warranty and receive product updates announcements and registration in...

Страница 6: ...a USB flash drive containing JPEG images Audio out to provide sound for external speakers 5 volt DC output RS 232 connector for serial control Command control codes are available on our support websit...

Страница 7: ...rom the lens of the projector to the screen the zoom setting and the video format determine the size of the projected image The image exits the projector at a given angle This image offset is 115 This...

Страница 8: ...er any dam age caused by use of non approved ceiling mount kits or by installing in an improper location The ceiling must be strong enough to support the projector and the installation must be in acco...

Страница 9: ...ooting and to download the latest DisplayLink software go to www infocus com support displaylink VGA connection Connect one end of the provided computer cable to the VGA 1 or VGA 2 connector on the pr...

Страница 10: ...creen as well as on the projection screen connect the computer s monitor cable to the Monitor Out connector on the projector NOTE Only VGA video is sent to the Monitor out connector To display a prese...

Страница 11: ...s active Many laptops do not automatically turn on their external video port when a projector is connected Usually a key combination like Fn F8 or CRT LCD key turns the external display on and off Loc...

Страница 12: ...ble listing to screen sizes and distances Adjust the zoom or focus If the image is not square first make sure that the projector is perpendicular to the screen To reduce the size of the top edge of th...

Страница 13: ...ideo device and into the HDMI connector on the projector To take advantage of HDMI 1 3 Deep Color 30 bit you must have a 1 3 compatible source Composite video connection Plug the composite video cable...

Страница 14: ...ou plan to project will also help you choose between 4 3 16 9 or 16 10 Many TV shows are 4 3 while most movies are 16 9 If you have a 16 9 screen then you should select an aspect ratio of 16 9 for wid...

Страница 15: ...tor indicates the state of the projector and is a helpful when troubleshooting Table 3 Status indicator light behavior and meaning Icon Meaning Power solid amber Power blinking green Power solid green...

Страница 16: ...image Startup Screen A Startup Screen Only start up screen appears If your computer is using the projector s DisplayLink connector see the DisplayLink Software User s Guide for troubleshooting informa...

Страница 17: ...eed to set a different resolution on your computer as shown in the following problem image fuzzy or cropped Computer image projected Only my laptop s background appears not the Desktop icons A Display...

Страница 18: ...ual display mode Set your computer s display resolution to the native resolution of the projector Start Settings Control Panel Display Settings tab A Image clear and not cropped Image not centered on...

Страница 19: ...c Picture menu Square image Image not sharp Adjust Sharpness in the Basic Picture menu Correct image Image does not fit 4 3 or 16 9 screen Change aspect ratio to 4 3 or 16 9 in Basic Picture Aspect Ra...

Страница 20: ...age reversed left to right A Turn off Rear Project in Setup menu Correct image COLOR Projected colors don t match source Adjust color tint brightness contrast in the Basic Picture menu and or color sp...

Страница 21: ...splayLink Software User s Guide for video troubleshooting information Turn off the internal LCD display on your laptop Embedded video plays correctly A B Lamp won t turn on Temperature light is on Tem...

Страница 22: ...n extended warranty plan may be purchased from your dealer When sending the projector in for repair we recommend shipping the unit in its original packing material or having a professional packaging c...

Страница 23: ...ff see page 14 for shutdown information Press the remote s Menu button to open the projector s menu system Use the arrow buttons to navigate and the Select button to select features and adjust values...

Страница 24: ...cable is connected to the correct audio in connector Computer or Video Make sure the volume is turned up enough Press the Volume button on the keypad or remote Make sure you are connected to the corre...

Страница 25: ...ption that best fits your input source page 27 Adjust the Color Temperature in the Advanced Picture menu page 28 Adjust the Phase Tracking or Horizontal or Vertical position in the Advanced Picture me...

Страница 26: ...ojection turn Ceiling Mount on in the Setup menu Specify which source the projector checks first for active video during power up Specify the function of the Custom key on the remote Turn the projecto...

Страница 27: ...es Use the arrow buttons to navigate to another setting When your adjustments are complete press Menu to access a different menu press the Menu button at any time to navigate to the higher level menu...

Страница 28: ...width to image height TV screens are usually 4 3 HDTV and most DVDs are 16 9 Select Auto to have the projector choose the ratio Choose Native to see the unmodified input with no resizing by the proje...

Страница 29: ...option applies to computer and component video sources It allows you to select a color space that has been specifically tuned for the input signal When Auto is selected the projector automatically de...

Страница 30: ...hat to display when the blank key on the remote is depressed your custom snapshot a solid color screen blue black or white the factory logo screen a timer or test patterns The timer option is useful f...

Страница 31: ...g is not off and audio is not muted and the source is NTSC and contains captions on the selected channel then the projector must display caption text overlaid on the image Ceiling Mount Turns the imag...

Страница 32: ...order to access the Wrong PIN message and re enter the code To enter the PIN at projector startup Power up the projector The Enter PIN dialog box appears after the startup screen Enter the PIN Use the...

Страница 33: ...rvice menu Help Press Help on the keypad or remote at any time to get interactive help for solving common picture sound and cabling problems NOTE The projector can be re programmed to display a custom...

Страница 34: ...lect the Network item in the projector s Setup menu 2 If DHCP is on select it to turn it off NOTE If you still don t see an IP address go to the projector s Setup menu select Network then turn on Show...

Страница 35: ...ludes basic remote control functions other tabs correspond to the projector s menus NOTE If a Basic User is logged in only the Controls Basic Picture and Advanced Pic ture tabs are shown In each tab t...

Страница 36: ...of time elapsed allowing it to maintain the correct time and date SNTP Server The address of the time and date server on your network Time Zone The projector s time zone if you are in a different time...

Страница 37: ...to erase all events in the log Network Utilities Page administrators only This page lets you perform various network related projector tasks Save and Load Projector Configuration These functions save...

Страница 38: ...nging any settings or Network Factory Reset to return all network settings back to default values and then restart the network subsystem If the manual restart procedure does not work To force the netw...

Страница 39: ...mage is high lighted to start the slide show or press Select when a folder is highlighted to open that folder To start the slide show While viewing thumbnails press the arrow buttons to highlight a th...

Страница 40: ...d to save a presentation as separate JPEG files 1 Connect the USB flash drive to your computer 2 Open your PowerPoint document 3 This step is optional but improves image quality Click the Design tab n...

Страница 41: ...see a blank screen or a logo or the wrong input source com puter video etc instead of your images Keep pressing the Source button on the keypad or remote until the LitePort message is displayed if yo...

Страница 42: ...s Abrasive cleaners solvents or other harsh chemicals might scratch the lens 4 Lightly wipe the cleaning cloth over the lens in a circular motion WARNINGS Turn the projector off and unplug power cord...

Страница 43: ...the projector to cool for at least 60 minutes before you replace the lamp Unplug the power cord before replacing the lamp Do not drop the lamp module The glass may shatter and cause injury Do not tou...

Страница 44: ...place 7 Tighten the captive screws 8 Replace the top front cover and tighten both screws 9 Plug in the power cord and press the Power button to turn the projector back on 10 To reset the lamp hour tim...

Страница 45: ...age 26 Monitor Out connector 9 N Network Using network functions 33 O Optimizing computer images 24 Optimizing video images 25 P Position the projector 6 Power connector 8 Power cord 8 Presentation fe...

Страница 46: ...45 V Viewing a slide show 37 Volume button 23 W Warranty 21 Z Zoom 11...

Отзывы: