background image

32

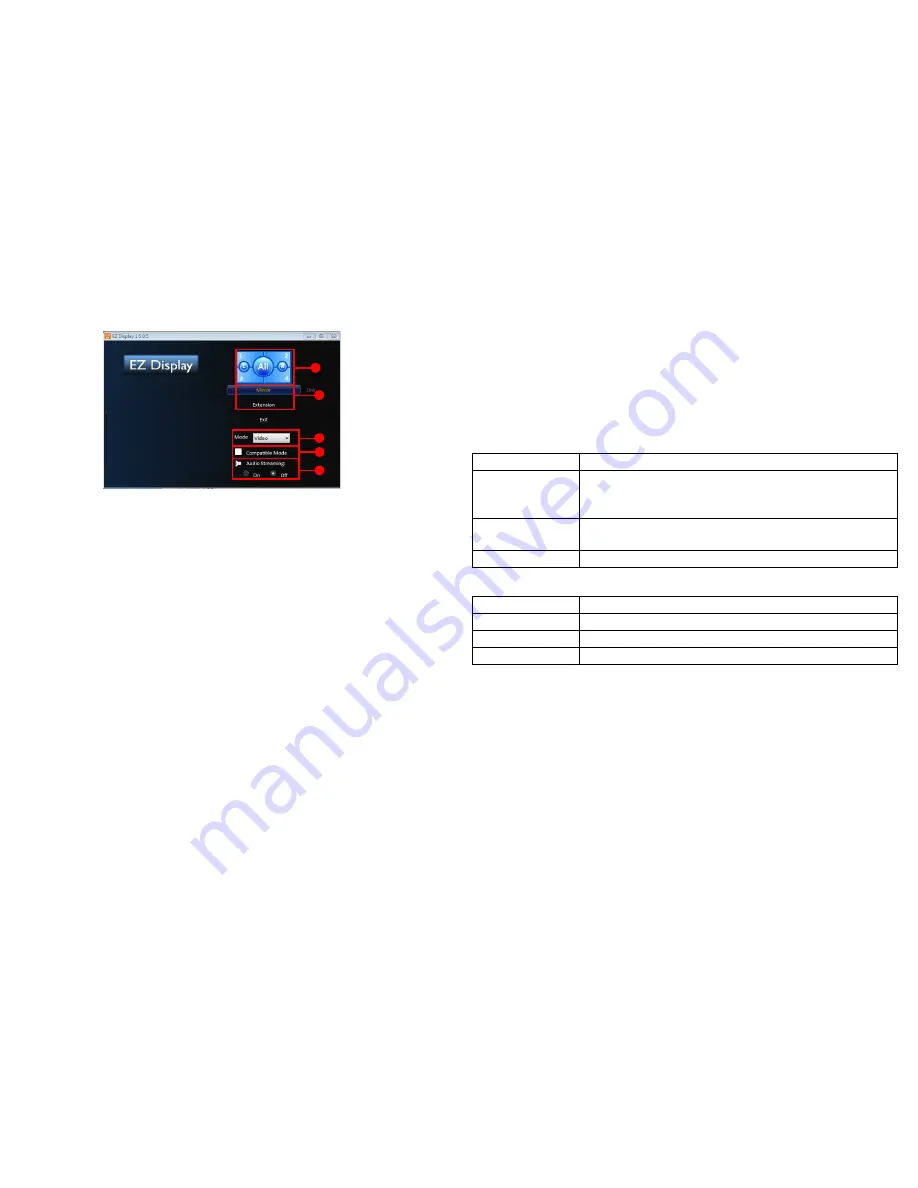
Using EZ Display

i.

4 to 1 Display: To display up to 4 computers simultaneously, click on the 
location you want to display to. If you only have 2 computers, choose L (left) 
or R (right). To display in full screen mode, click All. You can change the 
location at any time.

ii.

Mirror/Extended Display: To duplicate your computer display onto the pro-
jector, click Mirror. To extend your desktop display onto the projector, click 
Extension.

iii.

Video/Graphic Display: To display the best image quality, but with a slightly 
slower transmission speed, click Video. To display images faster, but with 
slightly less quality, click Graphic. Note: Transmission performance is deter-
mined by your network speed.

iv.

Compatibility Mode: Check the Compatibility mode box, if the projector is 
having trouble displaying video from any media players.

v.

Audio Streaming: To turn Audio Streaming on or off, click On or Off as 
appropriate.

Note: Supported functions vary per computer’s operating system.

Projecting from Smartphones/Tablets

EZ Display is a special program to project your iOS or Android device display to a 

projector through a WiFi connection. You can remotely control the projector, 

decode document files, link to your dropbox account, surf the web, view photos, 

display a live camera feed and transfer files wirelessly. You can even annotate 

documents, webpages and photos and save them for sharing.

System Requirements

iOS

Android

Installation for Android and iOS

Search for “EZ Display” and “EZ Remote” in Google Play or App Store, then 

download and install the applications. Before downloading, please make sure your 

device is supported.

Start up

1

Insert the optional USB WiFi Adapter (SP-WIFIUSB-2) into the USB Type A 
input.

2

Select the connection mode in the Settings > WiFi from Type-A source. See 
page 29 for details.

iii

iv

v

i

ii

iOS

iOS 5.1 and above

Device

All iPhone model after iPhone 3GS
All iPad model after iPad 2
All iPod touch after iPod touch 4th generation

Resolution support

iPhone: 480x320~1136x640
iPad: 1024x768~2048x1536

Storage

At least 20MB free space needed

OS

Android ICS 4.0 and above

CPU

1Ghz above

Memory

1GB DDR above

Storage

At least 20MB free space needed

Содержание IN122A

Страница 1: ......

Страница 2: ...following two conditions 1 This device may not cause harmful interference and 2 this device must accept any interference received including interference that may cause undesired operation Note This eq...

Страница 3: ...own the projector 11 Troubleshooting your setup 11 Using the remote control 19 Using the audio 20 Using the keypad buttons 21 Optimizing computer images 22 Presentation features 22 Optimizing video im...

Страница 4: ...n InFocus approved ceiling mount kit for proper fitting ventilation and installation The warranty does not cover any damage caused by use of non approved ceiling mount kits or by installing in an impr...

Страница 5: ...ur multimedia projector be sure to visit our website at www infocus com as specifications are subject to change Accessories The standard accessories that came with your projector are listed in the inc...

Страница 6: ...d EZ media firmware upgrade USB A View photos movies documents and listen to audio from USB drive display wirelessly with optional WiFi adapter Monitor out for VGA pass through to an external monitor...

Страница 7: ...he projector the desired distance from the screen The distance from the lens of the projector to the screen and the video format determine the size of the projected image Model Minimum Distance to Scr...

Страница 8: ...necting power Connect the black power cord to the Power connector on the rear of the projector and to your electrical outlet If the Power Saving Mode feature is off the Power LED on the Status Indicat...

Страница 9: ...ector s keypad or remote If you are using a VGA cable to connect your computer to the projector If using a laptop make sure its external video port is active Many laptops do not automatically turn on...

Страница 10: ...mage is larger or smaller on the top or bottom edge of the screen press the top Keystone button to reduce the upper part of the image and press the bottom Keystone button to reduce the lower part If t...

Страница 11: ...es an interface between sources such as set top boxes DVD players and receivers and your projector Plug an HDMI cable into the video out connector on the video device and into the HDMI connector on th...

Страница 12: ...tate of the projector and can help you troubleshoot Table 3 Indicator Lights Status Indicator Light Meaning POWER Solid Blue TEMP Off LAMP Off POWER Blinking Blue TEMP Off LAMP Off 1 If the Power Savi...

Страница 13: ...screen Plug power cord into the projector press the Power button Correct image Only start up screen appears Press the SOURCE button activate laptop s external port Computer image projected Startup Scr...

Страница 14: ...r operating system You may also need to set a different resolution on your computer as shown in the following problem image fuzzy or cropped Computer image projected Only my laptop s background appear...

Страница 15: ...r operating system Image clear and not cropped Image not centered on screen Move projector adjust height Correct image Problem Solution Result A A A Force Wide Phase Prevent PC Screen Saver Sync Thres...

Страница 16: ...rrect image Problem Solution Result Aspect Ratio Auto Image Brightness Contrast Auto Keystone Keystone Presets Sharpness Volume Ceiling Mount Advanced Menu Auto Execute 50 50 Off 0 Presentation 16 16...

Страница 17: ...s Contrast Auto Keystone Keystone Presets Sharpness Volume Ceiling Mount Advanced Menu Auto Execute 50 50 Off 0 Presentation 16 16 Off Basic Menu MDL IN124a FW 1 12 A Digital Zoom Horz Shift Vert Shif...

Страница 18: ...internal LCD display on your laptop Embedded video plays correctly Lamp won t turn on the projector is overheating Make sure vents aren t blocked turn off the projector and allow it to cool for one m...

Страница 19: ...ranty plan may be purchased from your dealer When sending the projector in for repair we recommend shipping the unit in its original packing material or having a professional packaging company pack th...

Страница 20: ...select features and adjust values in the menus See page 24 for more info on the menus The remote also has Volume buttons adjust the sound Custom button that can be assigned to a special function like...

Страница 21: ...eshooting Audio If you aren t hearing the audio check the following Make sure the audio cable is connected to the Audio 1 Audio 2 connector on the projector and that the other end of the cable is conn...

Страница 22: ...image page 9 Down arrow Keystone When the menu is displayed the down arrow button navigates through the menu When the menu is not displayed this button adjusts the squareness of the image page 9 Left...

Страница 23: ...page 25 Presentation features Several features are provided to make giving presentations easier Here is an overview details are found in the menu section The Custom key allows you to assign various fe...

Страница 24: ...oise on the edges of the image page 26 Customizing the projector You can customize the projector for your specific setup and needs See page 27 for details on these features For rear projection turn Re...

Страница 25: ...on and press or to scroll through the available adjustments 4 Press the Menu button to exit the menu system The menus are grouped by usage The Basic Menu provides common adjustments The Advanced Menu...

Страница 26: ...the image Auto Keystone automatically corrects distorted images resulting from an angled projection Keystone adjusts the image vertically and makes a squarer image You can also adjust keystone from t...

Страница 27: ...lect the appropriate gamma from among Video Film Bright and CRT Tint adjusts the red green color balance in the image of NTSC video images The tint setting applies to NTSC video sources only White Int...

Страница 28: ...the Horz Shift and Vert Shift settings Ceiling Mount turns the image upside down for ceiling mounted projection Rear Project reverses the image so you can project from behind a translucent screen Keyp...

Страница 29: ...ox appears after the startup screen Enter the PIN Use the Left Right Up Down arrows buttons on the remote or keypad to enter the correct 4 button press sequence See the description above for instruc t...

Страница 30: ...s only after changing the lamp Factory Reset restores all settings to their factory default settings Service Code only used by authorized service personnel Controlling the projector through a WLAN env...

Страница 31: ...rojector and the projector is on or in standby mode you can use any computer that is on the same local area network to control the projector If you are using Microsoft Internet Explorer make sure it i...

Страница 32: ...on for Windows and Macintosh EZ Display is an application which can run on the host PC It helps connect your computer to an available network projector and transfer the desktop content to the network...

Страница 33: ...Smartphones Tablets EZ Display is a special program to project your iOS or Android device display to a projector through a WiFi connection You can remotely control the projector decode document files...

Страница 34: ...d for future feature EZ Display Launch EZ Display and it will scan for and list the device s IP address When you click the device a passcode is required Enter the 4 digit number shown on your projecto...

Страница 35: ...done editing EZ Display Pix Viewer To display your photos select Photo Gallery and select your photo You can also draw on it with the Sketch feature EZ Display Live Cam Live Cam will project what your...

Страница 36: ...e Client Info page The default home page is www google com EZ Display Dropbox Once you have allowed EZ Display to access your Dropbox account you will be able to log in using your Account ID and passw...

Страница 37: ...Windows XP 32 64bit SP3 Professional or above Windows Vista 32 64bit SP2 Home premium and above Windows 7 32 64bit SP1 Home premium and above and Windows 8 Mac OS 10 7 and later System Requirements Wi...

Страница 38: ...e arrow keys to navigate up and down left and right The right hand menus change based on the left hand menu selection To select a menu option press the right hand arrow To return to the previous EZ Su...

Страница 39: ...elect picture rotation Toggle the Enter Select four arrow keys to rotate the picture counterclockwise press Menu key to exit from it Toggle Enter Select to zoom in the picture by x0 x1 x2 x3 x4 in seq...

Страница 40: ...video file Down Go to the next video file Select Enter Play the video Menu Exit video playlist and return to EZ Suite main menu USB Photo Video Audio Office viewer EZ Suite Internal Memory Press to Ex...

Страница 41: ...Down Go to the next audio file Left Display the sort type Select Enter Play the audio file Menu Exit audio playlist and return to EZ Suite main menu USB Photo Video Audio Office viewer EZ Suite Intern...

Страница 42: ...toolbar first and press Select Enter key Note The file name displays in the upper left corner of the Office Viewer toolbar The current page number and number of pages appears on the upper right corne...

Страница 43: ...hoto Description Display Ratio Sets the display aspect ratio Slideshow Enables slide show mode Slideshow Duration Sets the time interval each image displays Video Description Display Ratio Sets the di...

Страница 44: ...h Profile Levels 1 4 1 1080P 30fps 20Mbps Only supports 1 3 reference frames XVID Up to Advance Simple profile 1080P 30fps 20Mbps MPEG2 Main profile Low and Main Levels 1080P 30fps 20Mbps MPEG4 Advanc...

Страница 45: ...Word BritishWord 95 Because Office Viewer does not load all pages of a Word file simultaneously there are no obvious page or line limitations Up to 100MB Simplified Chinese bold text is not supported...

Страница 46: ...before cleaning any part of the projector Do not touch or block the projector lens with any objects as this can damage the projector lens Scratches gouges and other lens damage are not covered by the...

Страница 47: ...s allow the projector to cool for at least 60 minutes before you replace the lamp Do not touch or block the projector lens with any objects as this can damage the projector lens Scratches gouges and o...

Страница 48: ...lamp in an environmentally proper manner 6 Install the new lamp module aligning the pins properly Be careful not to pinch the lamp connector 7 Tighten the screws NOTE If the pins have not been aligned...

Страница 49: ...g Video device 10 Connecting a video device 10 Contacting InFocus 18 Contrast 25 Crestron RoomView 31 Customer service contact information 18 D Detect Film 26 Digital Zoom 27 E Eco Blanking 28 EZ Disp...

Страница 50: ...oject 27 Red Green Blue Gain 26 Red Green Blue Offset 26 remote control 19 Resetting the projector 29 Restart Network 29 S Screen Aspect 10 Search Screen 28 Service 29 Set Black Level 26 Sharpness 25...

Отзывы: