Infoblox Trinzic Reporting 1400 Скачать руководство пользователя страница 13

For the Trinzic Reporting 1400 Appliance 

13

Installing an Appliance

Follow these instructions to rack mount the Trinzic Reporting 1400 appliance, connect it to a power source, and 
cable it to a network. Before proceeding, review the 

Infoblox Safety Guide

 and follow the necessary precautions.

Rack Mounting

The Trinzic Reporting 1400 appliance mounts into a standard 19” (48 cm) equipment rack. The appliance ships with 
accessory kits that contain the following: a pair of rack slide brackets and chassis slide rails, a pair of rack ears, 
eight (8) 10-32 screws, and eight (8) 8-32 screws. To mount the appliance to an equipment rack, you also need a 
#2 screwdriver with a cross-headed tip. There are two ways to rack mount the Trinzic Reporting 1400:

Two-post rack mount

Four-post rack mount

Two-Post Rack Mount

To mount the appliance to an equipment rack and secure it at the rear rack posts:

1.

Align the mounting holes on the rack ears with the rear-most mounting holes on each side of the chassis.

2.

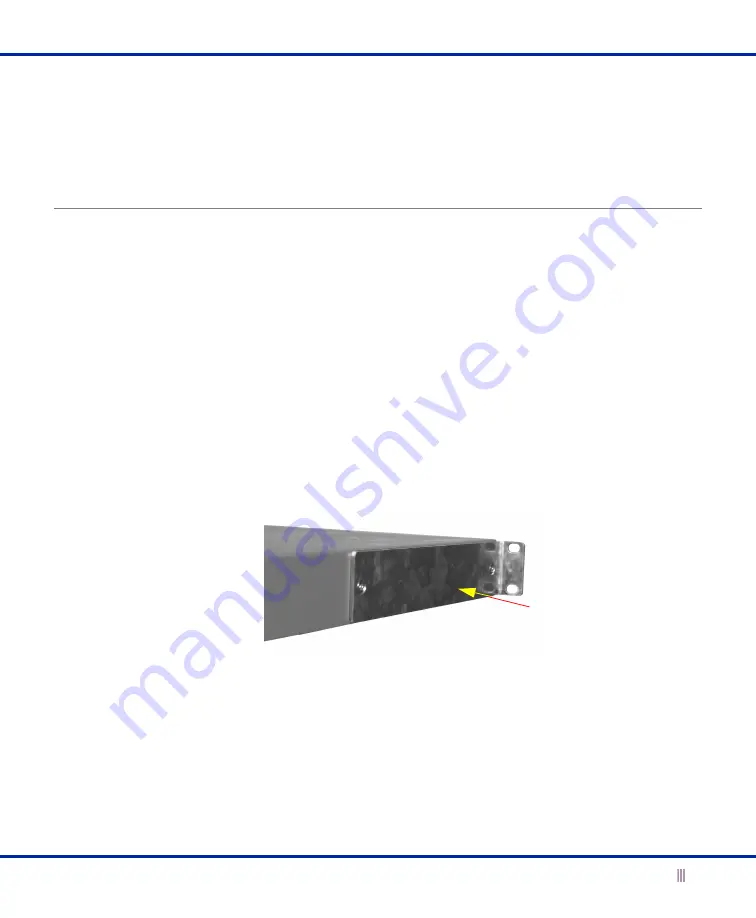
Attach each rack ear on each side of the chassis with two (2) 8-32 screws, as shown in 

Figure 6

.

Figure 6  

Rack Ears in Two-Post Rack Mount

3.

With one person on each side, lift the appliance and position it in the equipment rack.

4.

Attach each rack ear to the equipment rack with two (2) 10-32 screws on each side.

Rack Ear

Содержание Trinzic Reporting 1400

Страница 1: ...For the Trinzic 1400 Appliances 1 Infoblox Installation Guide Trinzic Reporting 1400 Appliance...

Страница 2: ...foblox NIOS Administrator Guide Trademark Statements Infoblox the Infoblox logo Grid NIOS bloxTools NetMRI Trinzic and PortIQ are trademarks or registered trademarks of Infoblox Inc All other trademar...

Страница 3: ...the Appliance 15 Cabling the Appliance to a Network 15 Accessing the Appliance 17 Connecting to the Appliance 18 Specifying Appliance Settings 19 Infoblox GUI 21 Infoblox CLI 22 System Device Replace...

Страница 4: ...Contents 4 Infoblox Installation Guide...

Страница 5: ...ase and generates reports that provide statistical data about IPAM DNS DHCP and system activities and performance It can receive up to 5 GB of data each day You configure and manage the Trinzic Report...

Страница 6: ...described in Table 1 Table 1 Front Panel Components Component Description LCD Panel An LCD screen that displays network settings software version number hardware serial number and software licenses Y...

Страница 7: ...agement or DNS service You can enable the MGMT port and define its use through the GUI after the initial setup HA Port High Availability system failover port The HA port is disabled The Trinzic Report...

Страница 8: ...guration see 10 Gigabit Ethernet Support section The DB 9 and RJ 45 connector pin assignments are described in Figure 3 The DB 9 pin assignments follow the EIA232 standard To make a serial connection...

Страница 9: ...h Wire Color T568B Straight Through Wire Color 1 Transmit BI_DA White Green White Orange 2 Transmit BI_DA Green Orange 3 Receive BI_DB White Orange White Green 4 not used BI_DC Blue Blue 5 not used BI...

Страница 10: ...GbE support accepts Infoblox provided SFP 10GbE Short Range and Long Range transceivers Cisco SFP Direct Attach 10GSFP Cu or HP HPJ9283B SFP Direct Attach 10GSFP Cu transceivers You may mix media type...

Страница 11: ...e the hard drive is processing data Fans A fan system 5 fans total to help maintain optimum operating temperature Do not obstruct UID LED Blue UID is activated through pressing the UID button on the a...

Страница 12: ...DB 9 9600 8n1 Xon Xoff USB Port USB2 0 1 1 compliant LCD Panel LCD liquid crystal display with input buttons Environmental Specifications Operating Temperature 41 to 104 degrees F 5 to 40 degrees C St...

Страница 13: ...and eight 8 8 32 screws To mount the appliance to an equipment rack you also need a 2 screwdriver with a cross headed tip There are two ways to rack mount the Trinzic Reporting 1400 Two post rack mou...

Страница 14: ...lign the mounting holes on the chassis slide rails with the rear most mounting holes on each side of the chassis Ensure that you place the chassis slide rails in the correct orientation Otherwise the...

Страница 15: ...the other Note If your appliance comes with one power supply and an empty module ensure that the power supply is in the PSU 1 slot and the empty module in the 2 slot You cannot switch them To power th...

Страница 16: ...tion ports and the Ethernet ports on a connecting switch If the appliance fails to auto negotiate the optimal settings see the Infoblox NIOS Administrator Guide for steps you can take to resolve the p...

Страница 17: ...Access Microsoft Windows 8 Microsoft Internet Explorer 10 x Mozilla Firefox 21 x 16 x and 10 x Google Chrome 27 x 22 x and 16 x Microsoft Windows 7 Microsoft Internet Explorer 8 x and 9 x Mozilla Fire...

Страница 18: ...initial network settings using the Infoblox CLI Note Only a properly grounded USB to Serial dongle is allowed to connect to the serial console port If the dongle is connected to a laptop this laptop...

Страница 19: ...he Infoblox NIOS Administrator Guide 1 Open an Internet browser window and enter https IP address or hostname of your reporting appliance 2 Accept the certificate when prompted A certificate warning a...

Страница 20: ...ing the reporting appliance On the last screen of the wizard click Finish The Infoblox GUI application restarts Settings Enter your information here Grid Name Shared Secret Host Name Grid Master s IP...

Страница 21: ...e 21 Infoblox GUI You can view reporting data and configuration settings and make configuration changes through the Reporting tab of the Infoblox GUI Figure 11 Infoblox GUI Overview Finder Panel Works...

Страница 22: ...es dig Perform a DNS lookup and print the results exit Exit command interpreter help Display help ping Send ICMP ECHO quit Exit command interpreter reboot Reboot device reset Reset system settings set...

Страница 23: ...disk subsystem RAID 1 uses two disk drives for mirroring so that each disk in the logical volume is fully redundant Figure 12 RAID 1 Array Configuration Evaluating the Status of the Disk Subsystem You...

Страница 24: ...the release button to unlatch the disk 3 Use the catch release lever to pull the disk about two cm one inch to disengage contact as indicated in Figure 13 Figure 13 Pull the catch release lever to re...

Страница 25: ...r any reason the Infoblox GUI displays a power supply alarm The Grid Status widget on the Dashboard of the GUI also displays an error The appliance sends an email notification and reports an SNMP trap...

Страница 26: ...place 5 Reconnect the power cable 6 Turn on the power supply If it is fully seated powered on and operating properly the LED glows steady green You can order an additional power supply to set up a red...

Страница 27: ...oblox supports SFP SFP transceivers of various types for 1GbE and 10GbE networking applications Table 5 lists the Ethernet SFP transceivers that are compatible with Infoblox Ethernet SFP SFP interface...

Страница 28: ...er Direct Attach 10GSFP Cu Cable Cisco SFP H10GB CU5M Not sold by Infoblox Contact your distributor for availability Y HP SFP 10GbE Copper Direct Attach 10GSFP Cu Cable HPJ9283B Not sold by Infoblox C...

Отзывы: