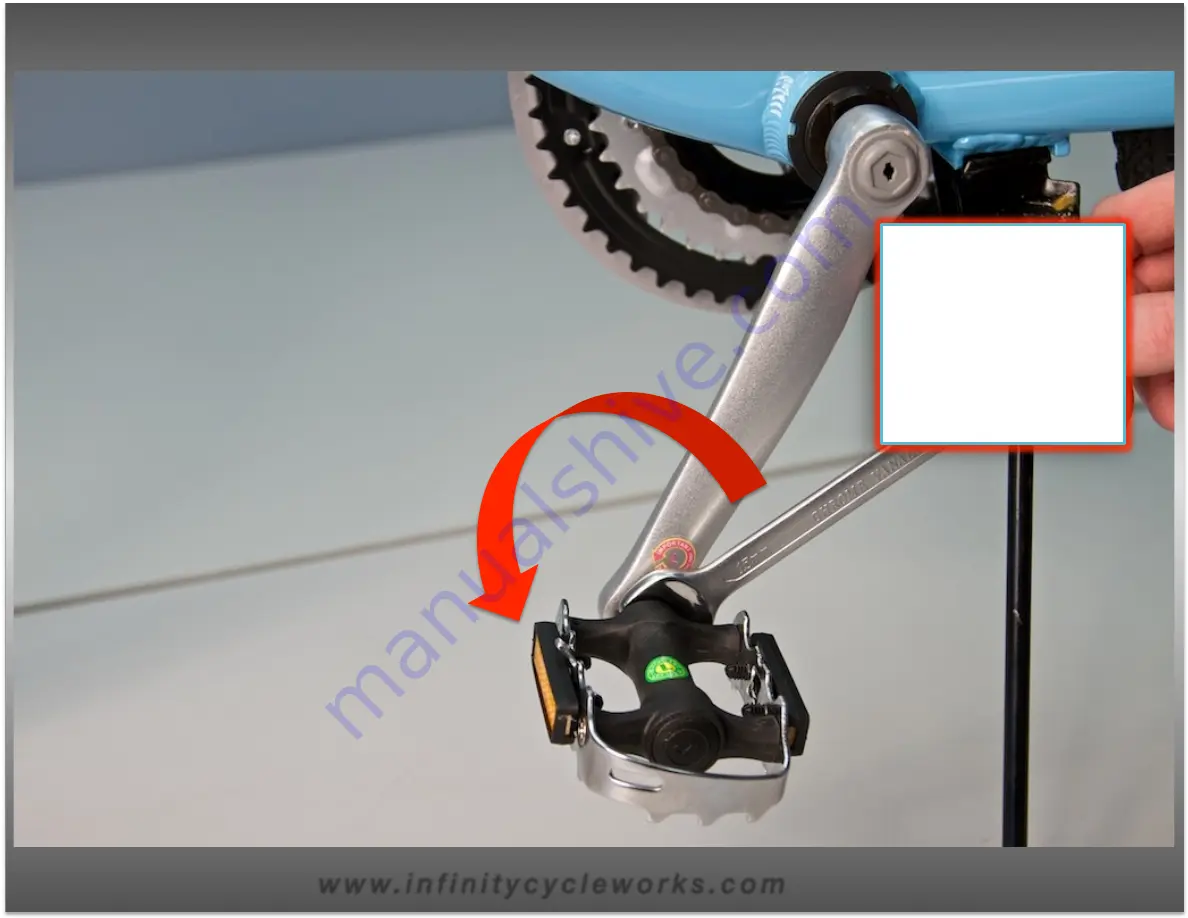
Finish =ghtening
the pedal using a 15 mm box end
wrench, or narrow adjustable
wrench.
w w w. i n f i n i t y c y c l e w o r k s . c o m
Страница 1: ...Toll Free 1 855 521 1127...
Страница 2: ...table or 15 mm open end wrench 6 mm Allen wrench screwdriver cable cu9ers or sharp knife adjustable wrench metric Allen wrenches open end wrenches screwdrivers cable cu ers w w w i n f i n i t y c y c...
Страница 3: ...Your bike will arrive par ally assembled in a box similar to the one shown w w w i n f i n i t y c y c l e w o r k s c o m...
Страница 4: ...Ensure the arrows on the side of the box are poin ng up then Open Bike Box from the top as shown Be Cau ous of the staples when opening w w w i n f i n i t y c y c l e w o r k s c o m...
Страница 5: ...ully remove your bike from the box and open the kickstand to keep upright as shown Remove all cardboard and plas c shipping material and recycle accordingly w w w i n f i n i t y c y c l e w o r k s c...
Страница 6: ...Note the Pedals are a9ached to the chain stays on their correct side as shown w w w i n f i n i t y c y c l e w o r k s c o m...
Страница 7: ...the Pedals are a9ached to the chain stays on their correct side as shown Remove pedals and place under the crank arm on their correct side for installa on w w w i n f i n i t y c y c l e w o r k s c...
Страница 8: ...When removing the packing material ensure you remove the rear axle derailleur caps as well w w w i n f i n i t y c y c l e w o r k s c o m...
Страница 9: ...A9ached to the handle bar is your Owners and Assembly manual as well as other informa on for the assembly and maintenance of your bicycle w w w i n f i n i t y c y c l e w o r k s c o m...
Страница 10: ...Once you have removed all the packing material and pedals your bike is ready for the nal adjustments w w w i n f i n i t y c y c l e w o r k s c o m...
Страница 11: ...The First adjustment will be straightening the handlebar stem assembly You will need a 6 mm Allen wrench for this w w w i n f i n i t y c y c l e w o r k s c o m...
Страница 12: ...Insert the 6 mm Allen wrench as shown and loosen the bolt by turning it counter clockwise w w w i n f i n i t y c y c l e w o r k s c o m...
Страница 13: ...Insert the 6 mm Allen wrench as shown and loosen the bolt by turning it counter clockwise You should only need to turn the bolt half a turn to loosen w w w i n f i n i t y c y c l e w o r k s c o m...
Страница 14: ...Ensure the fork is posi oned with the brakes poin ng in the forward posi on as shown Rotate the fork if needed to this posi on w w w i n f i n i t y c y c l e w o r k s c o m...
Страница 15: ...Standing beside your bicycle and looking down at the stem turn the handle bar un l the stem is in line with the front wheel w w w i n f i n i t y c y c l e w o r k s c o m...
Страница 16: ...Standing beside your bicycle and looking down at the stem turn the handle bar un l the stem is in line with the front wheel as shown w w w i n f i n i t y c y c l e w o r k s c o m...
Страница 17: ...Once the handlebar and stem are aligned use the 6 mm Allen wrench to ghten the stem bolt by rota ng the bolt clockwise un l ght w w w i n f i n i t y c y c l e w o r k s c o m...
Страница 18: ...nd stem are aligned use the 6 mm Allen wrench to ghten the stem bolt by rota ng the bolt clockwise un l ght Turn an extra 1 8 of a turn to ensure the bolt is fully ghtened w w w i n f i n i t y c y c...
Страница 19: ...Double check your cables to ensure they are not pinched or tangled w w w i n f i n i t y c y c l e w o r k s c o m...
Страница 20: ...p threading the pedals on the crank arms ensuring they follow the s ckers for which side the pedal should be a9ached Note s ckers on both pedals and crank arms w w w i n f i n i t y c y c l e w o r k...
Страница 21: ...The pedals thread into the crank arms in the direc on shown on the decal on their corresponding crank arm do not a9empt to a9ach the incorrect pedal w w w i n f i n i t y c y c l e w o r k s c o m...
Страница 22: ...Each Pedal will have a s cker no ng which crank arm they are to be a9ached w w w i n f i n i t y c y c l e w o r k s c o m...
Страница 23: ...hread the correct pedal into the corresponding crank arm by hand following the direc on shown on the crank arm decal Thread Clockwise for the RIGHT side pedal w w w i n f i n i t y c y c l e w o r k s...
Страница 24: ...sh ghtening the pedal using a 15 mm box end wrench or narrow adjustable wrench Remember once ght con nue for 1 8 of a turn to ensure the pedal is fully ght w w w i n f i n i t y c y c l e w o r k s c...
Страница 25: ...Finish ghtening the pedal using a 15 mm box end wrench or narrow adjustable wrench w w w i n f i n i t y c y c l e w o r k s c o m...
Страница 26: ...sh ghtening the pedal using a 15 mm box end wrench or narrow adjustable wrench Remember once ght con nue for 1 8 of a turn to ensure the pedal is fully ght w w w i n f i n i t y c y c l e w o r k s c...
Страница 27: ...Ensure you have the correct pedal for the correct side crank arm and note the direc on on the crank arm decal for ghtening w w w i n f i n i t y c y c l e w o r k s c o m...
Страница 28: ...ad the correct pedal into the corresponding crank arm by hand following the direc on shown on the crank arm decal Thread Counter Clockwise for the LEFT side pedal w w w i n f i n i t y c y c l e w o r...
Страница 29: ...Finish ghtening the pedal using a 15 mm box end wrench or narrow adjustable wrench w w w i n f i n i t y c y c l e w o r k s c o m...
Страница 30: ...sh ghtening the pedal using a 15 mm box end wrench or narrow adjustable wrench Remember once ght con nue for 1 8 of a turn to ensure the pedal is fully ght w w w i n f i n i t y c y c l e w o r k s c...
Страница 31: ...Check your seat post height and alignment Grab the quick release and open it to loosen the seat post w w w i n f i n i t y c y c l e w o r k s c o m...
Страница 32: ...ick release and open it to loosen the seat post Adjust the seat to a comfortable height ensuring that the minimum inser on line is NOT visible and is fully inserted into the seat tube Minimum Inser on...
Страница 33: ...To straighten align your seat along with the top tube w w w i n f i n i t y c y c l e w o r k s c o m...
Страница 34: ...To straighten align your seat along with the top tube w w w i n f i n i t y c y c l e w o r k s c o m...
Страница 35: ...e you are happy with the posi on of your seat and the minimum inser on line is NOT visible close the quick release by rota ng the arm to the closed posi on w w w i n f i n i t y c y c l e w o r k s c...
Страница 36: ...e you are happy with the posi on of your seat and the minimum inser on line is NOT visible close the quick release by rota ng the arm to the closed posi on w w w i n f i n i t y c y c l e w o r k s c...
Страница 37: ...rward pedals are a8ached and fully ght the seat seat post assembly is aligned with the top tube s shown and the minimum inser on mark is not visible Check the quick release to con rm seat post is ght...