


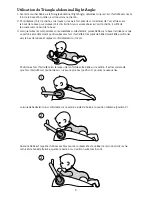


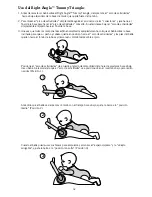


3. Attach the “peek-a-boo mirror” and “crinkle bee” to the “activity arch” using the “hook & loop fasteners”.
The toys can be placed anywhere along the “activity arch” to accommodate your baby. The “peek-a-
boo mirror” encourages baby to lift their head (strengthening their neck muscles) and the “crinkle bee”
encourages reaching and grasping.
4. Place the “musical tummy timer” near the Right Angle™ Tummy Triangle. Do NOT place the “musical
tummy timer” on the base of the Right Angle™ Tummy Triangle.
5. Place the “padded fabric cover” on the base of the Right Angle™ Tummy Triangle (if it is not already
attached). Match the “hook & loop fasteners” under the “padded fabric cover” to the fabric pieces
attached to the base. Press firmly on top of the “padded fabric cover” to attach. Refer to illustrations below.
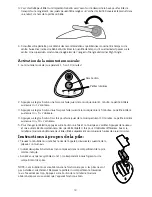
Preparing the Right Angle ™ Tummy Triangle for use:
Become familiar with the Right Angle™ Tummy Triangle
1.
impoRtant!
Adult assembly is required. Position the base firmly on a level ground surface away from any
obstacles. Never place the base on an elevated surface.
2. Snap the red caps into the openings on the sides of the plastic base. Attach the “arch connectors” to
each side of the base. You will feel each “arch connector” snap into place. Then, attach the “activity
arch” to the “arch connectors” on each side of the base. Make sure that the ends of the “activity arch”
are pushed all the way to the bottom of the “arch connector”.
3.
tummy triangle base
crinkle bee activity toy
adjustable activity arch
arch connector
musical tummy timer
peek-a-boo mirror
padded fabric cover
hook & loop fasteners


