background image

19

GB

Service

Tr

oubleshooting

Precautions

Care

Programmes

Detergents

Installation

Description

Personalisations

C

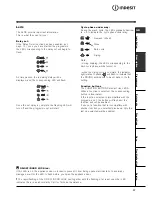
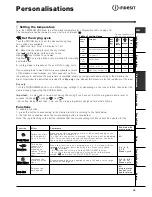
 Setting the temperature

Turn the TEMPERATURE knob to set the wash temperature 

(see Programme table on page 18)

.

The temperature can be lowered, or even set to a cold wash ( ).


Set the drying cycle

Turn the DRYING knob to set the desired drying type.

Two options are available:

A

 - Based on time: From 40 minutes to 150.

B

 - Based on the damp level of the dry clothes:

Iron 

: slightly damp clothes, easy to iron.

Hanger 

: dry clothes to put away.

Cupboard


: very dry clothes, recommended for towelling

and  bathrobes.
A cooling stage is foreseen at the end of the drying cycle.

If your laundry load to wash and dry is exceptionally in excess

of the maximum load foreseen 

(see table opposite)

, perform

the wash cycle, and when the programme is complete, divide up the garments and put part of them back in the

drum. Now follow the instructions provided for a 

dry only

 cycle. Repeat this procedure for the remainder of the load.

Dry  only

Turn the PROGRAMME knob to one of the drying settings (7-8) depending on the type of fabric, then select the

desired drying type using the DRYING knob.

Important:

 - A spin cycle is carried out during the drying if you have set a cotton programme and a level of

dryness (Cupboard 

, Hanger 

, Iron 

).

- For cotton loads of less than 1 Kg, use the drying programme designed for delicate fabrics.

Functions

To  enable  a  function:

1. press the button corresponding to the desired function, according to the table below;

2. the function is enabled when the corresponding button is illuminated.

Note: The rapid flashing of the button indicates that the corresponding function cannot be selected for the

Function

Effect

C om m ents

Enab led  with

p rogram m es:

Delay Timer

Delays th e start

of the wash  by

up to 9 hours.

Press th e bu tton  repeatedly u ntil the L ED corresponding to th e

desired delay is turned on.

Th e fifth time the button  is pressed, th e function will be disabled.

N.B .: Once you h ave pressed th e Start/R eset button, th e delay

can only be decreased if you  wish to modify it.

A ll

Easy iron

Th is option

redu ces th e

amoun t of

creasing on

fabrics, makin g

them easier to

iron .

W h en this fun ction is set, programmes 4, 5, 6 w ill end with th e

laundry left to soak (An ti-crease) an d th e R inse cycle ph ase

L ED       will flash .

- to conclude the cycle, press the STAR T/RESET button ;

- to ru n the drain in g cycle alon e, set the kn ob to the relative

symbol       and press the STAR T/R ESET button .

3, 4, 5, 6,

9, 10,

Rinse cycle.

Extra R in se

In creases th e

efficiency of the

rinse.

R ecommended when  th e applian ce has a full load or w ith  large

quantities of detergent.

1, 2, 3, 4, 9,

10, 12, 13,

Rinse cycle.

800-400

R educes th e

spin  speed.

A ll

p rogram m es

ex cep t for 6

and  d raining.

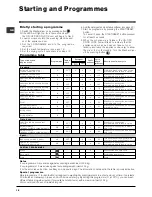
Fabric

type

Load type

Max.

load

(kg)

Cup-

board

Hanger

Iron

Cotton,

Linen

Clothing of different sizes

4

130

120

110

Cotton

Terry towels

4

130

120

110

Terital,

Cotton

Sheets, Shirts

2,5

90

80

70

Acrylics

Pyjamas, socks, etc.

1

65

60

60

Nylon

Slips, tights, stockings, etc.

1

65

60

60

Table of drying times

The data contained in the

table are purely indicative.

Содержание WIDL 86

Страница 1: ...cycle 21 Functions 21 Detergents and laundry 22 Detergent dispenser 22 Preparing your laundry 22 Special items 22 Precautions and advice 23 General safety 23 Disposal 23 Saving energy and respecting the environment 23 Care and maintenance 24 Cutting off the water or electricity supply 24 Cleaning your appliance 24 Cleaning the detergent dispenser 24 Caring for your appliance door and drum 24 Clean...

Страница 2: ... it up against walls furniture cabinets or other 2 If the floor is not perfectly level compen sate for any unevenness by tightening or loosening the adjustable front feet see figure the angle of inclination measured according to the worktop must not exceed 2 Levelling your appliance correctly will provide it with stability and avoid any vibrations noise and shifting during operation If it is place...

Страница 3: ...erstorms When the washing machine is installed the mains socket must be within easy reach Do not use extensions or multiple sockets The power supply cable must never be bent or dangerously compressed The power supply cable must only be replaced by an authorised serviceman Warning The company denies all liability if and when these norms are not respected The first wash cycle Once the appliance has ...

Страница 4: ... see page 17 DRYING knob to set the desired drying cycle see page 19 FUNCTION buttons to select the functions available The button corresponding to the function selected will remain on TEMPERATURE knob to set the temperature or the cold wash cycle see page 19 START RESET button to start the programmes or cancel any incorrect settings ON OFF DOOR LOCK Led to find out whether the Washer dryer is on ...

Страница 5: ...te the indicator light relative to phase will flash to indicate that the DRYING knob needs to be set back to the 0 setting Function buttons The FUNCTION BUTTONS also act like LEDS When a function is selected the corresponding button is illuminated If the function selected is incompatible with the programme set the button will flash and the function will not be enabled If you set a function that is...

Страница 6: ... 50 Cold wash without detergents wash cycle rinse cycles and delicate spin cycle Fabrics for sportswear Tracksuits shorts etc 13 30 C 60 Wash cycle rinse cycles intermediate and final spin cycles PARTIAL PROGRAMMES Rinse Rinse cycles and spin cycle Spin cycle Draining and spin cycle Drain Drain Starting and Programmes Programme table Briefly starting a programme 1 Switch the Washer dryer on by pre...

Страница 7: ... the button corresponding to the desired function according to the table below 2 the function is enabled when the corresponding button is illuminated Note The rapid flashing of the button indicates that the corresponding function cannot be selected for the Function Effect C om m ents Enabled with programmes Delay Timer Delays the start of the wash by up to 9 hours Press the button repeatedly until...

Страница 8: ...e symbol on the label the colours separate coloured garments from whites Empty all pockets and check for loose buttons Do not exceed the weight limits stated below which refer to the weight when dry Sturdy fabrics max 5 kg Synthetic fabrics max 2 5 kg Delicate fabrics max 2 kg Wool max 1 kg How much does your laundry weigh 1 sheet 400 500 g 1 pillow case 150 200 g 1 tablecloth 400 500 g 1 bathrobe...

Страница 9: ...ng the drying cycles This washer dryer can only be used to dry clothes which have been pre washed in water Disposal Disposing of the packaging material observe local regulations so the packaging can be re used Disposing of an old Washer dryer before scrapping your appliance cut the power supply cable and remove the appliance door Saving energy and respecting the environment Environmentally friendl...

Страница 10: ... The Washer dryer is fitted with a self cleaning pump that does not require any maintenance Sometimes small items such as coins or buttons may fall into the pre chamber that protects the pump situated in the lower part of the same Make sure the wash cycle has ended and unplug the appliance To access the pre chamber 1 using a screwdriver remove the cover panel on the lower front of the Washer dryer...

Страница 11: ... page 15 The wall drainage system doesn t have a breather pipe If the problem persists even after these checks turn off the water tap switch the appliance off and call for Assistance If the dwelling is on one of the upper floors of a building there may be drain trap problems causing the Washer dryer to load and unload water continuously In order to avoid such an inconvenience special anti drain tr...

Страница 12: ... this is not the case contact an authorised Technical Service Centre on the telephone number provided on the guarantee certificate Always request the assistance of authorised servicemen Notify the operator of the type of problem the appliance model Mod the serial number S N This information can be found on the data plate situated on the rear of the washer dryer Service ...

Отзывы: