


11
Instructions for installation and use
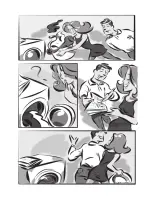
When the new washer-
dryer arrives
Installation and removal
Whether new or just transported to a new house,
installation is extremely important for the correct
functioning of your washer-dryer.
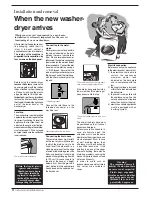
The hook to be used in case the drain
hose ends at a height below 60 cm.
If the drains hose empties into a
tub or sink then fit the plastic gui-
de and secure it to the tap.
The guide for draining into tubs and
sinks.
The end of the drain hose must
be positioned so that it cannot
become submerged.
Extensions are unadvisable. In
case of absolute need, the
extension must have the same
diameter as the original hose and
must not exceed 150 cm. In case
of wall draining pipes, their
efficiency must be checked by
a qualified technician. If the
dwelling is on one of the upper
floors of a building, there may be
drain trap problems causing the
washer-dryer to load and unload
water continuously.
In order to avoid such an
inconvenience, special anti-drain
trap valves are available in
shops.
After removing the appliance from
its packaging, check that it is
intact. If in doubt, contact a
qualified technician immediately.
The inside of the machine is
supported, for transportation, by
four screws on the back panel.
Before using the washer-dryer,
remove the screws
, remove the
spacers together with the rubber
tubes attached to them (keeping
all the parts) and use the plastic
plugs provided to fill in the holes.
Important:
Use the cap (provided)
to close the 3 holes which housed
the stop pin, situated in the right-hand
part of the lower back of the
washer-dryer.
Levelling
The washer-dryer must be levelled
appropriatey in order to guarantee
its correct functioning. To level the
appliance, the front feet must be
adjusted; the angle of inclination,
measured according to the worktop,
must not exceed 2°. When placed
on carpet, make sure the ventilation
is not reduced.
The front feet are adjustable.
Connection to the water
mains
Water pressure must range within
the values indicated on the data
plate on the rear of your washer-
dryer. If the water pipes are new or
left unused, then before connecting
the machine run the water until clear
to remove debris. Connect the inlet
hose to a cold water tap having a
¾ “ BSP thread. Ensure that the
rubber sealing washer-dryers are
fitted at each end of the inlet hose,
with the fitter washer-dryer at the
tap end.
A
The rubber gasket .
Connect the inlet hose to the
threaded connector on the
machine rear.
Water pipe inlet at the top right.
Connecting the drain hose
There are two hooks (right or left)
on the rear of your washer-dryer
to which the drain hose is to be
fixed. Insert the other end in a
stand pipe or place it on the edge
of a sink or tub avoiding excessive
kinks and bending. It should be
placed at a height ranging from 60
to 100 cm. If it is necessary to fix
the end of the hose at a height
below 60 cm from the ground, it
must be fixed in the appropriate
hook placed on the upper part of
the back panel.
Warning!
The company denies all
liability if and when these
norms are not respected.
Plastic bags, expanded
styrofoam, nails and other
packaging parts are not
children’s toys, and are
potentially dangerous.
Retain the transit screws,
spacers and washers.
Should you move house
then these should be
replaced to support the
inside of the machine to
prevent damage when
transporting the machine.
Electric connection
Before connecting the appliance
to the electric socket, be sure that:
1) the electric socket is able to
sustain the appliance’s
maximum power load
indicated on the data plate
and in compliance with the
law;
2) the supply voltage is included
within the values indicated on
the data plate;
3) the socket is compatible with
the appliance’s plug. If not, do
not use adapters, but replace
either the socket or the plug;
4) electric household appliances
must be equipped with an
“earthing” system.
Содержание WD 84 T
Страница 3: ......
Страница 17: ...Instructionsforinstallationanduse 14...


