background image

GB

27

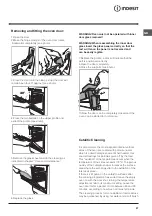
Removing and fitting the oven door: 

1.Open the door
2.Make the hinge clamps of the oven door rotate
 backwards completely (see photo)  

3.Close the door until the clamps stop (the door will 
remain open for 40° approx.) (see photo) 

40°

4.Press the two buttons on the upper profile and 
extract the profile (see photo) 

5.Remove the glass sheet and do the cleaning as 
indicated in chapter: "Care and maintenance".

6.Replace the glass.

WARNING! Oven must not be operated with inner 
door glass removed!

WARNING! When reassembling the inner door 
glass insert the glass panel correctly so that the 
text  written on the panel is not reversed and
can be easily legible.

7.Replace the profile, a click will indicate that the 
part is positioned correctly. 
8.Open the door completely.
9.Close the supports (see photo).

10.Now the door can be completely closed and the
 oven can be started for normal use.

Catalitic Cleaning

In some models, the most exposed internal vertical 
sides of the oven are coated with porous enamel, 
which is called catalytic enamel. When heated, this 
enamel destroys fat particles given off by the food.
This "oxidation" of the fat particles occurs when the 
temperature of the sides exceeds 170°C. The porous 
quality of the catalytic enamel increases the surface 
area where the exchange vital to the oxidation of the 
fats takes place.
If there is still grime on the catalytic surfaces after 
the cooking programme has ended, leave the empty 
oven on with the door shut, turning the temperature 
adjustment knob to its maximum setting. Leave the 
oven like this for a period of time between 60 and 90 
minutes, according to how much dirt was left inside. 
The cleaning process for more stubborn food residues 
may be quickened by using hot water and a soft brush.

Содержание I6GGC2G/FR

Страница 1: ...d ensemble Tableau de bord Mise en marche et utilisation 8 10 Utilisation du plan de cuisson Utilisation du four Tableau de cuisson Précautions et conseils 11 Sécurité générale Mise au rebut Economies et respect de l environnement Nettoyage et entretien 12 Mise hors tension Nettoyage de l appareil Entretien robinets gaz Remplacement de l ampoule d éclairage du four Assistance Français 1 FR I6GGC2G...

Страница 2: ...est dange Il ne faut JAMAIS essayer d éteindre une flamme ou un incendie avec de l eau Il faut éteindre l appareil et couvrir la flamme avec un couvercle par exemple ou avec une couverture anti feu Ne pas utiliser de produits abrasifs ni de spatules métalliques coupantes pour nettoyer la porte du four en verre sous peine d érafler la surface et de briser le verre Les surfaces intérieures du tiroir...

Страница 3: ...ies de 100 surface minimale 2 cm2 en cas d appareils dépourvus du dispositif de sécurité de flamme et quand l afflux de l air provient de manière indirecte de pièces voisines voir figure B à condition qu il ne s agisse pas de parties communes du bâtiment de chambres à coucher ou de locaux à risque d incendie équipées d un conduit d aération avec l extérieur comme décrit plus haut A B Après une uti...

Страница 4: ...es ci dessus Raccordement gaz Pour raccorder l appareil au réseau de distribution du gaz ou à la bouteille de gaz utilisez un tuyau flexible en caoutchouc ou en acier conformément à la réglementation en vigueur Assurez vous auparavant que l appareil est bien réglé pour le type de gaz d alimentation utilisé voir étiquette sur le couvercle autrement voir ci dessous Si l alimentation s effectue avec ...

Страница 5: ... bouton et tournez la vis de réglage positionnée à l intérieur ou sur le côté de la tige du robinet jusqu à obtenir une petite flamme régulière En cas de gaz naturel il faut dévisser la vis de réglage en tournant dans le sens inverse des aiguilles d une montre 3 vérifiez si en tournant rapidement le robinet du maximum au minimum le brûleur ne s éteint pas Les brûleurs du plan de cuisson ne nécessi...

Страница 6: ...nt s accroche à la porte du four la chaîne de sécurité DOIT être installée La cuisinière est équipée d une chaîne de sécurité qui doit être fixée à l aide d une vis non fournie avec l appareil au mur derrière l appa reil à la même hauteur que sur la cuisinière Choisissez une vis et un système d ancrage adapté au mur contre lequel se trouve l appa reil Si la vis présente un diamètre inférieur à 9 m...

Страница 7: ...GRILLE Support LECHEFRITE GLISSIERES de coulissement niveau 3 niveau 2 niveau 1 Brûleur à gaz Plateau du plan de cuisson Pied de réglage Pied de réglage niveau 5 niveau 4 ALLUMAGE Manette FOUR Manettes BRÛLEURS du plan de cuisson de fonctionnement du grill ALLUMAGE des brûleurs VOYANT tournebroche lumiere du four ...

Страница 8: ...raphe Caractéristiques des brûleurs et des injecteurs Mise en marche et utilisation Utilisation du four Lors de son premier allumage faites fonctionner le four à vide porte fermée pendant au moins une heure en réglant la température à son maximum Puis éteignez le ouvrez la porte et aérez la pièce L odeur qui se dégage est due à l évaporation des produits utilisés pour protéger le four Avant toute ...

Страница 9: ...a température est atteinte dans le four un thermostat la maintient constante au degré prêt Tournebroche Pour actionner le tournebroche voir figure procédez comme suit 1 placez la lèchefrite au gradin 1 2 placez le berceau au gradin 4 et encastrez le bout arrière de la broche dans le trou situé au fond de l enceinte 3 allumer le four ou le gril à l aide du bouton ALLUMAGE tourneboche Eclairage du f...

Страница 10: ...on Maquereaux Denté Truite en papillote 1 1 1 5 1 3 3 3 10 10 10 180 200 180 200 180 200 35 40 40 50 40 50 Pizza Napolitaine 1 3 15 220 15 20 Gâteaux Biscuits Tarte Tartes salées Gâteaux levés 0 5 1 1 1 1 3 3 3 3 15 15 15 15 180 180 180 180 30 35 30 35 45 50 35 40 Cuisson au gril Côtes de veau Côtelettes Hamburgers Maquereaux Croque monsieur 1 1 5 1 1 n 4 4 4 3 4 4 5 5 5 5 5 15 20 20 20 30 15 20 2...

Страница 11: ...s sur la porte du four ouverte Cet appareil n est pas prévu pour être utilisé par des personnes y compris les enfants dont les capacités physiques sensorielles ou mentales sont réduites ou des personnes dénuées d expérience ou de connaissance sauf si elles ont pu bénéficier par l intermédiaire d une personne responsable de leur sécurité d une surveillance ou d instructions préalables concernant d ...

Страница 12: ...gressifs contenant du phosphore Il est conseillé de rincer abondamment et d essuyer après le nettoyage Mieux vaut essuyer aussitôt tout débordement d eau Contrôler les joints du four Contrôlez périodiquement l état du joint autour de la porte du four S il est abîmé adressez vous au service après vente le plus proche de votre domicile Mieux vaut ne pas utiliser le four tant qu il n est pas réparé E...

Страница 13: ...ble de fermer complètement la porte pour faire fonctionner le four AVERTISSEMENT Le four ne doit pas etre utilisé en verre enlevé AVERTISSEMENT Réassembler le correctement afin que le signe sur le verre est lisible avec la porte du four verre correctement AVERTISSEMENT Le four ne doit pas etre utilisé en verre enlevé AVERTISSEMENT Réassembler le correctement afin que le signe sur le verre est lisi...

Страница 14: ...rall view Control panel Start up and use 22 24 Starting the oven Cooking modes Oven cooking advice table Precautions and tips 25 General safety Disposal Respecting and conserving the environment Care and maintenance 26 Switching the appliance off Cleaning the appliance Replacing the oven light bulb Cleaning the hob Assistance Removing and fitting the oven door Operating Instructions COOKER AND OVE...

Страница 15: ...oil can be dangerous and may result in fire NEVER try to extinguish a fire with water but switch off the appliance and then cover flame e g with a lid or a fire blanket Do not use harsh abrasive cleaners or sharp metal scrapers to clean the oven door glass since they can scratch the surface which may result in shattering of the glass Theinternalsurfacesofthecompartment where present may become hot...

Страница 16: ...ombustion fumes should be guaranteed using a hood connected to a safe and efficient natural suction chimney or using an electric fan that begins to operate automatically every time the appliance is switched on see figure Installation A After prolonged use of the appliance it is advisable to open a window or increase the speed of any fans used The liquefied petroleum gases are heavier than air and ...

Страница 17: ... cylinder may be carried out using a flexible rubber or steel hose in accordance with current national legislation and after making sure that the appliance is suited to the type of gas with which it will be supplied see the rating sticker on the cover if this is not the case see below When using liquid gas from a cylinder install a pressure regulator which complies with current national regulation...

Страница 18: ...ightly as possible 3 While the burner is alight quickly change the position of the knobfromminimumtomaximumandviceversaseveraltimes checking that the flame is not extinguished The hob burners do not require primary air adjustment Adapting the oven Replacing the oven burner nozzle 1 Open the oven door fully 2 Pull out the sliding oven bottom see diagram 3 Remove the oven burner after unscrewing the...

Страница 19: ...as a diameter smaller than 9mm a washer should be used Concrete wall requires the screw of at least 8mm of diameter and 60mm of length Ensure that the chain is fixed to the rear wall of the cooker and to the wall as shown in figure so that after installation It is tensioned and parallel to the ground level TE CHNI CAL DAT A Oven Dimensi ons Hx Wx D 31x43 5x43 5 cm Vo lume 58 l Usef ul measu rement...

Страница 20: ...m Thermal Power kW p c s By Pass 1 100 Nozzle 1 100 Flow g h Nozzle 1 100 Flow l h Nominal Reduced mm mm mm Fast Large R Semi Fast Medium S Auxiliary Small A Oven Supply Pressures Nominal mbar Minimum mbar Maximum mbar 28 30 20 35 37 25 45 20 17 25 75 1 90 0 40 30 69 138 136 104 181 51 1 00 0 40 30 50 73 71 78 95 100 3 00 0 70 41 87 218 214 128 286 2 60 1 00 52 78 189 119 248 186 S S R A I6GGC2G F...

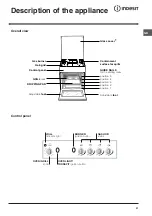
Страница 21: ...ks position 3 position 2 position 1 Gas burner Containment surface for spills Adjustable foot Adjustable foot position 5 position 4 Description of the appliance Overall view Control panel OVEN LIGHT TURNSPIT knobs GAS HOB indicator light GRILL knob OVEN GRILL ignition button BURNER ignition button ...

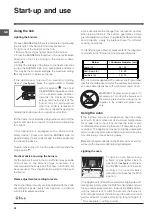
Страница 22: ...om maximum to minimum with 4 intermediate positions Start up and use a click will indicate the change from one level to another when turning the knob The system guarantees a more precise adjustment allows to replicate the flame intensity and to identify easily the preferred level for different cooking operations To identify the type of burner please refer to the diagrams contained in the Burner an...

Страница 23: ... activated The grill enables the surface of food to be browned evenly and is particularly suitable for roast dishes schnitzel and sausages Place the rack in position 4 or 5 and the dripping pan in position 1 to collect fat and prevent the formation of smoke The GRILL indicator light shows when the grill is operating Always use the grill with the oven door shut this achieves better cooking results ...

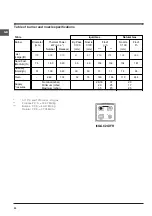
Страница 24: ...24 GB Oven cooking advice table ...

Страница 25: ...m the electricity mains If the appliance breaks down under no circumstances should you attempt to repair the appliance yourself Repairs carried out by inexperienced persons may cause injury or further malfunctioning of the appliance Contact Assistance Do not rest heavy objects on the open oven door If the cooker is placed on a pedestal take the necessary precautions to prevent the same from slidin...

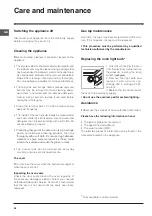
Страница 26: ...tal scrapers as these could scratch the surface and cause the glass to crack The accessories can be washed like everyday crockery and are even dishwasher safe The cover Do not close the cover when the burners are alight or when they are still hot Inspecting the oven seals Check the door seals around the oven regularly If the seals are damaged please contact your nearest Authorised After sales Serv...

Страница 27: ...supports see photo 10 Now the door can be completely closed and the oven can be started for normal use Catalitic Cleaning In some models the most exposed internal vertical sides of the oven are coated with porous enamel which is called catalytic enamel When heated this enamel destroys fat particles given off by the food This oxidation of the fat particles occurs when the temperature of the sides e...

Страница 28: ...28 GB 09 2013 195109385 01 XEROX FABRIANO ...

Отзывы: