background image

©

 IMPEX INC.                                                                                                                               www.impex-fitness.com 

10 

CARE AND MAINTANCE 


1.  Inspect and tighten all parts each time you use the bike.  Replace any worn parts 

immediately.   

2.  The bike can be cleaned using a damp cloth and mild non-abrasive detergent.  Do not use 

solvents. 

3.  Store the bike IN-DOOR.  Excess moisture and water would cause rust on the frame. 
4.  The Bike shall be placed at least 24 inches away from the wall or/and any other object such 

as furniture to provide safe access to and passage around the bike. 

5.  To avoid possible injury, the help of two or more people are needed when moving the bike 

around. 

6.  Disposal Instructions – The equipment can be safely disassembled and disposed without 

unreasonable hazards.  Call your local recycle agency regarding details of recycling. 

7. 

The maximum user weight is 300 lbs.


8. 

Assembled Dimension: 45.5” x 20” x 44”


OPERATING NOTES 


ADJUSTMENT 

1.  Use the Tension/Brake Knob (#21) to adjust the resistance for exercises. 
2.  Loosen and pull out the Lock Knob (#19).  Slide the Seat Post to the desired height and 

lock at the position by fastening the Lock Knob (#19). 

3.  Loosen and pull out Lock Knob (#19 & #43). Slide Handle Post to desired height and 

Lock at the position by fastening the Lock Knob (#19 & #43). 

4.  The seat height adjustment is in approximately 1” increment.  

*The seat height can be adjusted for 10 different height ranges from 35” to 44”. 

5.  The height of Elbow Support can be adjusted with 6 positions range from 36” to 41” with 

approximately 1” adjustment. 

6.  Loosen and pull out the Seat Lock Knob (#29). Slide the Seat Support to the desired 

position and lock at the position by fastening the Seat Lock Knob. 

7.  Loosen the L-shaped Lock Knob (#13), move the Handle Sliding Block (#10) to desired 

position; lock the Handle at position by fastening the L-shaped Lock Knob.  


1.  Press down the Tension/Brake Knob (#21) to stop the fly wheel.  ONLY when 

the flywheel has stopped, will it be safe to remove feet from pedals. 

Stopping the Exercise 

2.  DO NOT stop pedaling: doing so could result in serious injury. 
3.  DO NOT attempt to stop the Fly Wheel by hands, feet or any other device not 

indicated in this instruction. 


TRANSPORT 

The Bike has a pair Roller Wheels on Front Stabilizer.  
To move, carefully tilt the cycle forward, and then roll. 


Содержание MARCY JX-7038

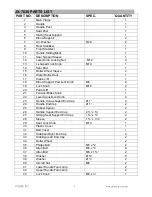
Страница 1: ...Hardware Pack Assembly Instruction Parts List Warranty Ordering Parts Model JX 7038 Retain This Manual for Reference 131101 ASSEMBLY OWNER S MANUAL CLUB REVOLUTION CYCLE JX 7038 IMPEX INC 2801 S Town...

Страница 2: ...IMPEX INC For your safety and benefit read this manual carefully before using the bike As a manufacturer we are committed to provide you complete customer satisfaction If you have any questions or fi...

Страница 3: ...e also required when using the bike 7 Use the bike only for its intended use as described in this manual DO NOT use attachments not recommended by the manufacturer 8 Do not place any sharp object arou...

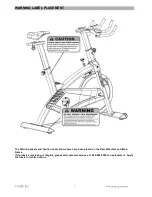
Страница 4: ...PLACEMENT The Warning Labels and Caution Label shown here have been placed on the Rear Stabilizer and Main Frame If the labels are missing or illegible please call customer service at 1 800 999 8899 f...

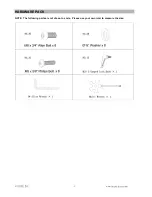
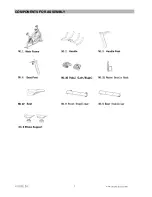
Страница 5: ...IMPEX INC www impex fitness com 4 HARDWARE PACK NOTE The following parts are not drawn to scale Please use your own ruler to measure the size...

Страница 6: ...IMPEX INC www impex fitness com 5 COMPONENTS FOR ASSEMBLY...

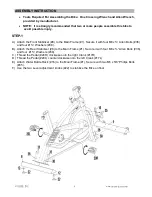
Страница 7: ...abilizer 9 to the Main Frame 1 Secure it with four M8x Allen Bolts 36 and four Washers 38 B Attach the Rear Stabilizer 8 to the Main Frame 1 Secure it with four M8 x Allen Bolts 36 and four Washers 38...

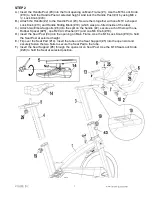
Страница 8: ...ed inside of the tube C Attach two Elbow Supports 6 into the split on the handle 2 secure each of them with one Rubber Spacer 25 one R29 Arc Washer 7 and one M6 Knob 18 D Insert the Seat Post 4 into t...

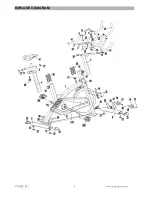
Страница 9: ...IMPEX INC www impex fitness com 8 EXPLODED DIAGRAM...

Страница 10: ...7 Crank L R 1 18 Elbow Support Pad Lock Knob M6 2 19 Lock Knob M16 2 20 Pedal L R 1 21 Tension Brake Knob 1 22 Level Adjustment Knob 4 23 Handle Cone shaped End Cap 1 4 24 Handle End Cap 1 2 25 Rubber...

Страница 11: ...d height and lock at the position by fastening the Lock Knob 19 3 Loosen and pull out Lock Knob 19 43 Slide Handle Post to desired height and Lock at the position by fastening the Lock Knob 19 43 4 Th...

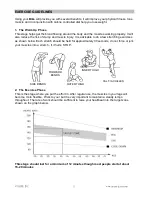
Страница 12: ...g exercises as shown below Each stretch should be held for approximately 30 seconds do not force or jerk your muscles into a stretch if it hurts STOP 2 The Exercise Phase This is the stage where you p...

Страница 13: ...on your MAGNETIC BIKE you will need to have the resistance set quite high This will put more strain on our leg muscles and may mean you cannot train for as long as you would like If you are also tryi...

Страница 14: ...performance of the product or other damages with respect to any economic loss loss of property loss of revenues or profits loss of enjoyments or use costs of removal installation or other consequentia...

Отзывы: