background image

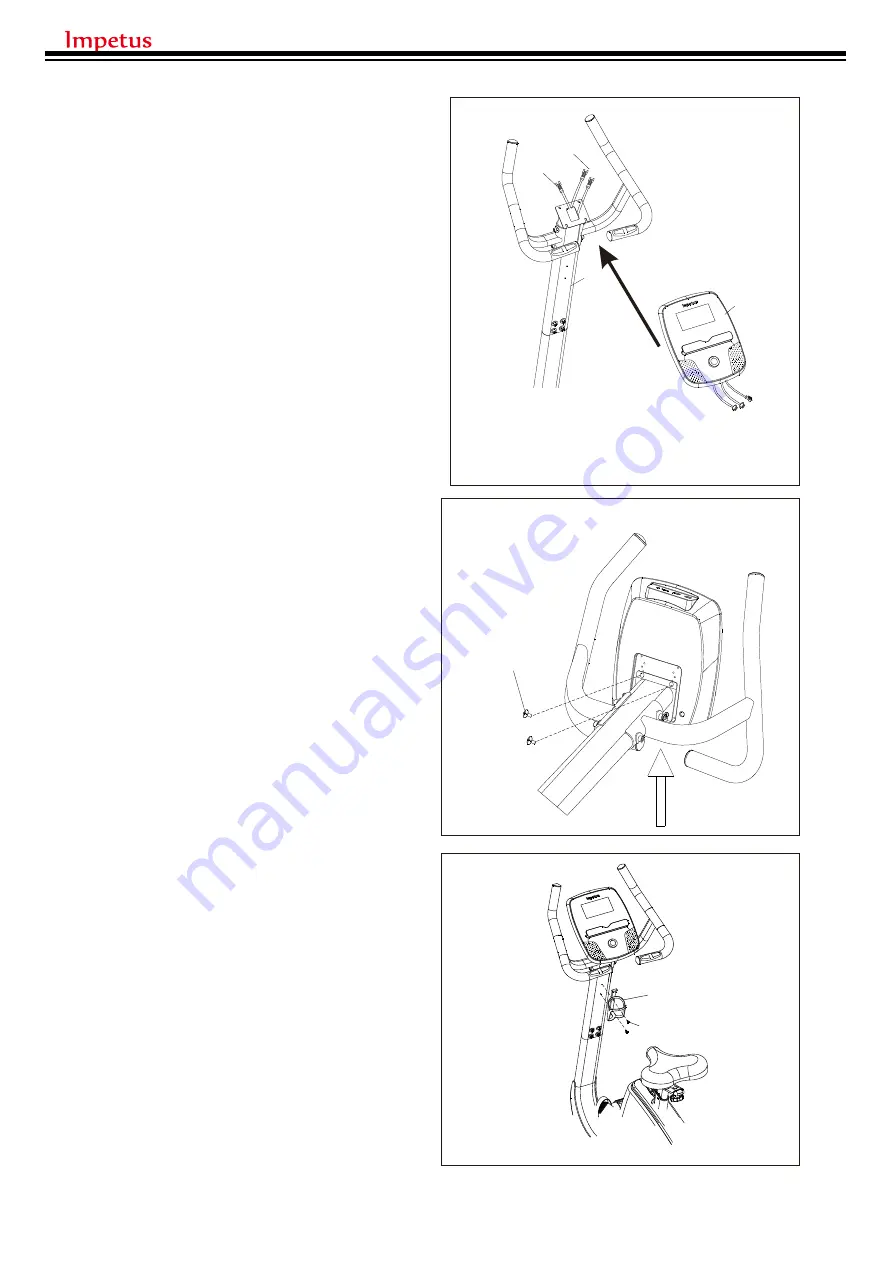
STEP 7

1.  Connect  the 

WIRES  (30  &  31)

  to  the 

CONSOLE (13).

2.  Slide  in  the 

CONSOLE

  (

13

to  the 

HANDLEBAR POST (09)

 as the arrow 

indicated.

STEP 8

1. Attach the 

CONSOLE (13)

 to the 

HANDLEBAR POST (09)

 using 2 

SCREWS (32)

 removed earlier.

2. Adjust the alignment of the 

CONSOLE 

(13)

 before tightening the bottom 2 

SCREWS (32)

.

32

STEP 9

Attach  the 

WATER  BOTTLE  HOLDER 

(76)

 to the 

HANDLEBAR POST (09)

using 2 

SCREWS (77).

31

30

09

13

76

77

8

Содержание iv500

Страница 1: ...USER MANUAL...

Страница 2: ...PACKING LIST HARDWARE PACK PACKING LIST ASSEMBLY INSTRUCTIONS SEAT ADJUSTMENT HOW TO MOVE THE TRAINER HOW TO ADJUST THE BALANCE OF THE TRAINER EXPLODED VIEW PART LIST WARM UP COOL DOWN CLEANING MAINTE...

Страница 3: ...ng parts Keep others especially children at a safe distance while exercise g Make sure all devices are fully adjusted before use to avoid injury h Remove all jewelry including rings chains and pins be...

Страница 4: ...ily physician The safety level of the equipment can be maintained only if it is examined regularly for damaged and wear The appliances are not for children under age of 14 IMPORTANT Read all instructi...

Страница 5: ...0mm Screw 4pcs M10 Locknut 4pcs M10 Arc Washer 4pcs Wrenches screw driver Main frame Handlebar post Water bottle holder Console Handlebar Front stabilizer Rear stabilizer Seat Seat holder Pedal L Peda...

Страница 6: ...S STEP 2 1 Attach the SEAT 08 to the SEAT CARRIAGE 07 using 3 WASHERS 25 3 NUTS 23 2 Install it on top of the SEAT POST 06 using KNOB 26 STEP 3 1 Tighten the RIGHT PEDAL 14R clockwise into the RIGHT C...

Страница 7: ...1 upward through the HANDLEBAR POST 09 2 Attach the HANDLEBAR 10 to the HANDLEBAR POST 09 using 2 WASHERS 72 and 2 SCREWS 28 3 Repeat the above steps for the other side 09 30 28 29 75 01 30 10 31 28 7...

Страница 8: ...as the arrow indicated STEP 8 1 Attach the CONSOLE 13 to the HANDLEBAR POST 09 using 2 SCREWS 32 removed earlier 2 Adjust the alignment of the CONSOLE 13 before tightening the bottom 2 SCREWS 32 32 ST...

Страница 9: ...9...

Страница 10: ...e trainer TRANSPORT WHEEL HOW TO ADJUST THE BALANCE OF THE TRAINER Make sure the trainer is placed on the flat floor and rotate the leveling foot clockwise or counter clockwise so the leveling foot to...

Страница 11: ...ghtly slowly bend forward from the hips Allow your back and shoulders to relax as you stretch down toward your toes Go as far as you can and hold for 15 counts then relax Repeat three times Stretch Ha...

Страница 12: ...14...

Страница 13: ...15...

Отзывы: