7.4 Master / slave mode
Multiple spotlights PARL-12RGBW can be oper-
ated in sync. In this mode, the first unit (master unit)
controls the other units (slave units).
1) Connect the units with each other in a chain;
please refer to chapter 8.1, skipping step 1.
2) Set the master unit to one of the following
modes: automatic mode, music control or colour
spotlight mode (
chapters 7.1 – 7.3).
3) Set the other units to the slave mode. To do so,
either press the button SLAVE on the remote
control or switch on the slave mode by means of
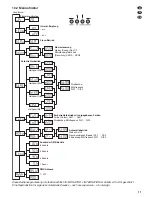
the menu: Select the menu item
and press
the button ENTER twice.
will appear on the display.
8
DMX Control
DMX (
D
igital
M
ultiple
x
) allows for digital control of
multiple DMX units by means of a common control
line. For operation by means of a DMX light con-
troller (e. g. DMX-1440 or DMX-510SUB from “img
Stage Line”), the LED spotlight is equipped with 8
DMX control channels. However, it can also be
controlled by 5, 4 or 1 channel only, if required. The
functions of the channels and the corresponding
DMX values can be found in chapter 10.1.
8.1 DMX connection
For DMX connection, 3-pole XLR connections with
the following pin configuration are available:
pin 1 = ground, 2 = DMX−, 3 = DMX+
For the connection, special cables for DMX signal
transmission (e. g. cables of the CDMXN series
from “img Stage Line”) should be used. For cable
lengths exceeding 150 m, the insertion of a DMX
level matching amplifier (e. g. SR-103DMX from
“img Stage Line”) is recommended.
1) Connect the input DMX IN (4) to the DMX output
of the light controller.
2) Connect the output DMX OUT (10) to the DMX
input of the next DMX unit. Connect the output of
the latter DMX unit to the input of the following
unit, etc. until all DMX-controlled units are con-
nected in a chain.
3) To prevent interference in signal transmission:
For long cables or for a great number of units
connected in series, terminate the DMX output
of the last DMX unit in the chain with a 120 Ω
resistor (> 0.3 W): Connect an appropriate ter-
minating plug (e. g. DLT-123 from “img Stage
Line”) to the DMX output jack.
8.2 Setting the number of DMX channels
To operate the PARL-12RGBW by means of a light
controller, set the DMX start address (
chapter
8.3) and the number of DMX channels. The number
of DMX channels depends on the functions re
-
quired and, if applicable, also on the number of the
control channels available at the light controller.
Please refer to chapter 10.1 for the functions avail-
able and then select the appropriate number:
1) Call up the menu item
. The display will
indicate the current setting:
…
= 1 … 8 channels
2) Use the button UP or DOWN to set the number
of channels, and then press ENTER to save the
setting.
8.3 Setting the start address
For separate control of the DMX units connected to
the light controller, each unit requires a start
address of its own. Example: If the first DMX chan-
nel of the PARL-12RGBW is to be controlled by
DMX address 17, set the start address on the
PARL-12RGBW to 17. The other DMX channels of
the PARL-12RGBW will then be automatically
assigned to the subsequent addresses. Example
for start address 17:
DMX address assignment of the PARL-12RGBW for
start address 17
Set the start address either by means of the remote
control:
Press the button DMX and then use the number
buttons to enter the 3-digit address (for example
for the address 17, press the following buttons:
DMX, 0, 1, 7)
or by means of the menu item
.
After that, the PARL-12RGBW can be operated by
means of the light controller.
Note:
A dot will flash on the display when a DMX signal is
available at the DMX input (4). As long as a DMX signal is
being received, it will not be possible to continue operation
by means of the infrared remote control.
Number
of DMX
channels
Addresses
for the
PARL-12RGBW
Next possible
start address for the
subsequent DMX unit
1
17
18
4
17 – 20
21
5
17 – 21
22
8
17 – 24
25
16
GB
Содержание PARL-12RGBW
Страница 3: ...3 5 6 7 8 5 9 10 1 2 3 4 ...


