background image

18

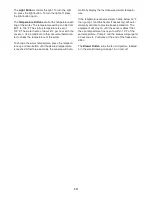
DRAINING THE PUMPS

After the hydrotherapy spa is drained, the jet pumps

should also be drained if the spa will be stored for

more than thirty days or if it may be exposed to freez-

ing temperatures.

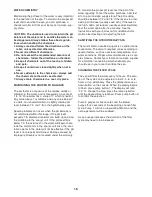
Turn off the power to

the spa. To drain the jet

pumps, remove the

access panel from the

spa (see ATTACHING

AND REMOVING THE

ACCESS PANEL on

page 17). Locate the jet

pumps inside the spa.

Loosen the indicated

collar on each of the

pumps.

WINTER USE AND CARE

The hydrotherapy spa is designed for year-round use.

If you decide to store the spa for the winter, store it in

a warm, dry location. Follow the steps below to winter-

ize the spa.

1. Make sure the power to the spa is turned off.

2. Drain the spa (see DRAINING THE HYDROTHER-

APY SPA on page 17).

3. Remove all remaining water from the spa shell. Dry

the spa shell with towels.

4. Set the air controls to the lowest setting. Use a

wet/dry vacuum to pull any remaining water from

the system. To do this, place the vacuum nozzle

over each jet, starting with the highest jet and fin-

ishing with the lowest jet.

5. Set the air controls to the highest setting and

repeat step 3.

6. Drain the pumps (see DRAINING THE PUMPS on

this page). Once the water is drained from the

pumps, place the vacuum nozzle over the drainage

hole in the pumps and vacuum any additional

water from the pumps.

Note: For additional pro-

tection, remove the pumps/motors from the spa

and store them in a climate-controlled room.

7. Clean the spa shell (see page 15).

8. Clean the filter (see page 15).

9. Shut the power off at the breaker.

Label the

breaker in such a way that the breaker will not

be turned on accidentally.

10. Reattach the access panel and the spa cover.

REPLACING THE LIGHT BULB

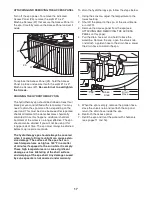
If the underwater light burns out, you will need to

remove the access panel to replace it (see ATTACHING

AND REMOVING THE ACCESS PANEL on page 17).

Make sure the spa power is turned off. Next, locate the

light housing. Turn the light housing counterclockwise

and remove it from the spa shell.

To replace the light bulb, pull the old bulb out of the

housing and insert a new bulb. Reattach the light

housing to the spa shell. Reattach the access panel to

the spa.

Collar

Light Housing

Light

Housing

Light

Bulb

Содержание PARADISE IMSB53940

Страница 1: ...will provide immediate assistance free of charge CUSTOMER HOT LINE 1 877 897 7493 Mon Fri 8 a m 5 p m CST Model No IMSB53940 Serial No The serial number is on a sign behind the access panel Write the...

Страница 2: ...9 Part List 22 Exploded Drawing 23 Ordering Replacement Parts Back Cover Limited Warranty Back Cover The warning sign shown below must be posted on a wall or fence where it will be visible to all user...

Страница 3: ...s can cause significant damage such as blistering of the shell surface and warping of the spa shell Any damage caused by sun exposure is not covered under the warranty 9 Do not bring any object into t...

Страница 4: ...njury Pregnant women should consult with their physician before using the hydrotherapy spa Pregnant women should not use the spa if the water temperature is above 100 F the unborn child could be serio...

Страница 5: ...NING The spa jets produce a stream of water with relatively high pressure Prolonged exposure of a localized area of the body may cause bruises to the skin 36 The included warning sign must be posted w...

Страница 6: ...d to feel your best For your benefit read this manual carefully before using the hydrotherapy spa If you have questions after reading the manual please call our Customer Service Department toll free a...

Страница 7: ...he spa provided you leave access to the motor for service 9 Make sure to note any other considerations such as aesthetics or privacy concerns that may affect the safety or enjoyment of using the spa I...

Страница 8: ...e oriented as shown in the drawings Read each assembly step before you begin Tighten all parts as you assemble them unless instructed to do otherwise ASSEMBLY REQUIRES THE FOLLOWING TOOLS not included...

Страница 9: ...n 4 The hydrotherapy spa operates on a 240 volt power source and must be wired directly to a 240 volt Ground Fault Circuit Interrupter GFCI installed in your home This procedure must be performed by a...

Страница 10: ...mbing and pumps during the priming process 3 Loosen the indi cated collar on one of the pumps to vent the air from the pump Repeat for the other pump Allow a small amount of water and air to escape fr...

Страница 11: ...USING THE CONTROLS on page 13 Once the spa is running press the GFCI test button The spa should shut off Press the reset button The spa should resume normal opera tion If the spa continues to run aft...

Страница 12: ...The suction covers should always be in place over the fittings Never operate the spa with out the suction covers in place F An optional ozone generator can be purchased and installed to utilize the oz...

Страница 13: ...spa to within 20 F of the set temperature during the filter cycles only SLP is always displayed when the measured temperature is not current and alternates with the temperature when the measured tempe...

Страница 14: ...erature press the tempera ture up or down button until the desired temperature is reached After three seconds the console will auto matically display the last measured water tempera ture If the temper...

Страница 15: ...INING THE SPA EXTERIOR The surround is maintenance free The surround should be cleaned with a mild soap solution do not use solvents or waxes CLEANING THE SPA SHELL The spa shell should be cleaned wit...

Страница 16: ...t unit Also the sani tation agents in the water will not be effective if the pH level is not properly maintained Damage caused by improper pH levels is not covered under the warranty To maintain the p...

Страница 17: ...erapy spa should always be covered when it is empty Direct sunlight can cause exten sive damage The surface of the spa shell can reach temperatures as high as 150 F in a matter of minutes if exposed t...

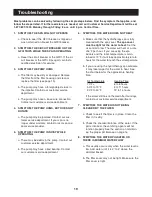
Страница 18: ...the highest jet and fin ishing with the lowest jet 5 Set the air controls to the highest setting and repeat step 3 6 Drain the pumps see DRAINING THE PUMPS on this page Once the water is drained from...

Страница 19: ...Set the air control to low The water will heat at a rate of 6 F per hour If you are using the spa indoors and the room temperature is main tained at 70 F it will take approximately 6 to 8 hours for t...

Страница 20: ...shell may have a leak Contact your local pool and spa service provider for repairs 10 SYMPTOM THE SPA JET UNIT CONTINUES TO RUN AFTER IT HAS BEEN SHUT OFF a To turn off the main jets press pump butto...

Страница 21: ...21 Notes...
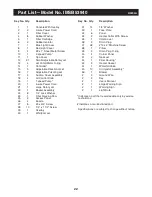
Страница 22: ...ousing Door 25 2 Access Panel 26 4 Buckle 27 8 4 x 3 4 Screw 28 10 1 4 x 1 1 2 Screw 29 1 Overlay 30 1 Whirlpool Jet 31 14 1 4 Washer 32 1 Face Plate 33 6 Panel 34 2 Heater Collar With Screw 35 1 Volc...

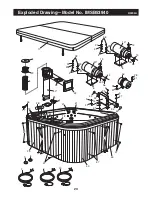
Страница 23: ...0 2 37 37 37 37 33 9 38 14 9 9 41 41 43 43 40 7 8 34 34 1 44 42 5 3 24 2 13 19 28 23 31 13 6 36 39 23 31 4 13 10 28 13 6 36 39 23 31 23 31 4 31 28 28 31 46 9 31 31 31 31 22 37 37 Exploded Drawing Mode...

Страница 24: ...ng incidents any damage to the premium cedar surround or frame attributable to improper handling or freight damage damage resulting from improper winterization damage to the spa shell resulting from i...

Отзывы: