


15
HOW TO USE A PRESET PROGRAM
Insert the key into the console.
See HOW TO TURN ON THE POWER on page
13.
Select a preset program.
To select a preset pro-
gram, press the
Program Select button
repeatedly until “P–1,”
“P–2,” “P–3,” or “P–4”
appears in the display.
When a preset program is selected, the maximum
incline setting of the program and the maximum
speed setting of the program will flash in the dis-
play for a few seconds. The display will then show
how long the program will last. A profile of the
speed settings of the program will scroll across the
matrix in the upper right corner of the display.
Press the Start button to start the program.
A moment after the button is pressed, the tread-
mill will automatically adjust to the first speed and
incline settings of the program. Hold the handrails
and begin walking.
Each program is divided into 30 one-minute peri-
ods. One speed setting and one incline setting are
programmed for each period. Note: The same
speed setting and/or incline setting may be pro-
grammed for two or more consecutive periods.
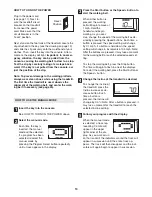
The speed setting for
the first period will be
shown in the flashing
Current Period column
of the matrix. (The in-
cline settings are not
shown in the matrix.) The speed settings for the
next four periods will be shown in the columns to
the right.
When only three seconds remain in the first period
of the program, both the Current Period column
and the column to the right will flash and a series
of tones will sound. If the speed and/or incline of
the treadmill is about to change, the speed setting
and/or the incline setting will flash in the display to
alert you.
When the first period is completed,
all speed set-
tings will move one column to the left
. The speed
setting for the second period will then be shown in
the flashing Current Period column and the tread-
mill will automatically adjust to the speed and in-
cline settings for the second period. Note: If all five
of the indicators in the Current Period column are
lit,
the speed settings may move downward
so that
only the highest indicators appear in the matrix.
The program will continue in this way until the
speed setting for the last period is shown in the
Current Period column and the last period ends.
The walking belt will then slow to a stop.
If the speed or incline setting for the current
period is too high or too low, you can manually
override the setting by pressing the Speed or
Incline buttons. Every few times a Speed button is
pressed, an additional indicator will appear or dis-
appear in the Current Period column; if any of the
columns to the right of the Current Period column
have the same number of lit indicators as the
Current Period column, an additional indicator
may appear or disappear in those columns as
well.
Important: When the current period of the
program ends, the treadmill will automatically
adjust to the speed and incline settings for the
next period.
To stop the program at any time, press the Stop
button. The time will begin to flash in the display.
To restart the program, press the Start button. The
walking belt will begin to move at 1 mph. When the
next period of the program begins, the treadmill will
automatically adjust to the speed and incline set-
tings for the next period.
Follow your progress with the display.
See step 5 on pages 13 and 14.
Measure your heart rate if desired.
See step 6 on page 14.
Turn on the fan if desired.
See step 7 on page 14.
When you are finished exercising, remove the
key from the console.
See step 8 on page 14.
7
6
5
4
3
2
1
Current Period


