background image

Stereo Audio System for Your iPod                  

                                                                                                                                   V11M11_IM_EN_03282007 

www.i-Luv.com


- 26 -

OPERATIONAL INSTRUCTIONS 


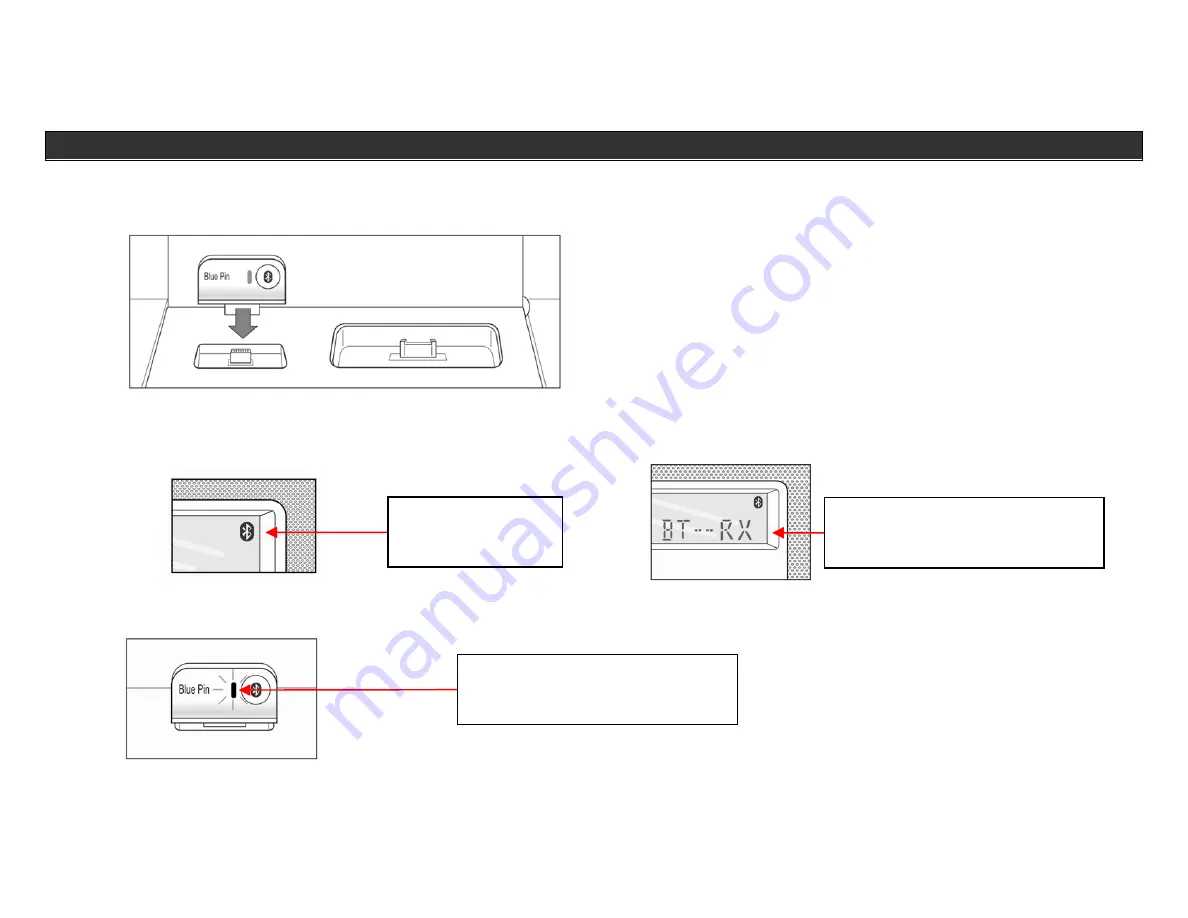
1. Plug 

the 

BluePin

TM

 unit securely into the i199’s 

BluePin

TM

 port. When 

BluePin

TM

 is plugged in, 

BluePin

TM

 status below :


TX selection: 

Status indicator will slow flash (standby mode

)    RX selection:  

Status indicator will fast flash (search mode)


2. When 

the 

BluePin

TM

 is plugged in to the i199, the main display will show flashing 

Bluetooth

 logo, after successfully connected to a 

Bluetooth


device, display will show “

TX CONN

” or 

RX CONN

” for a few seconds and 

Bluetooth

 icon lights steadily, press 

FUNC

 button until display indicates 

BT--RX

” mode when 

BluePin

TM

 is set to “

RX

” mode. 


3. Once 

the 

BluePin

TM

 is securely plugged in to the i199, press and hold the pairing button to start pairing with other devices. You will notice that 

blue and red lights will flash on the unit indicating the device is ready to be paired with other devices with 

Bluetooth

 technology. 


Display indicating 
the 

Bluetooth

 mode 

In pairing mode red & blue light will 

f

lash rapidly 

i199 Display will indicates “

BT- -RX

” 

function mode when 

BluePin

TM

 set 

to “

RX

” mode 

Содержание i198

Страница 1: ...Stereo Audio System for Your iPod Instruction Manual Model i198 i199 Please read this manual carefully before operating and save it for future reference Have a question Please visit www i Luv com ...

Страница 2: ...Stereo Audio System for Your iPod V11M11_IM_EN_03282007 www i Luv com 1 ...

Страница 3: ...ations not expressly approved by the party responsible for compliance could void the user s authority to operate the equipment IMPORTANT SAFETY WARNINGS 1 Before using the player please ensure that your local AC voltage is suitable for this unit 2 To prevent fire or electric shock do not expose the unit to rain or moisture 3 Never attempt to open the cabinet Always refer servicing to a qualified t...

Страница 4: ...r liquid has been spilled into the appliance s apertures c The appliance has been exposed to rain d The appliance has been dropped and suffered damage e The appliance does not appear to operate normally or exhibits a change in performance 12 SERVICING The user should not attempt to service the appliance beyond what is described in the user s operating instructions All other servicing should be ref...

Страница 5: ... circuit different from that to which the receiver is connected 4 Consult the dealer or an experienced radio TV technician for help IC NOTICE CANADA This digital apparatus does not exceed the Class B limits for radio noise emissions from digital apparatus as set out in the Radio Interference Regulations of Industry Canada These limits are designed to provide reasonable protection against harmful i...

Страница 6: ...ou and to us We strongly recommend you to follow the guideline below in order to prevent possible damage to or loss of hearing Hearing experts caution that listening to loud sounds can damage hearing over time With continuous listening to loud sounds hearing adapts and will give the impression that volume has reduced What seems normal may in fact be harmful To guard against this before hearing ada...

Страница 7: ...Stereo Audio System for Your iPod V11M11_IM_EN_03282007 www i Luv com 6 ...

Страница 8: ... the LCD screen 14 Setting the clock 15 Setting the alarm 15 Operational Instructions Using the alarm function 15 Adjusting the brightness of the LCD screen 16 Setting the sleep time 17 Listening to your favorite radio stations 17 Listening to your favorite songs on your iPod 18 Listening to CDs MP3 CDs 19 Listening to your favorite music on a USB storage device 22 Using the AV out port to watch v...

Страница 9: ...gital clock display with dual alarm Fall asleep or wake up to your iPod CD USB device AM FM radio or buzzer Charges your iPod Integrated universal dock for your iPod MP3 CD Audio CD playback with ESP anti shock system Capable of playing MP3 files on USB devices such as MP3 player flash memories etc Auxiliary line input for 1 st 2 nd and 3 rd generations of the iPod and other audio devices AM FM ra...

Страница 10: ...the AC power plug on the back of the unit Insert the end of the supplied power cord into the wall outlet Installing the Backup Battery for Clock and Alarm Settings In order to offer consistent clock settings and alarm functions the i199 uses a Backup Battery system This means that in the event of a power failure all the settings of the i199 will remain saved For example after the installation of t...

Страница 11: ...ed Likewise alkaline standard carbon zinc or rechargeable nickel cadmium batteries should not be used together 4 Secure the battery compartment by closing the cover Important Notes on Batteries To prevent battery leakage which may result in bodily injury property damage or damage to the unit follow these instructions Install all batteries correctly according to the polarity as marked on the unit D...

Страница 12: ...oop antenna into the connector To achieve the best reception possible a distance of 12 between the AM antenna the unit and the iPod is recommended Installing the Dock Adapter To ensure that your iPod will fit properly into the built in universal dock several detachable dock adapters for old iPod players are included with this product Please check the bottom of dock adapters to determine compatibil...

Страница 13: ...e Main Unit 1 MULTI DISPLAY 2 EJECT 3 iPod Dock 4 USB port 5 BluePin dock 6 ID3 ST 7 Docking door OPEN 8 SLEEP 9 FUNCTION 10 VOLUME 11 Power ON OFF Alarm off 12 SNOOZE DIMMER 13 WAKE TO 14 FF Up 15 STOP 16 FR Down 17 PLAY PAUSE PRESET 18 AM FM 19 ALARM 1 20 ALARM 2 21 MEMORY 22 TIME SET 23 PLAY MODE 24 DOCKING DOOR ...

Страница 14: ...the Main Unit continued 25 AC Power cord 26 FM Antenna 27 Aux In Socket 28 AM Loop Antenna Socket 29 iPod AV Out Socket 30 Backup Battery Compartment Location of Controls on the Remote Control 1 POWER 2 ALBUM 3 PLAY PAUSE PRESET 4 FR Down 5 VOLUME 6 MEMORY 7 SLEEP 8 FUNC 9 STOP AM FM 10 FF Up 11 PLAY mode 12 MUTE ...

Страница 15: ...Stereo Audio System for Your iPod V11M11_IM_EN_03282007 www i Luv com 14 GETTING STARTED Location of Indications on the LCD Screen ...

Страница 16: ...e Alarm This unit supports dual alarm feature 1 Press and hold either ALARM 1 or the ALARM 2 button until the display begins to flash Use or control button until the desired alarm time is displayed press ALARM 1 or ALARM 2 button to confirm and enter to next setting NOTE AM PM indicator displays are located on the left side of the time 2 After setting the time Use or control button and select the ...

Страница 17: ...tomatically This cycle will repeat every 24 hours unless the controls are changed 5 To prevent the alarm from coming on daily press the ALARM 1 or ALARM 2 buttons and set to off The Alarm Icon will disappear Notes on Alarm Function Set your iPod to the repeat mode if you ve selected Wake to iPod and your iPod has less than one hour of songs If you have selected the Wake To iPod CD or USB setting y...

Страница 18: ...disappears on LCD Listening to Your Favorite Radio Stations For the best FM radio clarity fully extend the pig tail wire antenna located on the rear of the i199 It is important not to alter obstruct or attach other antennas to this wire antenna To achieve the best AM reception a distance of 12 between the AM antenna the unit and iPod is recommended Rotate the AM loop antenna to have the better rec...

Страница 19: ... Your iPod 1 To listen to music make sure that your iPod is in play mode NOTE If the i199 fails to play or you do not hear any sound coming out from the unit make sure your iPod is securely docked in the Built In Universal dock and press the PLAY PAUSE button on the i199 or on the Remote Control for music play to begin 2 To play music when your iPod is already in the dock and in the standby mode p...

Страница 20: ...Press EJECT button next to CD load bay the MP3 CD CD disc will be loaded or unloaded Playing the Entire Disc 1 Press Play Pause PRESET button on the unit Play starts with the first track The display shows the current track number and its elapsed playing time When all tracks have played the MP3 CD CD will stop and return to initial display 2 To stop play press STOP button 3 To pause play press Play...

Страница 21: ...ogramming 3 Press or buttons to locate a particular track or album track MP3 CD 4 Press MEMORY key to store it in the memory 5 Continue this process until you have selected all the tracks you desire Reviewing the Program Press MEMORY key to review of the tracks currently programmed 1 The tracks will be displayed on the LCD 2 Press MEMORY key again to scroll through the program Playing a Program 1 ...

Страница 22: ...select REPEAT 1 To repeat all track select REPEAT ALL To listen to intro select INTRO To play randomly select RANDOM To cancel the play mode press PLAY MODE button until all play mode display disappears REPEAT or INTRO or RANDOM PLAY For MP3 Press PLAY MODE button until the display indicates one of the following To repeat one track select REPEAT 1 To repeat folders select REPEAT ALBUM To repeat al...

Страница 23: ...iPod on an External Monitor or TV The i199 has an AV port to send video signal of your video iPod 5G 5 5G to the external display devices such as TV or a monitor To use this function please follow the instructions below 1 Connect the provided AV cable into the iPod AV out port 3 5mm on the rear of the i199 Then connect the RCA plug side of the AV cable to the AV input jacks of the external display...

Страница 24: ...ake sure your iPod Video setting is set to TV Out ON Please follow the illustration below on your video iPod to change the setting n On the menu screen of your iPod select the Videos option o On the next menu screen select the Video Settings option p On the next menu screen select the TV Out option and set it on Note When watching video content using AV out port and TV Out is set to ON on your iPo...

Страница 25: ...ton on the i199 or on the Remote Control until the AUX icon appears on the i199 s display 3 It is now safe to turn ON your device and enjoy the music 4 Use the VOLUME button on the i199 or the Volume and Volume buttons on the Remote Control to adjust the decibel level You may also need to adjust the audio device volume Charging Your iPod Your iPod will always be in charge mode when left in the bui...

Страница 26: ...oth technology with Bluetooth stereo Profile A2DP RX Receiving sound from other media players such as MP3 Cell Phones with Bluetooth Stereo Profile A2DP or Other Media Players with Bluetooth Stereo Profile A2DP Bluetooth Mode When BluePinTM is connected to i199 you will see a flashing Bluetooth icon on the display NOTE Certain devices with Bluetooth technology might not be compatible with the Blue...

Страница 27: ...connected to a Bluetooth device display will show TX CONN or RX CONN for a few seconds and Bluetooth icon lights steadily press FUNC button until display indicates BT RX mode when BluePinTM is set to RX mode 3 Once the BluePinTM is securely plugged in to the i199 press and hold the pairing button to start pairing with other devices You will notice that blue and red lights will flash on the unit in...

Страница 28: ...Bluetooth technology with A2DP Profile RX is for receiving signals from other sources like a cell phone with Bluetooth stereo profile A2DP or Media Players equipped with Bluetooth Stereo Profile A2DP 6 The switch for TX and RX is located on the left side of the BluePinTM unit Example RX Mode If you have a MP3 cell phone with Bluetooth Stereo Profile A2DP could transmit the music on your cell phone...

Страница 29: ...d red light flashing From your cell phone or other devices go to Bluetooth setup in the devices menu Depending on the devices menu will differ Does a search for devices when initiated your device will look for any devices with Bluetooth technology in the area When the search is done you will see a device named RX i110 Select the device and your device will prompt for password The default password ...

Страница 30: ...urned off The next time both devices are turned on they will not need to be paired again simply follow one of following methods to connect them After turning on the headset it will connect BluePinTM automatically If the headset doesn t have automatic Bluetooth connection function just press PLAY PAUSE button to connect BluePinTM Or press PAIRING button of BluePinTM to connect headset with Bluetoot...

Страница 31: ...apter is not the correct one Check whether a correct dock adapter is installed o There might be some obstructions on the dock Check whether there are any obstructions on the connector and on the dock If everything is secured place your iPod back into the dock It does not recognize your iPod when docked o Your iPod may not be properly docked Take your iPod out of the dock and remove any obstruction...

Страница 32: ...he signal from iPod AV OUT jack needs to be amplified Use the active speakers which have a built in amplifier It does not find any AM radio stations or there is a lot of static on a radio station o The AM loop antenna is not connected to the i199 Connect the AM loop antenna to the jack on the back of the i199 o The i199 is installed where the reception is bad Move the AM loop antenna around keepin...

Страница 33: ...e sure to check your Bluetooth devices manual for compatibility issues Cannot pair with stereo headset with Bluetooth wireless technology made by other manufacturers o This could happen if the device has its own security method or unique password other then 0000 Please check with the manufacturer for compatibility issues For full compatibility we recommend an iLuv Stereo Headset with Bluetooth wir...

Страница 34: ... 87 5 108MHz USA Compact Disc Frequency Response 6dB 60 15 000Hz Signal to noise ratio 40dB Harmonic Distortion 1 Channel Separation 40dB BluePinTM Audio Transmitter Receiver o Bluetooth Core Bluetooth V1 2 compliant o Bluetooth Profile A2DP AVRCP o Operating Frequency 2 4 2 4835GHz o Security Features 128 bit Encryption o Transmitting Rate 721Kbps Max o Wireless Technology FHSS o Communication Di...

Страница 35: ...Stereo Audio System for Your iPod V11M11_IM_EN_03282007 www i Luv com 34 ...

Страница 36: ...ners 2007 jWIN Electronics Corp All rights reserved No portion of this printed material or product enclosed herewith including design shape and graphics may be reproduced or transmitted in any form without the expressed written consent of jWIN Electronics Corp by any means electronic or mechanical including photocopying recording or with an information storage and retrieval system Any unauthorized...

Отзывы: