

SPOTLIGHTS
INDOOR
ILTI LUCE srl·
Lungo Dora P. Colletta, 113/9· 10153 Torino (Italy); tel (39) 011 765 73 01; fax (39) 011 853855; www.iltiluce.com ; [email protected]
MADE in ITALY_10- 2018 (M)
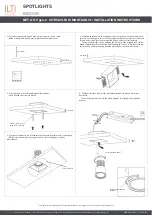
NET-Q HP gen.2 ISTRUZIONI DI MONTAGGIO / INSTALLATION INSTRUCTIONS
si consiglia la conservazione delle seguenti istruzioni - we suggest you to keep this copy for your files
3 - Fissare il tutto con le viti autofilettanti in dotazione.
- Fixed all with the screws supplied.
1 - Fare un foro quadrato (80x80 mm) nel cartongesso con un cutter
- Make a square hole (80x80 mm) in plasterboard with a cutter.
min 10mm
2 - Allentare appena le viti che tengono le alette, regolarne le altezze in base allo
spessore del cartongesso (min 15mm), stringere di nuovo le viti per bloccare tutto.
Inserire nello scasso la cassaforma posizionando le alette sul cartongesso.
- Loosen a little bit the screws holdeng the fins, adjust the height based on the
width of plasterboard (min 10mm), tighten again the screws to block everything.
Insert in the hole the mounting box and place the fins on the plasterboard.
4 - Cablare il faretto e fissarlo alla cassaforma ruotandolo tramite l’incastro a
baionetta.
-Connect the spot and fix it to the mounting box by rotating it through the
bayonet.
min 10mm
min 115mm
L=1 mt (2x0,60 mm
2
)
Stucco/Plaster
5 - Stuccare la testa delle viti e l'eventuale bordo tra la cassaforma ed il cartongesso.
- Fill the screws heads and any edge between the mounting box and the
plasterboard.
10mm
min
L
N
INP
UT
OU
TP
UT
XX700mA
110-240V
50~60Hz
Black
junction box
(not included)
incastro a baionetta
viti di fissaggio (incluse)
fixing screws (included)
Red
80mmx80mm
bayonet
min 10mm